|
Actors |
Harbor’s Master (pilot), Harbor’s Master (tower) |
|---|---|
|
Description |
Display of the schedule for the arrival of vessels at the port. |
|
Validating rights |
Captaincy |
|
Visibility right |
Harbor’s Master (pilot), Harbor’s Master (tower), Harbor’s Master (operator), Field operator, Financial service Shipping Agent, Environment, Health, , Administrator. |
What is the purpose of the PVMIS port planning ?
The port planning system deployed on PVMIS is a tool designed to be used by the harbor master’s office to effectively plan and manage operations across multiple seaports. It allows you to have visibility of the occupancy of vessels (represented by stopovers) over a period of time in a port, predict the forecast occupancy of the announced vessels, edit the position of the vessels and make ship movements. With real-time planning, port authorities can monitor the ships present in the port and organize the arrival of the next vessels.
This tool only concerns port management. The creation of a stopover, berth authorization and declaration of the arrival and the departure of the vessel apply on the detail of the stopover screen.
The tool implemented on PVMIS represents four ports in the Seychelles:
-
Mahe Quay
-
Fishing
-
IPHS
-
Zone 14
Access the port planning
Click on the Port Planning menu in the Harbor Master’s Office section.
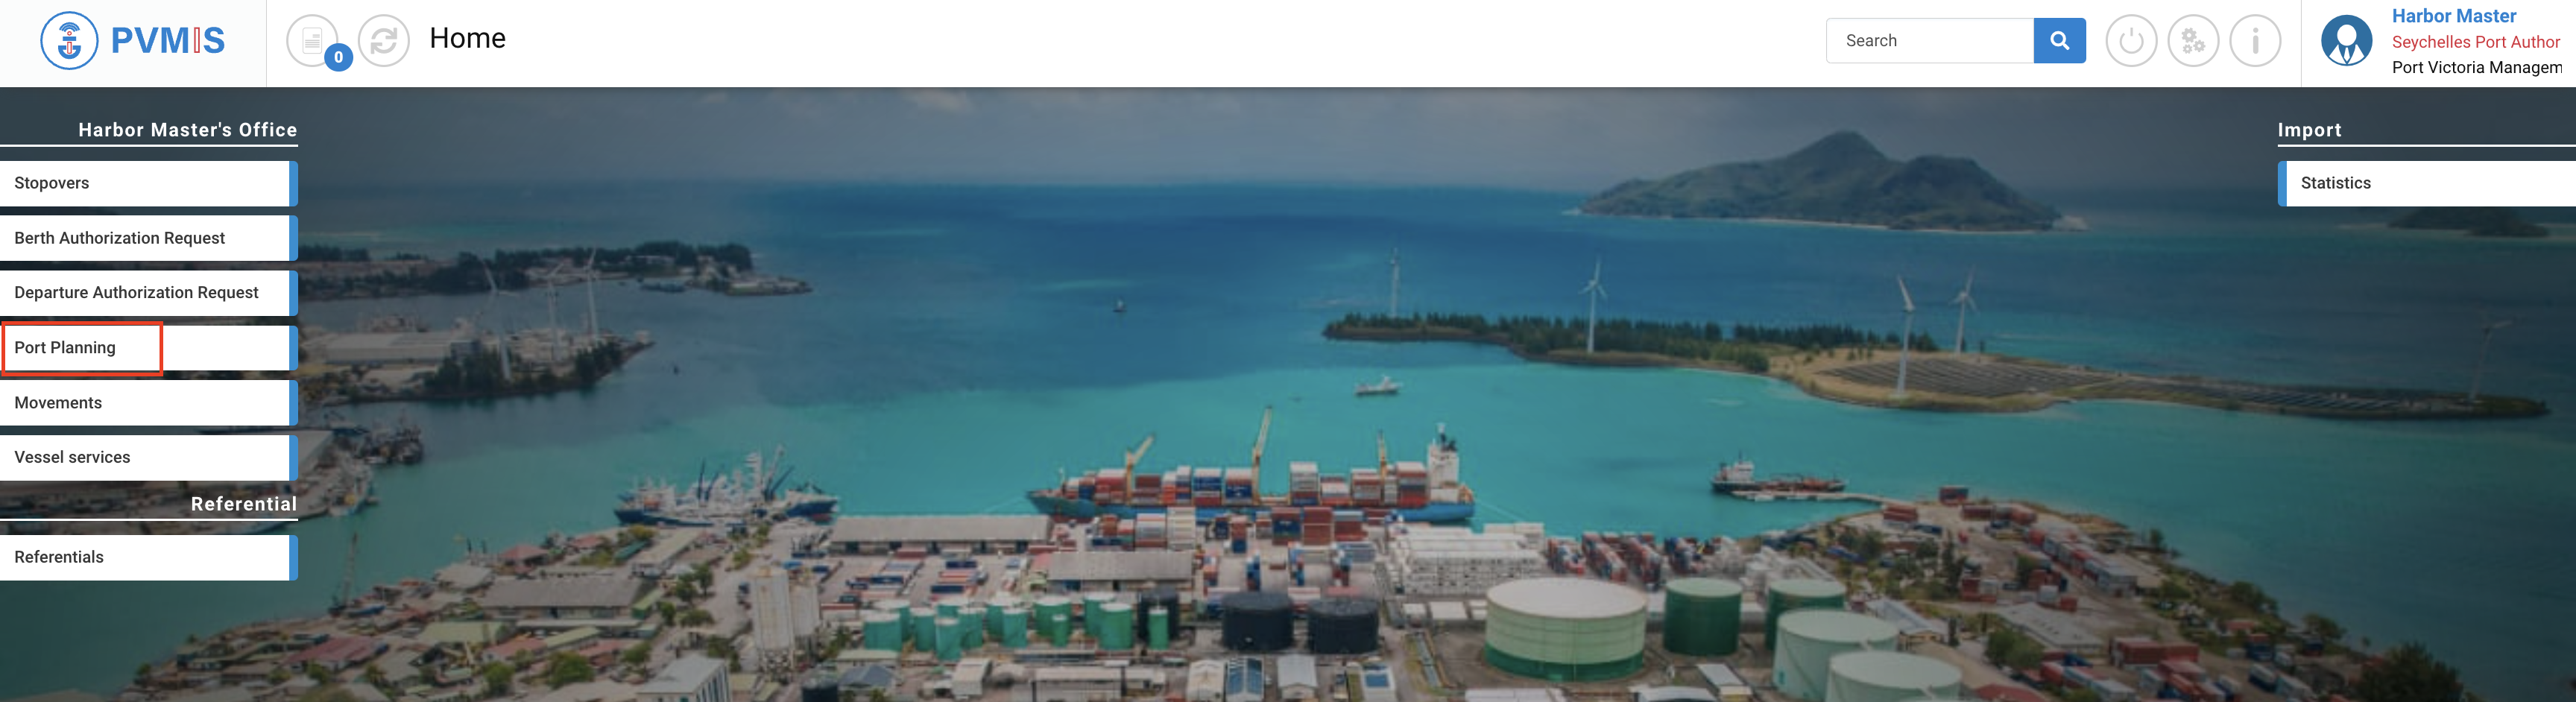
After clicking on the Port Planning menu, the user is redirected by default to the "Mahe Quay" port planning. The others accessible by clicking on the different sections.
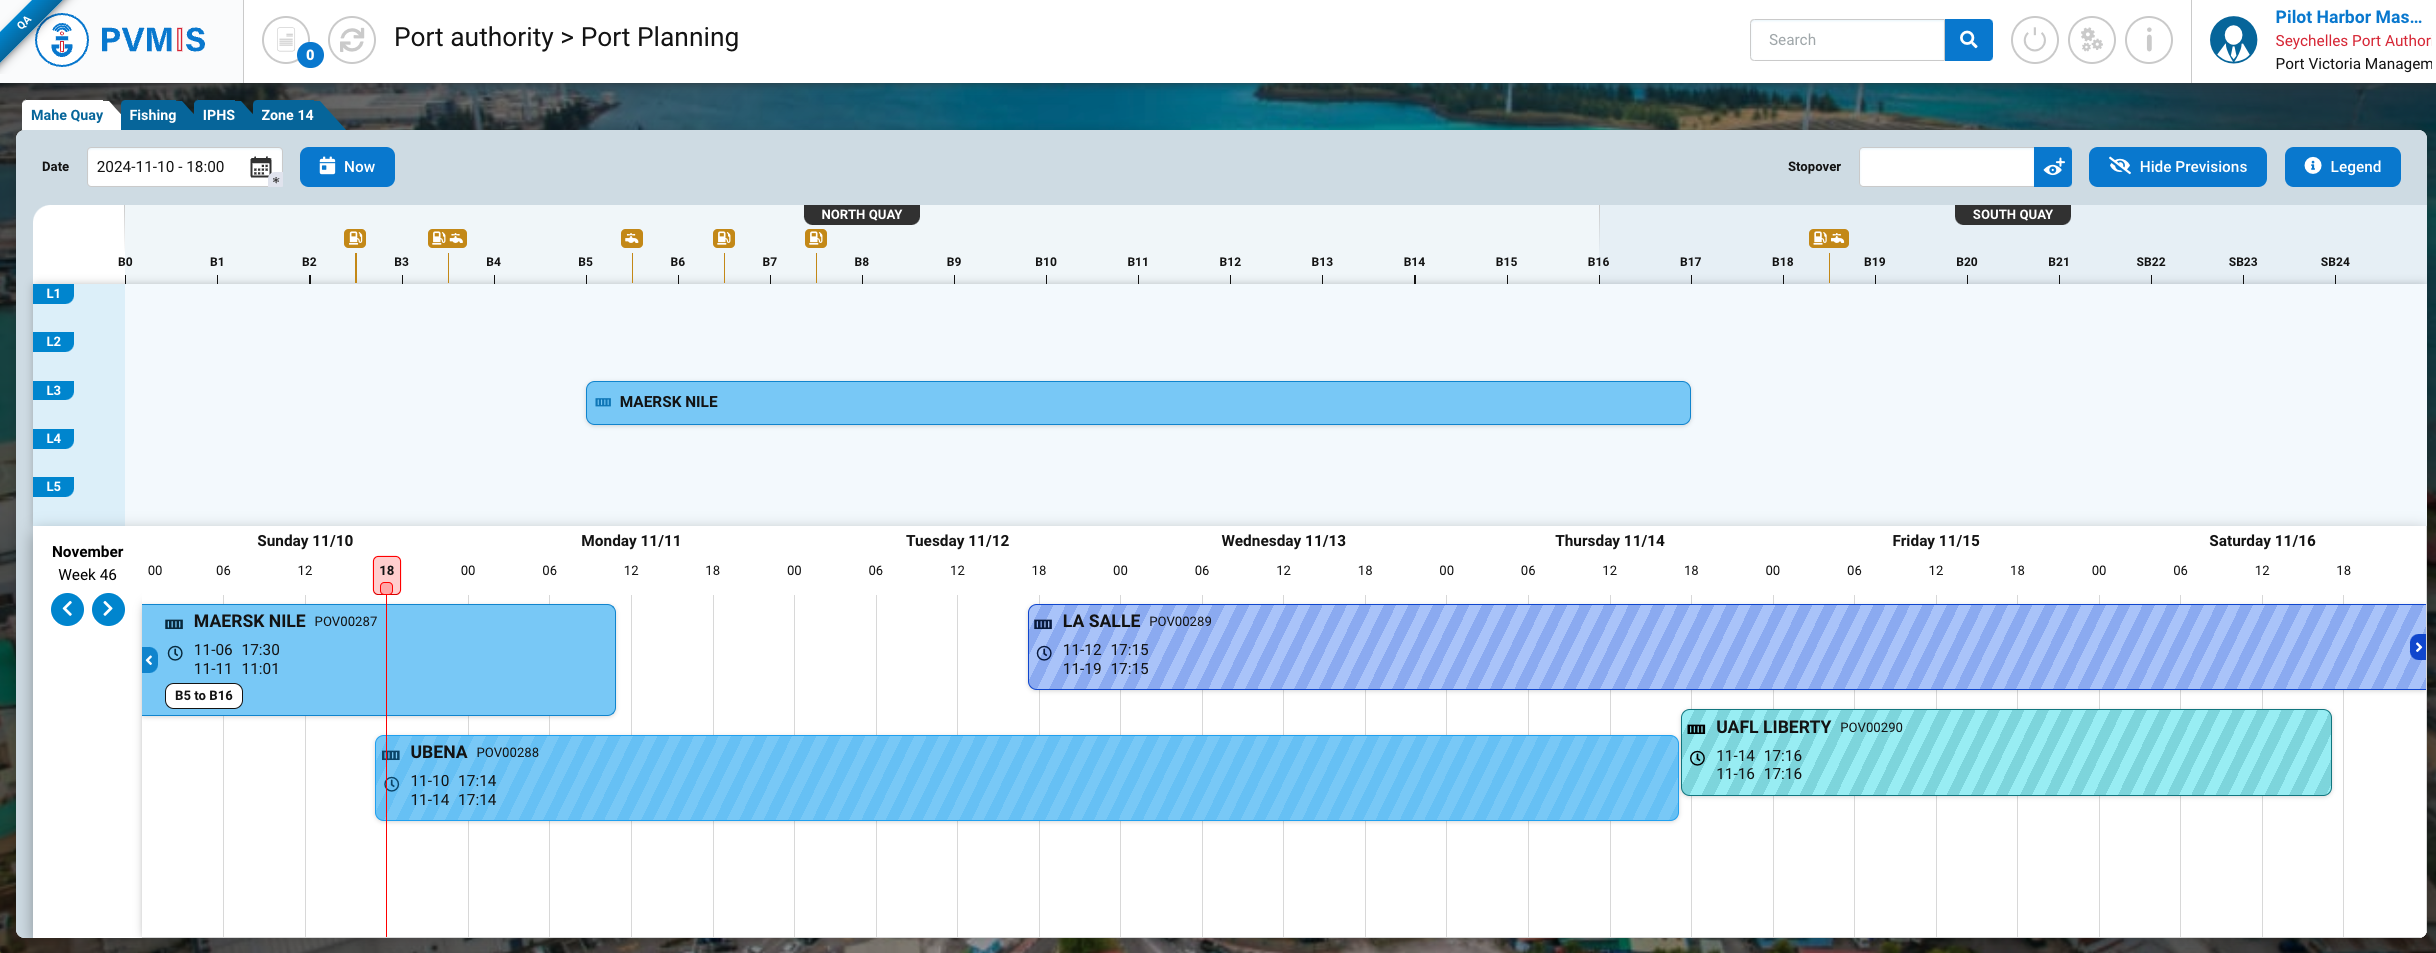
Mahe Quay port planning
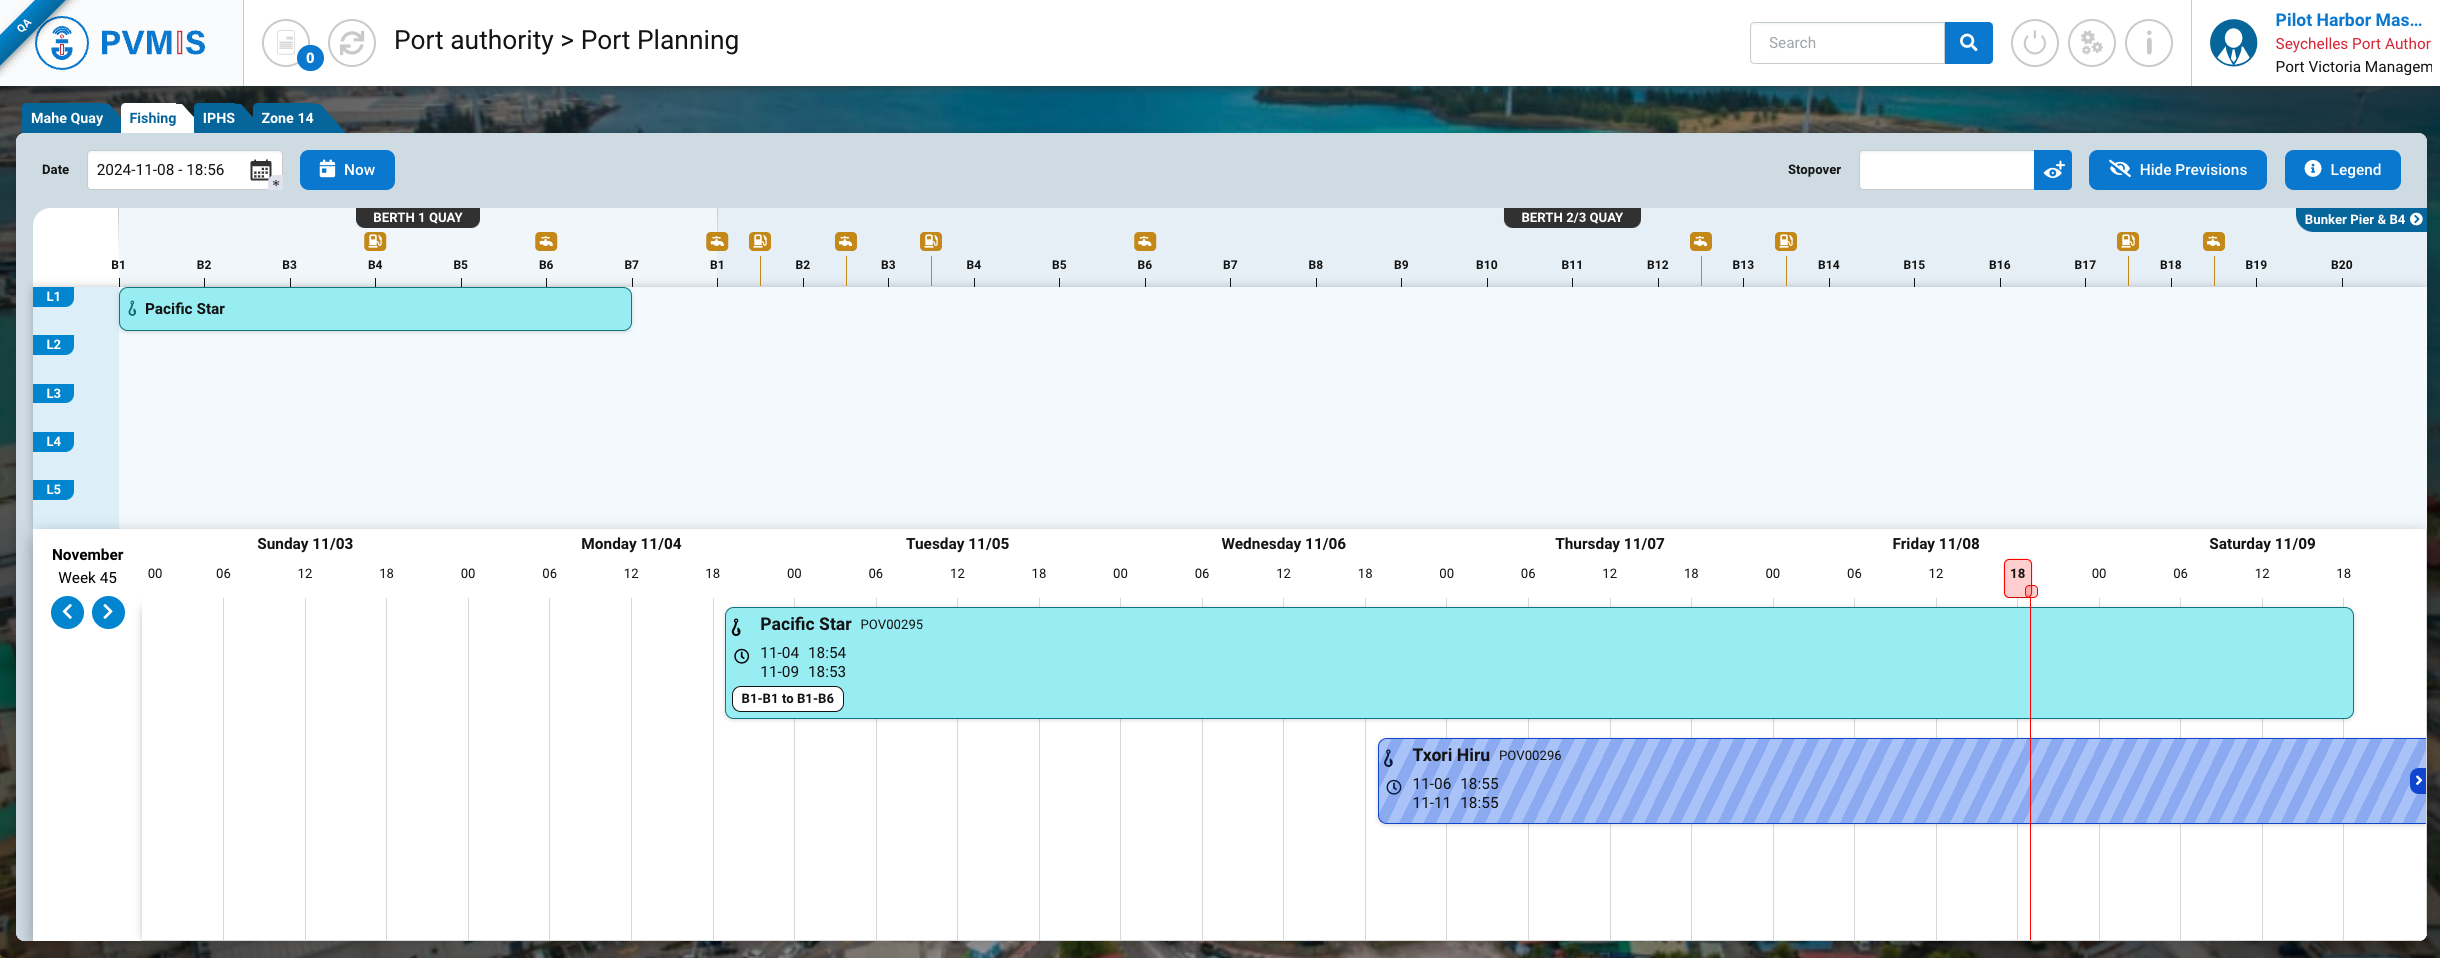
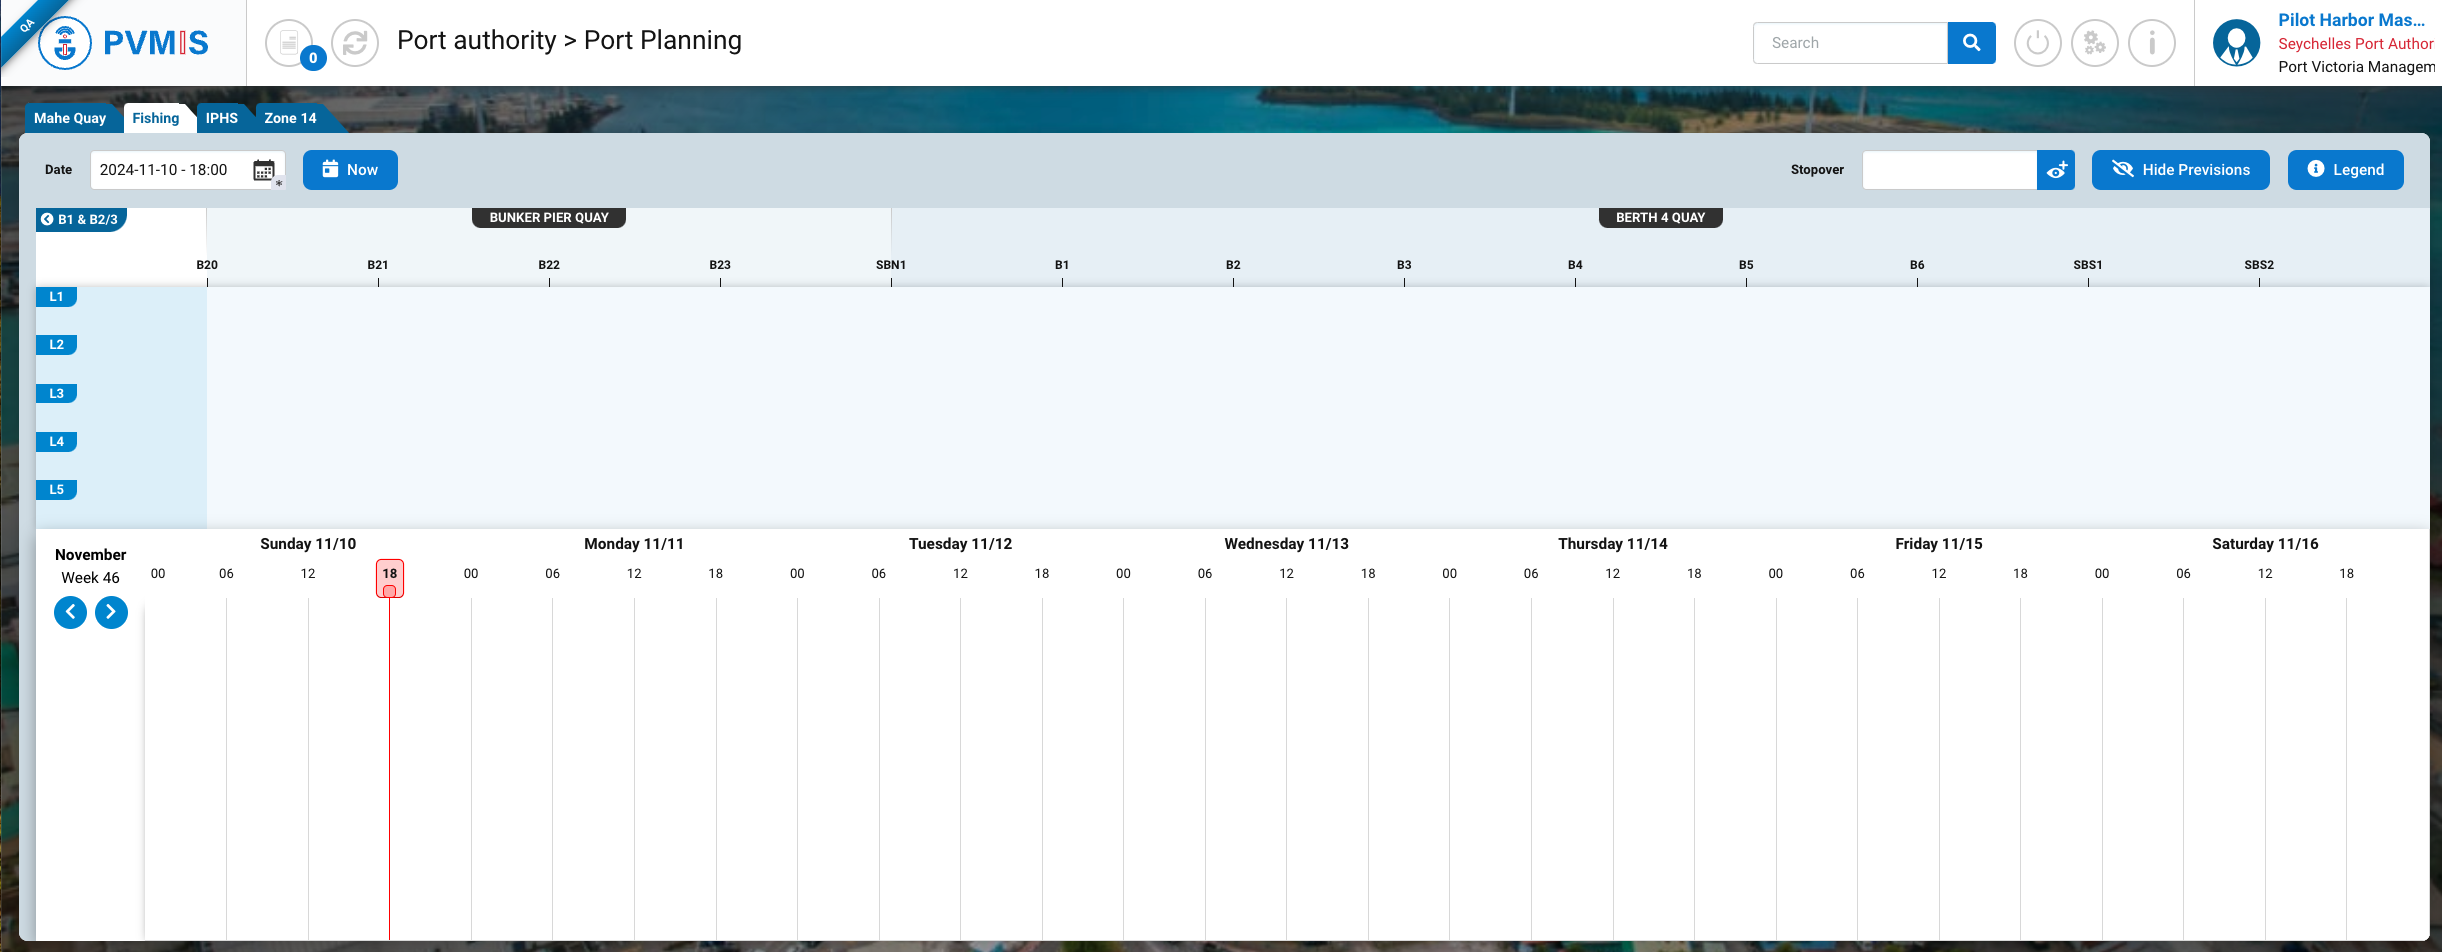
Fishing port planning
Berth 1, 2 and 3 quay.
Bunker Pier and berth 4 quay.
IPHS port planning
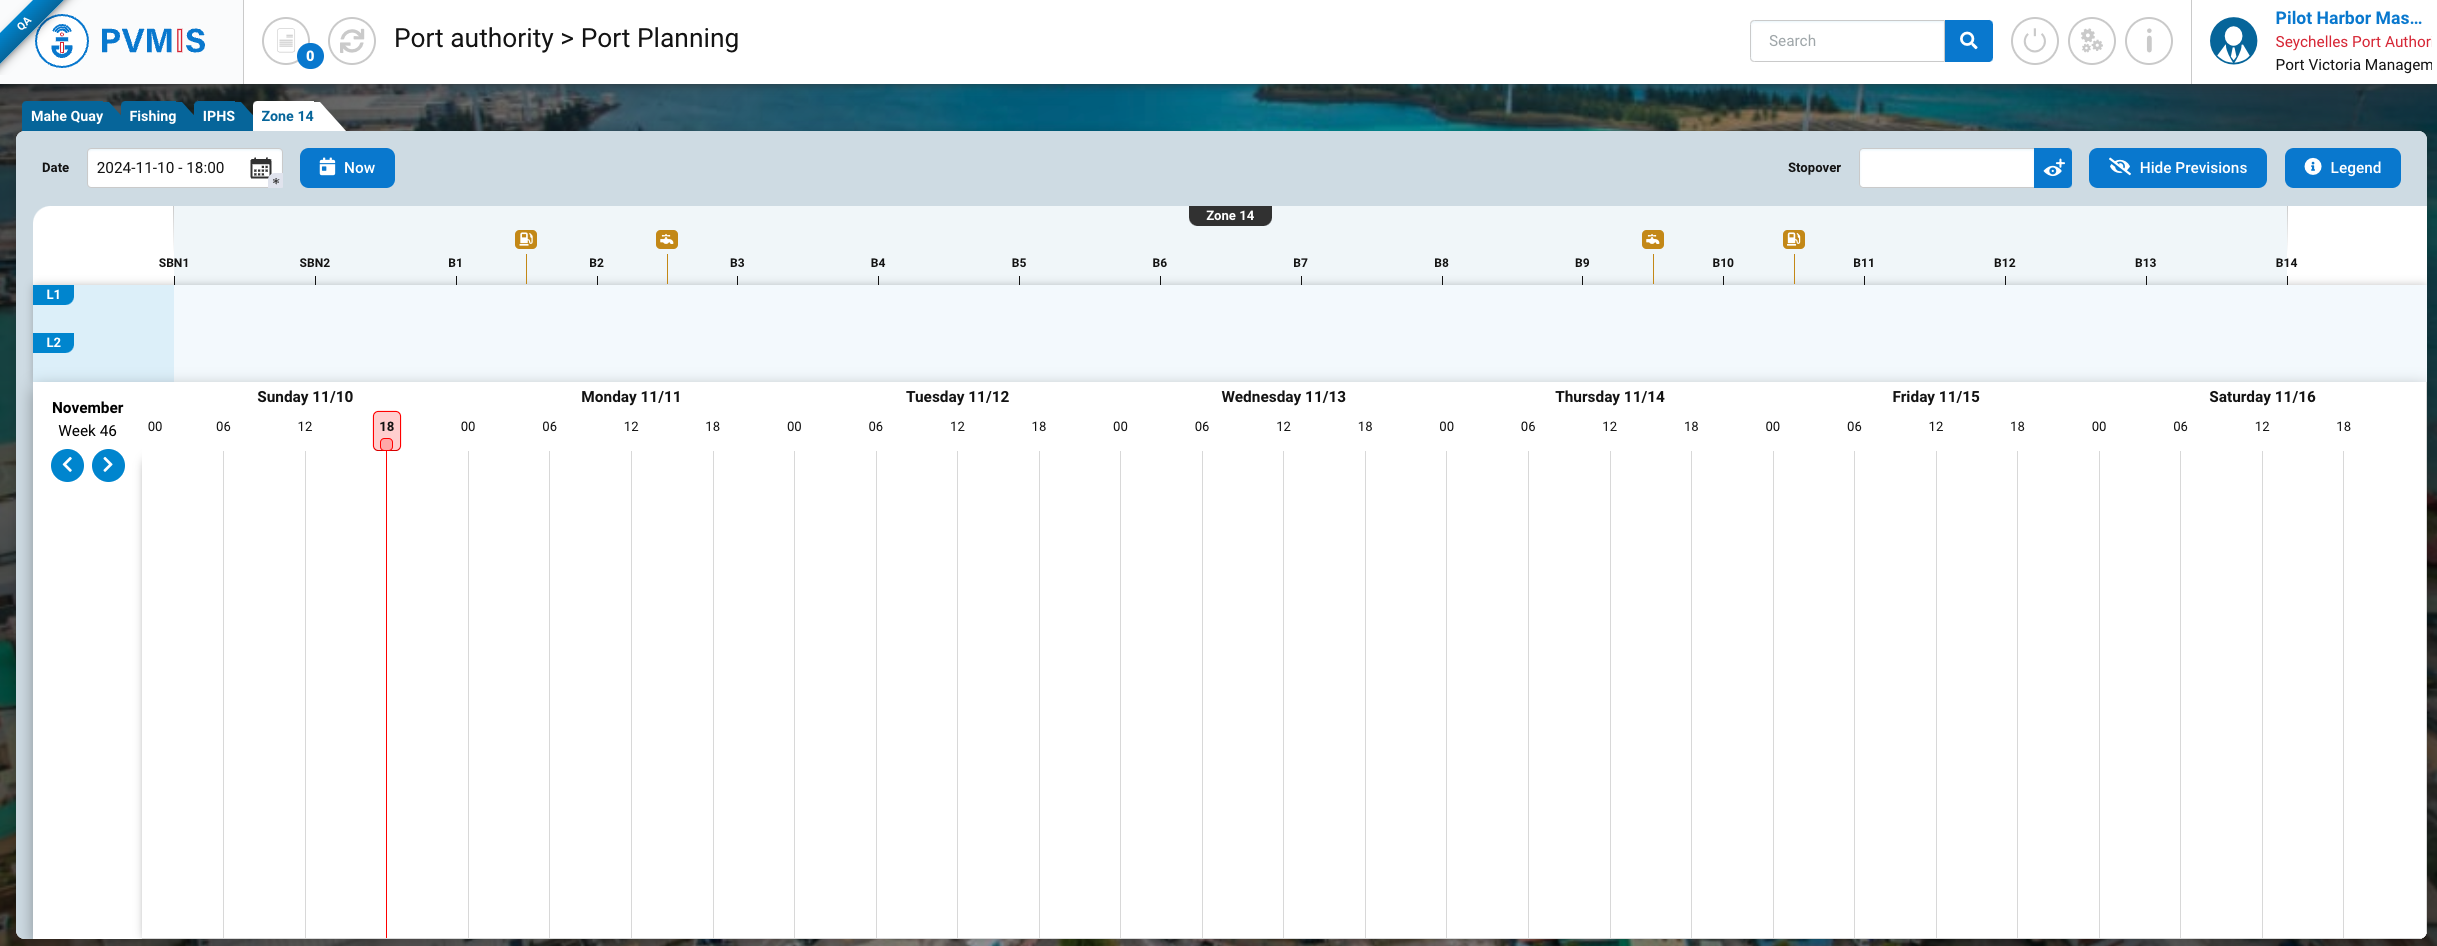
Zone 14 port planning
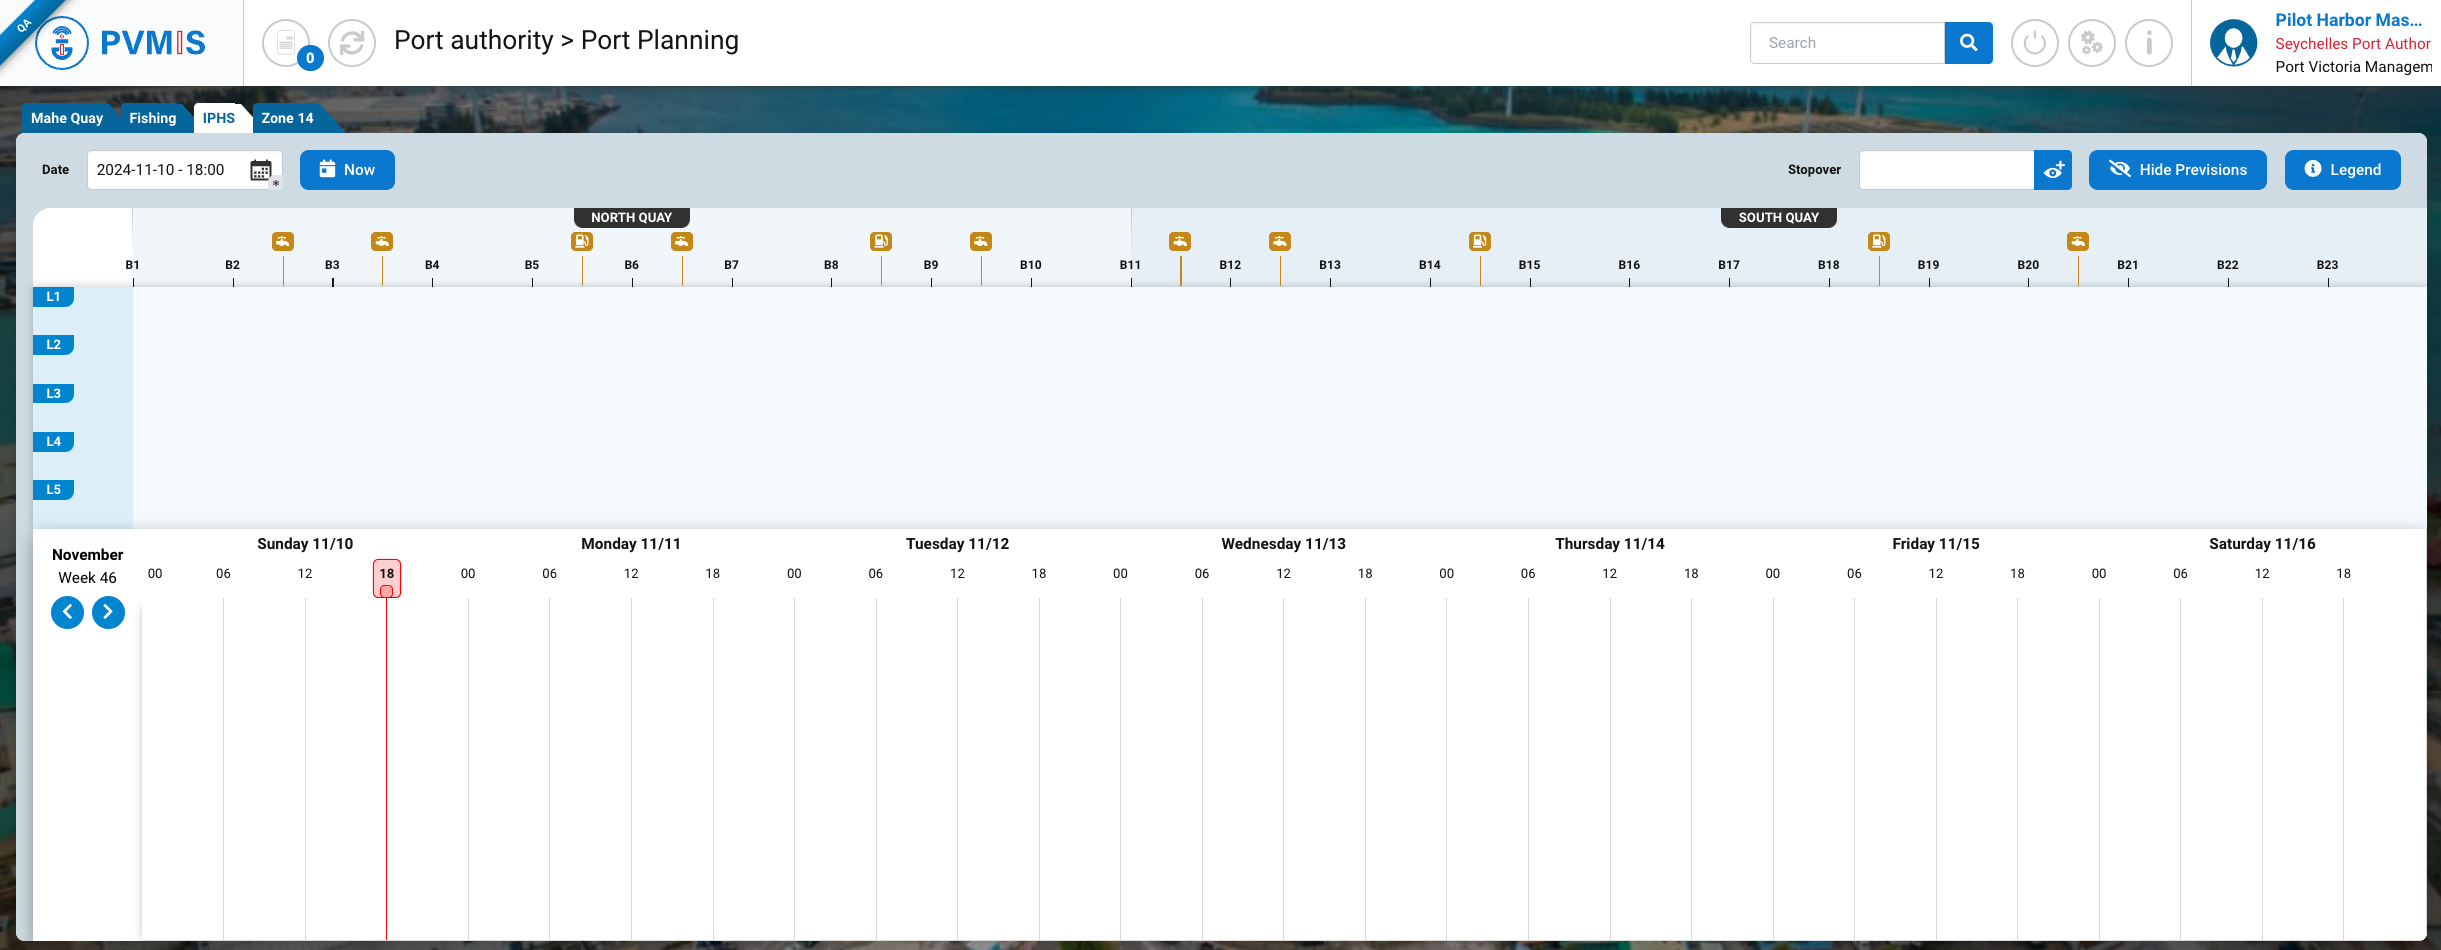
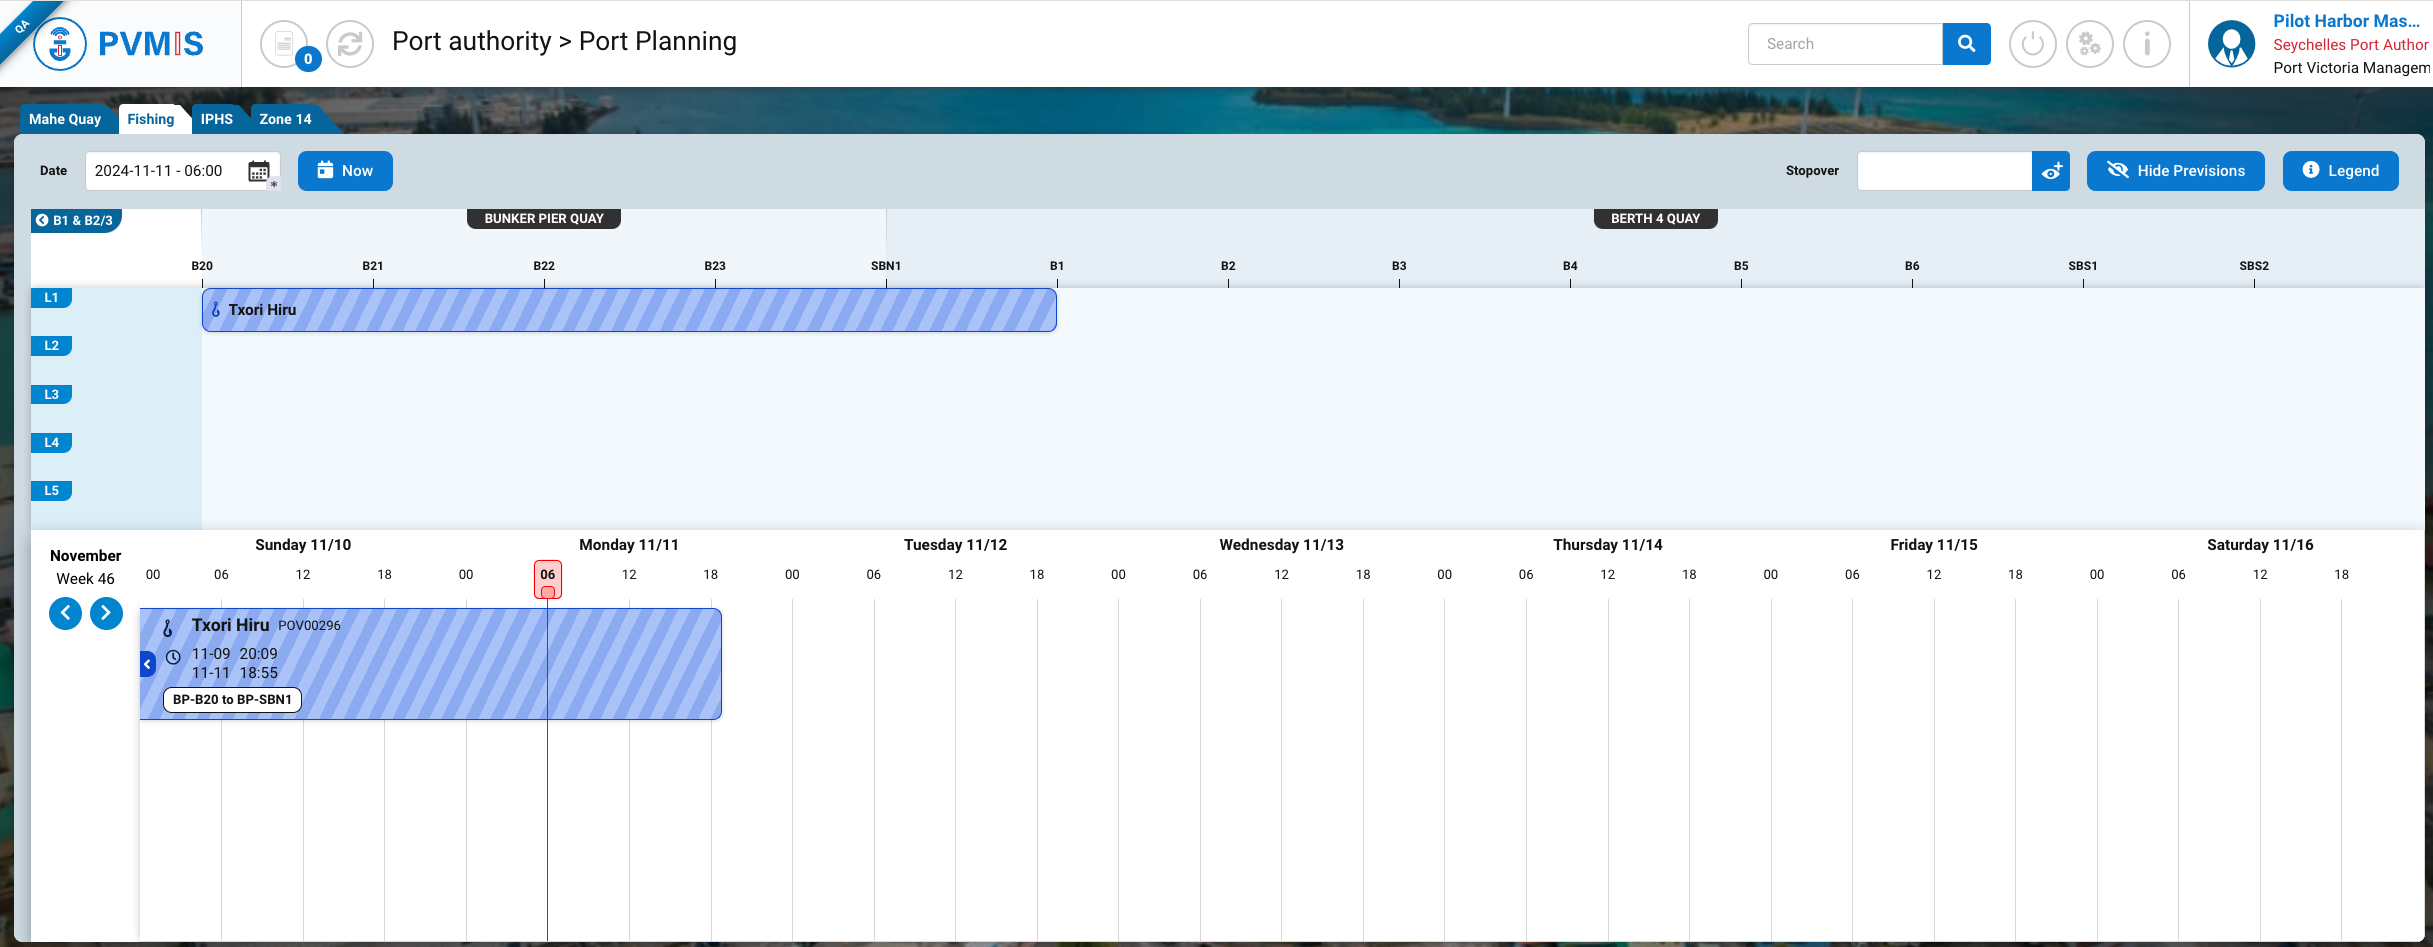
Description of the port planning screen
The screen is divided into 3 sections:
-
The header to apply filters and make research
-
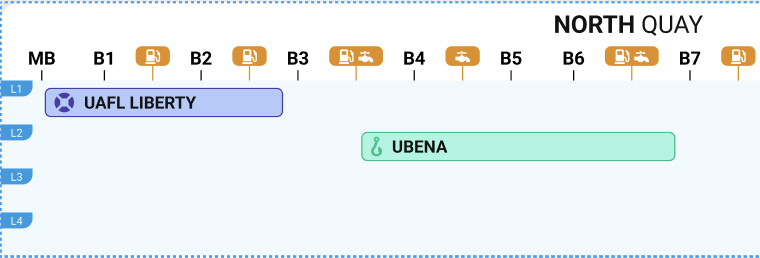
The upper section features a table that displays the occupancy of scheduled stopovers or arrivals at the port for a specific date and time (port map).
-
The lower section presents the agenda of scheduled stopovers or arrivals for the selected week
Header section
|
Element |
Description |
On the screen |
|---|---|---|
|
Section |
Each port planning screen have a personalized representation of the arrangement of these quays: bollards, quay lines, bunkering and water points. |

|
|
Date filter |
The port map display corresponds to the date and hour in the field. This filter condition both the display at the port map (upper section) and the calendar (lower section). The week containing the date is displayed starting from Sunday.
The display can also be modified by moving the red timeline of the agenda (lower part). |


|
|
NOW button |
If the user wishes to view occupancy and forecasts at the current time, he can press the button (on the model above is applied). This button condition both the display at the port map (upper section) and the calendar (lower section). |

|
|
Research a specific Stopover |
Users can use the Stopover filter to search for a specific stopover. They can either enter the stopover code (POVXXX) or select a stopover by clicking on the picker. Once the stopover has been entered, the port map (upper section) and the calendar (lower section) will be updated, displaying the port occupancy and the calendar for the date on which the selected stopover is scheduled. Other stopovers scheduled at the same time will also be visible. |

|
|
Hide Previsions button |
Planned stopovers are represented by hatching. Planned stops can be hidden by clicking the "Hide previsions" filter button allowing you to see actual occupancy, i.e. stopovers declared as arrivals. A provisional stopover means that it has not yet been declared as an arrival (Arrival status in the detail of a stopover) |

|
|
Legen button |
By clicking on this button, the user can consult the legend of the schedule. A modal will open, showing the meaning of the icons associated with vessel types, bunkering/ water points, and other element. |

|
Port map section
|
Element |
Description |
On the screen |
|---|---|---|
|
Quay |
Each port is made up of several bollards spread over one or more quays. |

|
|
Bollard |
Bollard distribution is customized for each port. |

|
|
Water and bunkering point |
Each port has a water and bunkering point located between two bollards or on one bollard. It is possible that between two bollards there is both a water and a bunkering point. |

|
|
Line of the quay |
Each port consists of two or more lines of quays (5 max). In reality, it is often the case that one or more vessels may be attached to the same bollard, but stationed on different lines. |
|
|
Stopover |
On this map, the stopovers are represented by rectangular ships. Their position takes into account the quay, the bollards to which they are attached, and the quay line. The name of the vessel in capital letters is indicated on these ships, preceded by an icon representing the type of ship (Cargo, fishing, cruise ship...). |
|
|
Colours |
All stopovers are differentiated by a color. |

|
|
Hatching |
Stopovers declared as arrivals and forecast stopovers are distinguished by hatching. They can be hidden by clicking the Hide Previsions button. See the mockup of the port planning for a future date. |

|
|
Yellow dotted line |
In the future, one or more scheduled stopovers may be planned at the same location (same bollards and quay line). In this case, a supperposition of these stopover blocks is displayed, with the stopover in the foreground being the one first declared on PVMIS. Yellow dotted lines should be visible around stopovers. |
|
|
Bunker Pier & B4 and B1 & B2/B3 buttons (specially for the fishing port) |
Among the 4 ports, only one (Fishing Port) consists of 4 quays with more bollards than the others. Two screens of the port plan are then displayed, and the user can swipe the port plan view by clicking on arrows, while the agenda part (bottom part) remains static. |


|
Agenda section
|
Element |
Description |
On the screen |
|---|---|---|
|
Week selection |
The user can view the schedule of planned stops for a week by clicking on the arrow buttons. |

|
|
Date |
The days are indicated by month and day. |

|
|
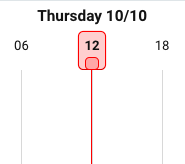
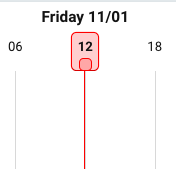
Hour |
The hours are displayed in 6-hour intervals, so we show 00, 06, 12, 18. |

|
|
Timeline |
We display a red timeline that can be moved by the user to condition the display of the port plan (top part). It moves with the click of an hour. For greater precision, it can be adjusted by entering the Date filter in the Header section. |
|
|
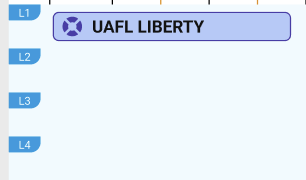
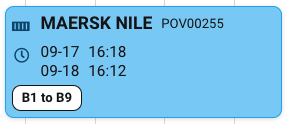
Arrival stopover |
The display of the stopovers is represented by blocks in which we indicate:
|
|
|
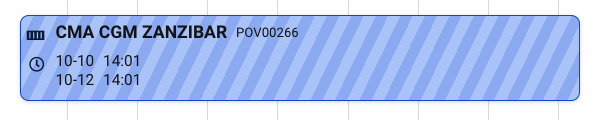
Provisionnal stopover |
Stopovers declared as arrivals and forecast stopovers are distinguished by hatching. |
|
|
Indication of bollard on the stopover (specially for the fishing port) |
For the Fishing port, multiple bollards may have the same code name but are associated with different docks. For this port, the indication of bollards in the stopover block differs; we additionally include the quay code and bollard number. See the mockup of the Fishing port planning. |

|
|
Modal of the detail information of a stopover |
On each stopover, the user can plan vessel movements. Clicking on the stopover block will open the modal of the detail of the stopover. |
|
|
Colours |
All stopovers are differentiated by a color.
|
|
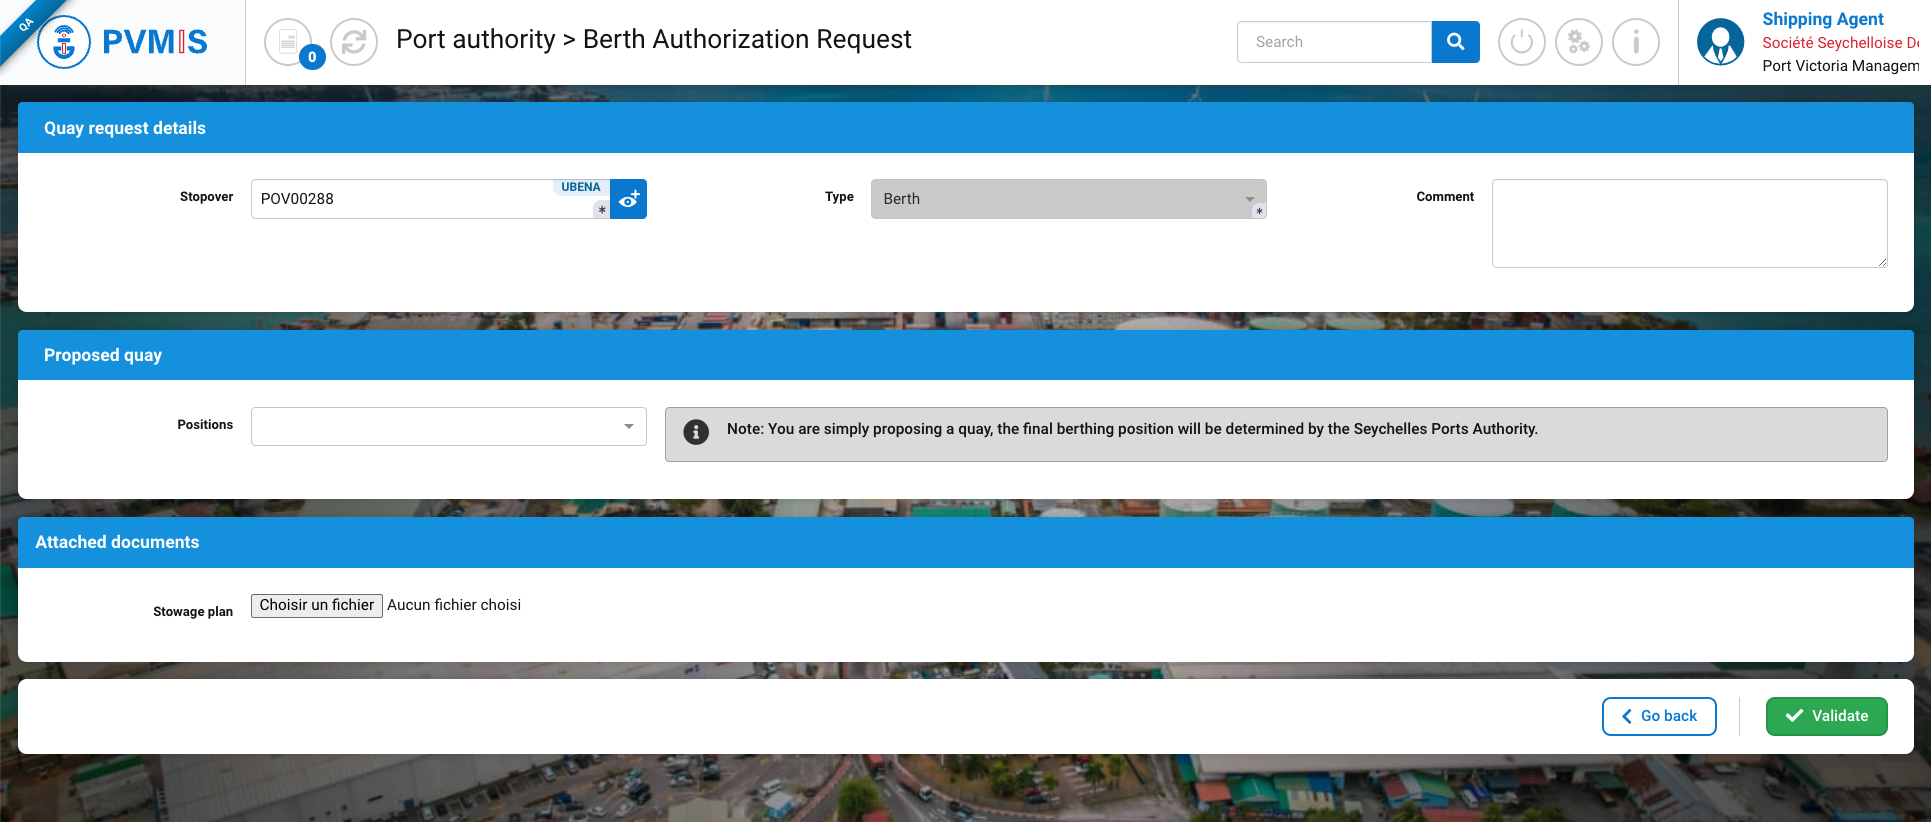
How to manage a provisional stopover on the port planning ?
As a shipping agent, after creating a stopover, when this role submits a berth authorization request (BAR), the form allows the agent to suggest a quay where the vessel is expected to dock. This quay suggestion informs the system about the port planning (Mahe Quay, Fishing, IPHS, or Zone 14) for the planned stopover. If the shipping agent does not fill in this field, the stopover will not appear on any of the port planning after the validation of the berth authorization request by the Harbor’s Master (Operation) role.
NB: It is important to note that it is possible to indicate quays that do not belong to the Mahe Quay, Fishing, IPHS, or Zone 14 ports, such as Eden Marina. As a result, these stopovers will not be visible on the port planning.
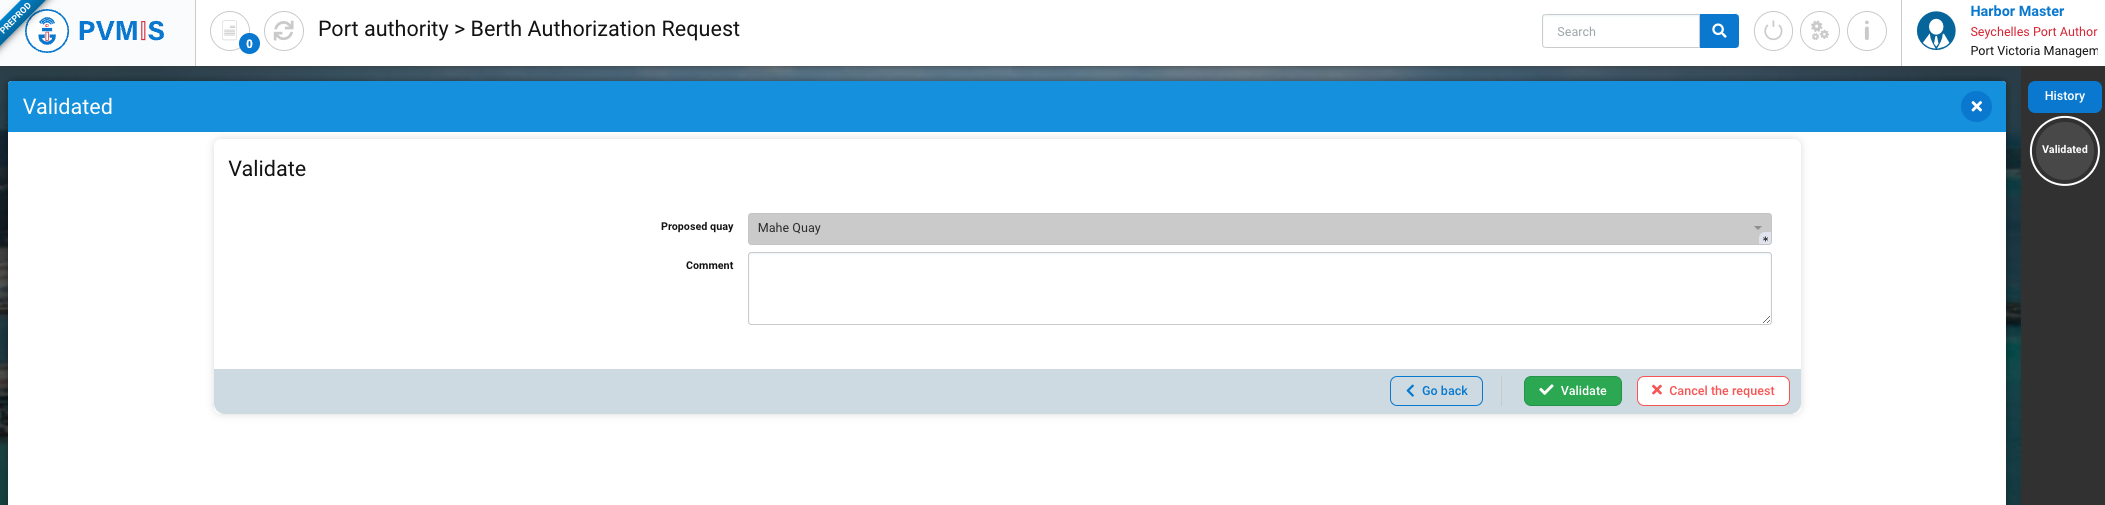
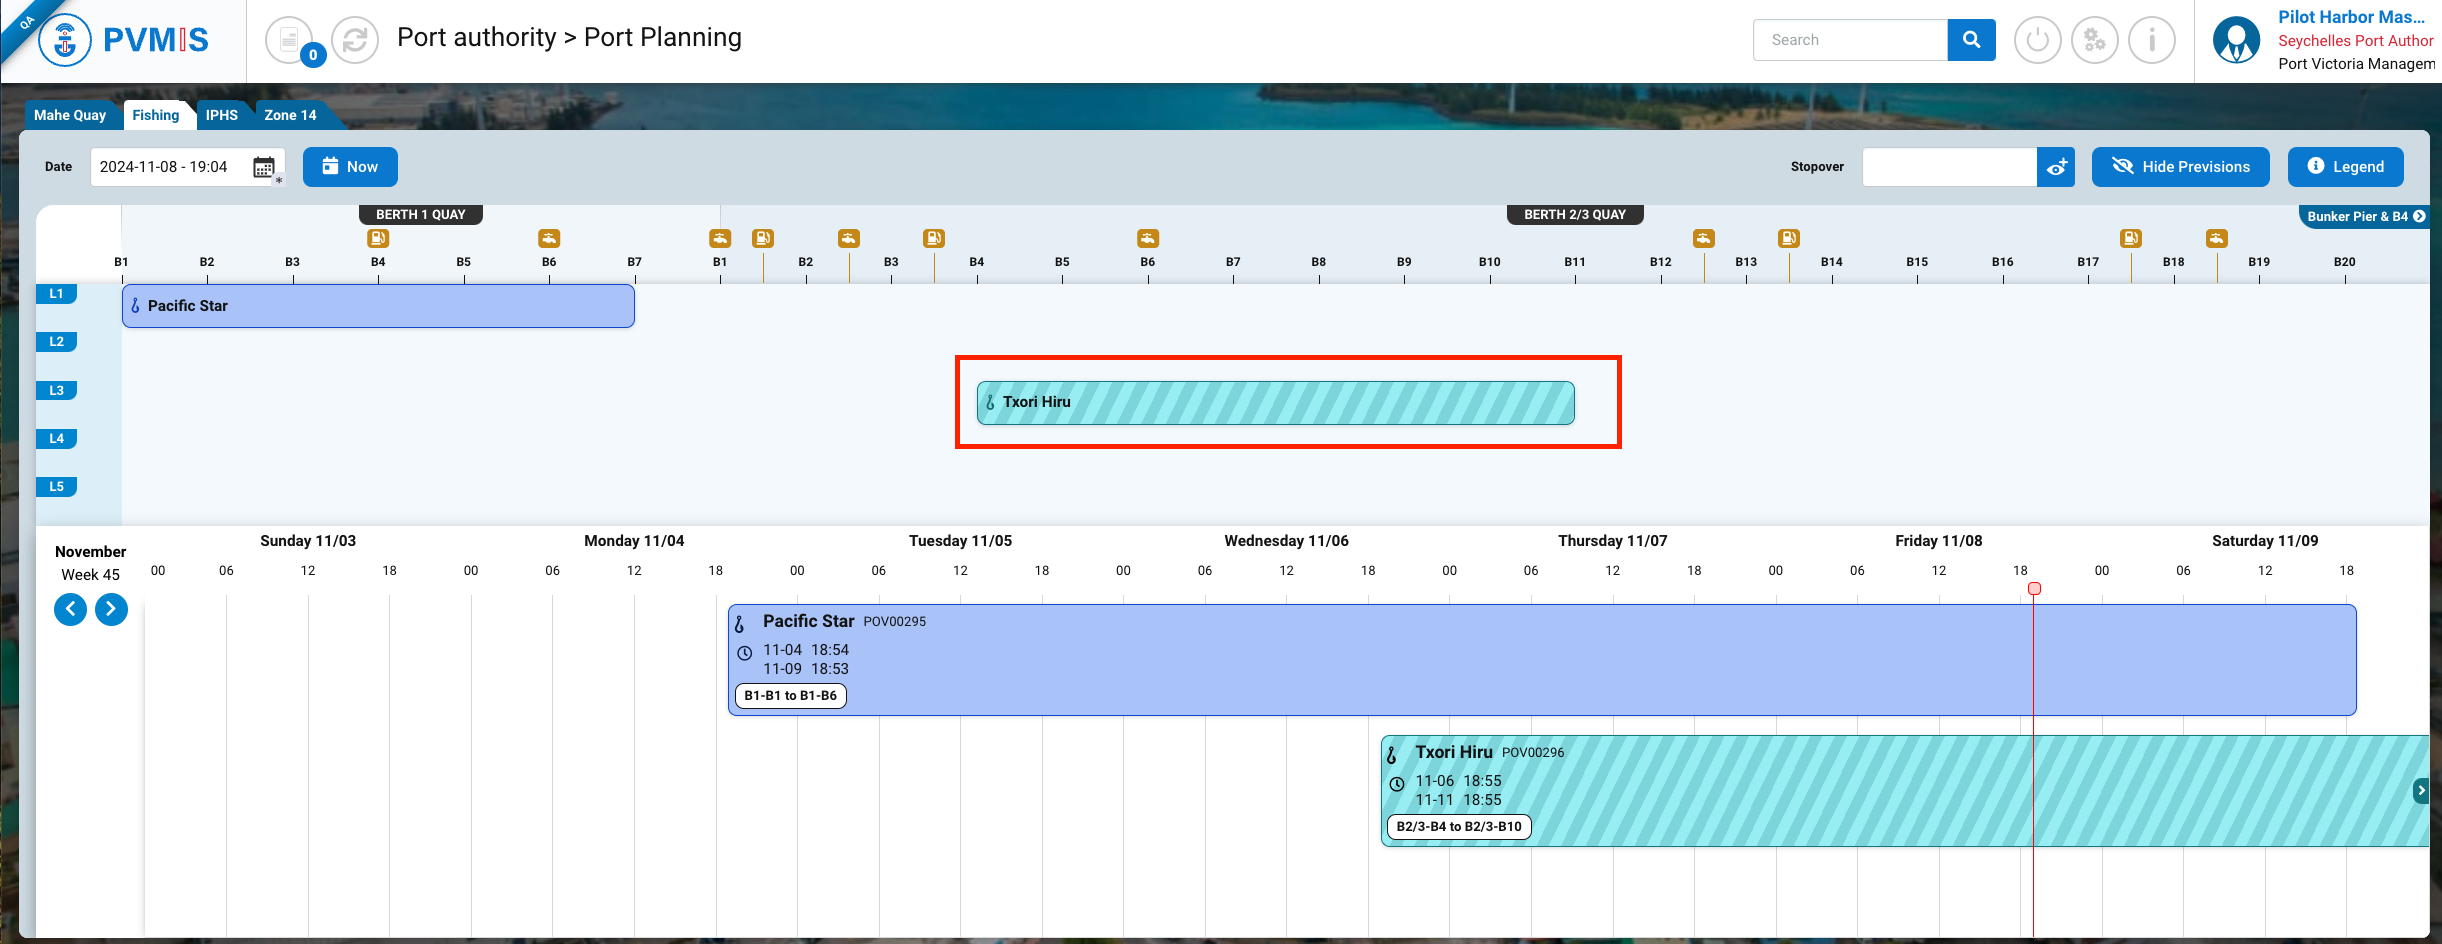
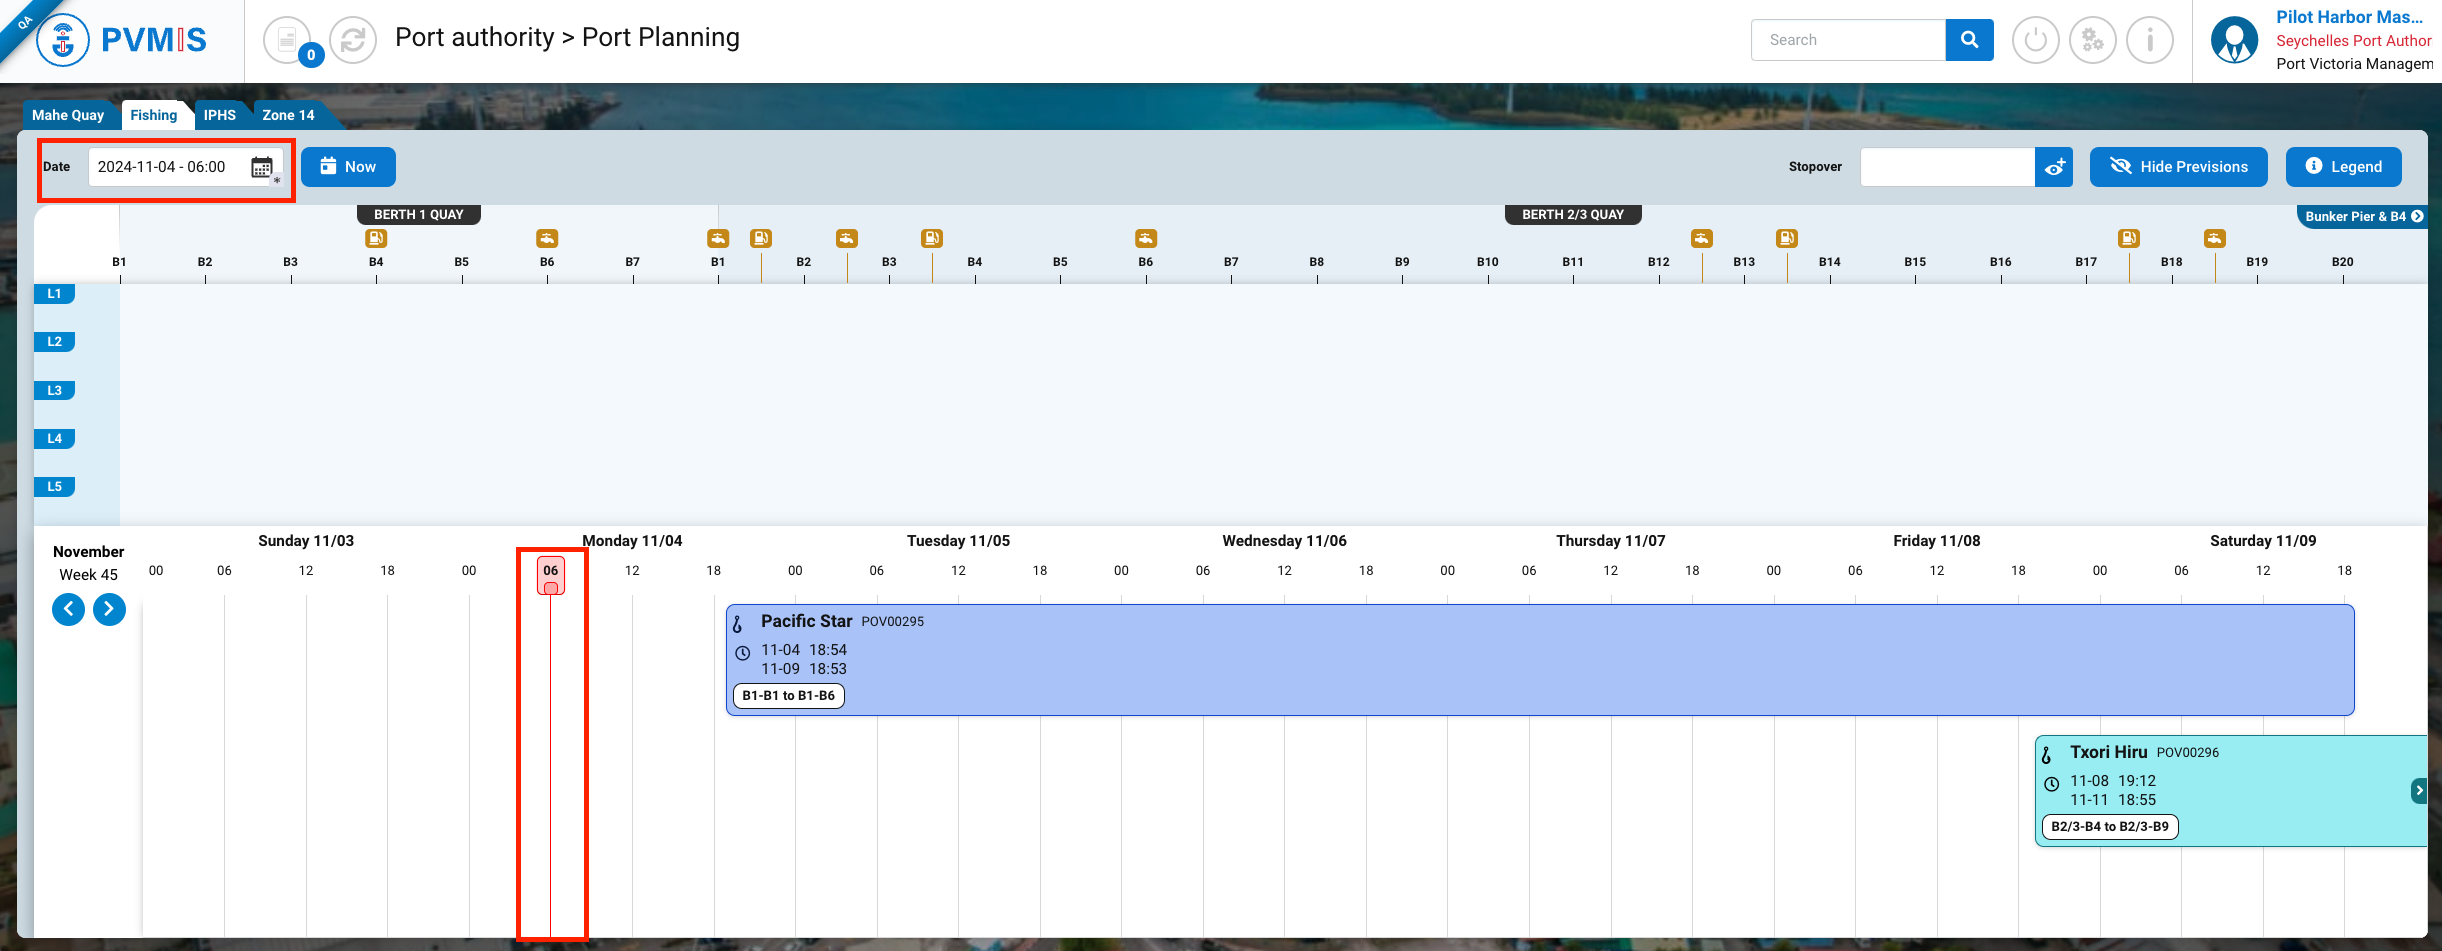
After submitting the berth authorization request, the Harbor Master (Operations) role can see the suggested quay in the form. When the Harbor Master approves the BAR, the stopover will appear in the associated port planning in the "Agenda section" at the bottom.
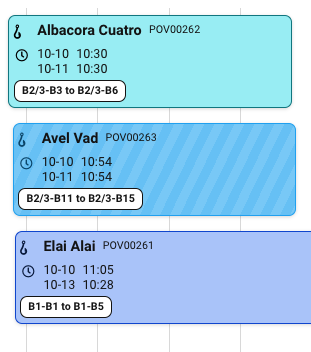
The provisional stopover is displayed only in the Agenda section, represented by hatching. It is not visible in the Port Plan section because, to display it, the quay, line of the quay, and bollards must be specified. To do this, the Pilot and Tower roles need to create “planned vessel movements” from the stopover detail modal. This can be done by clicking on the stopover block.

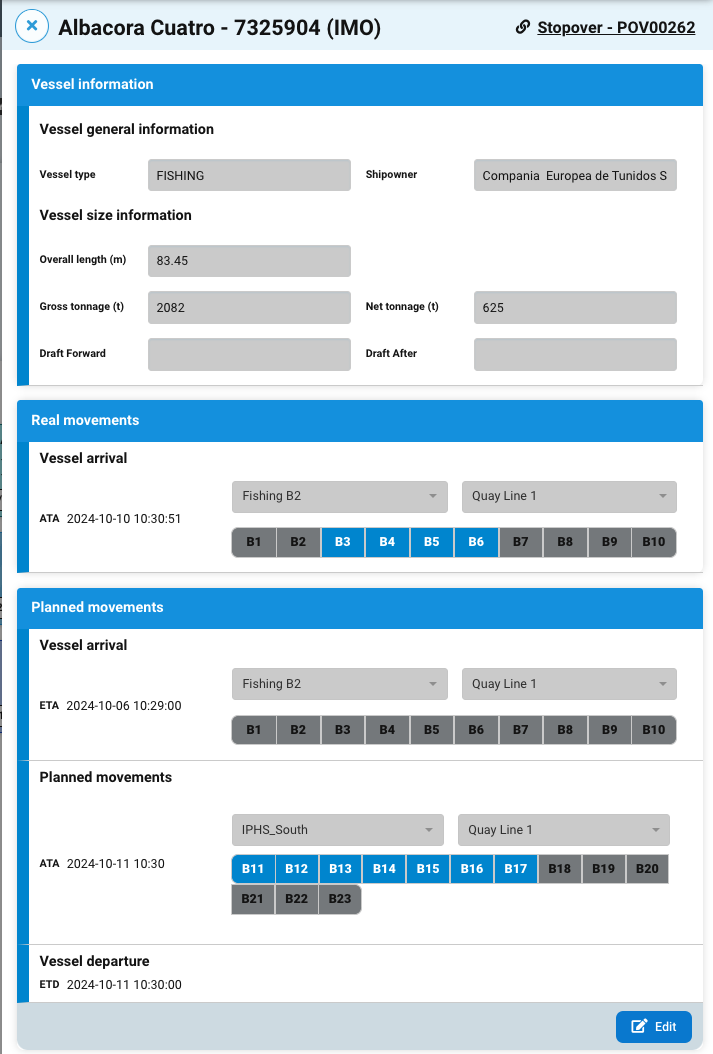
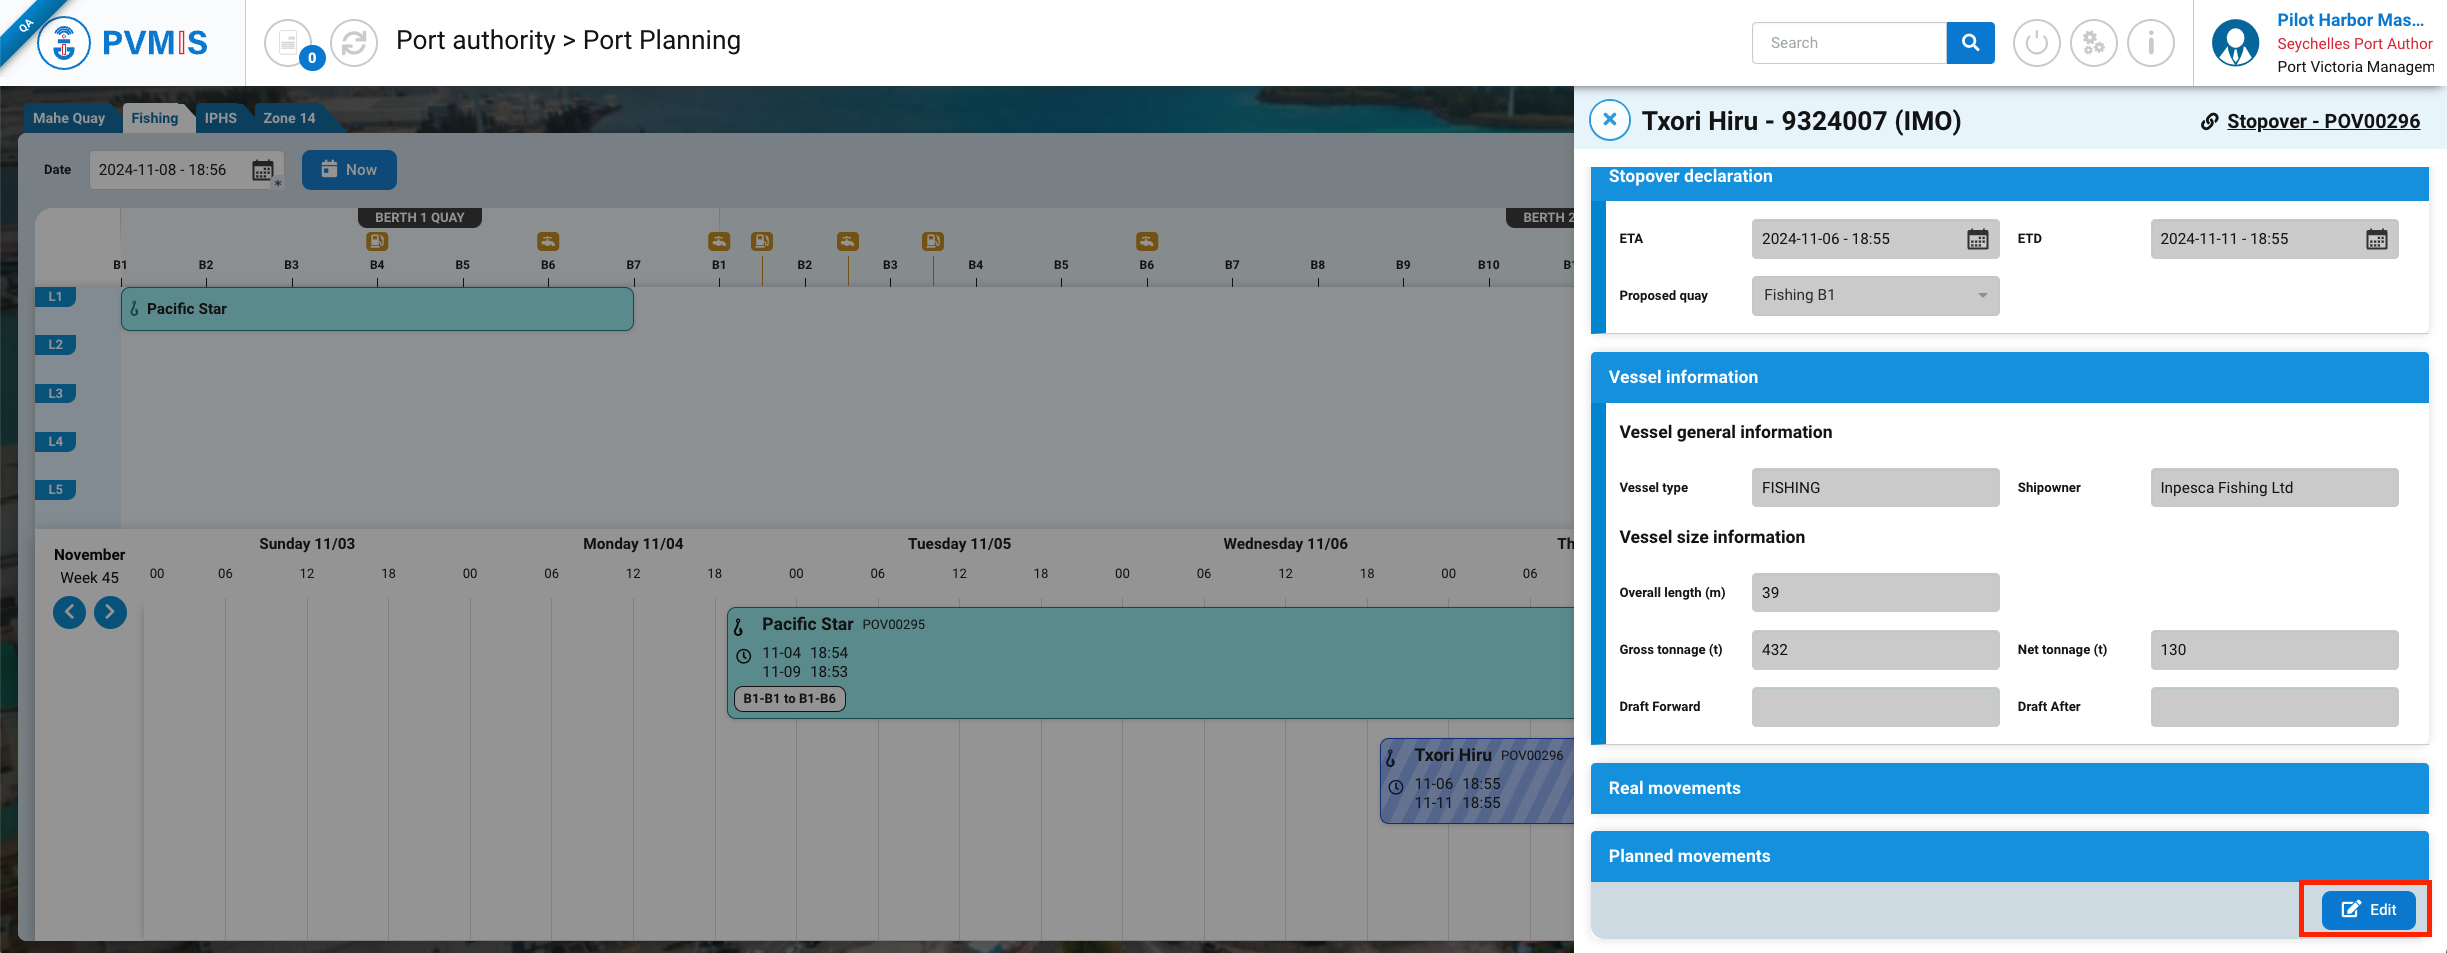
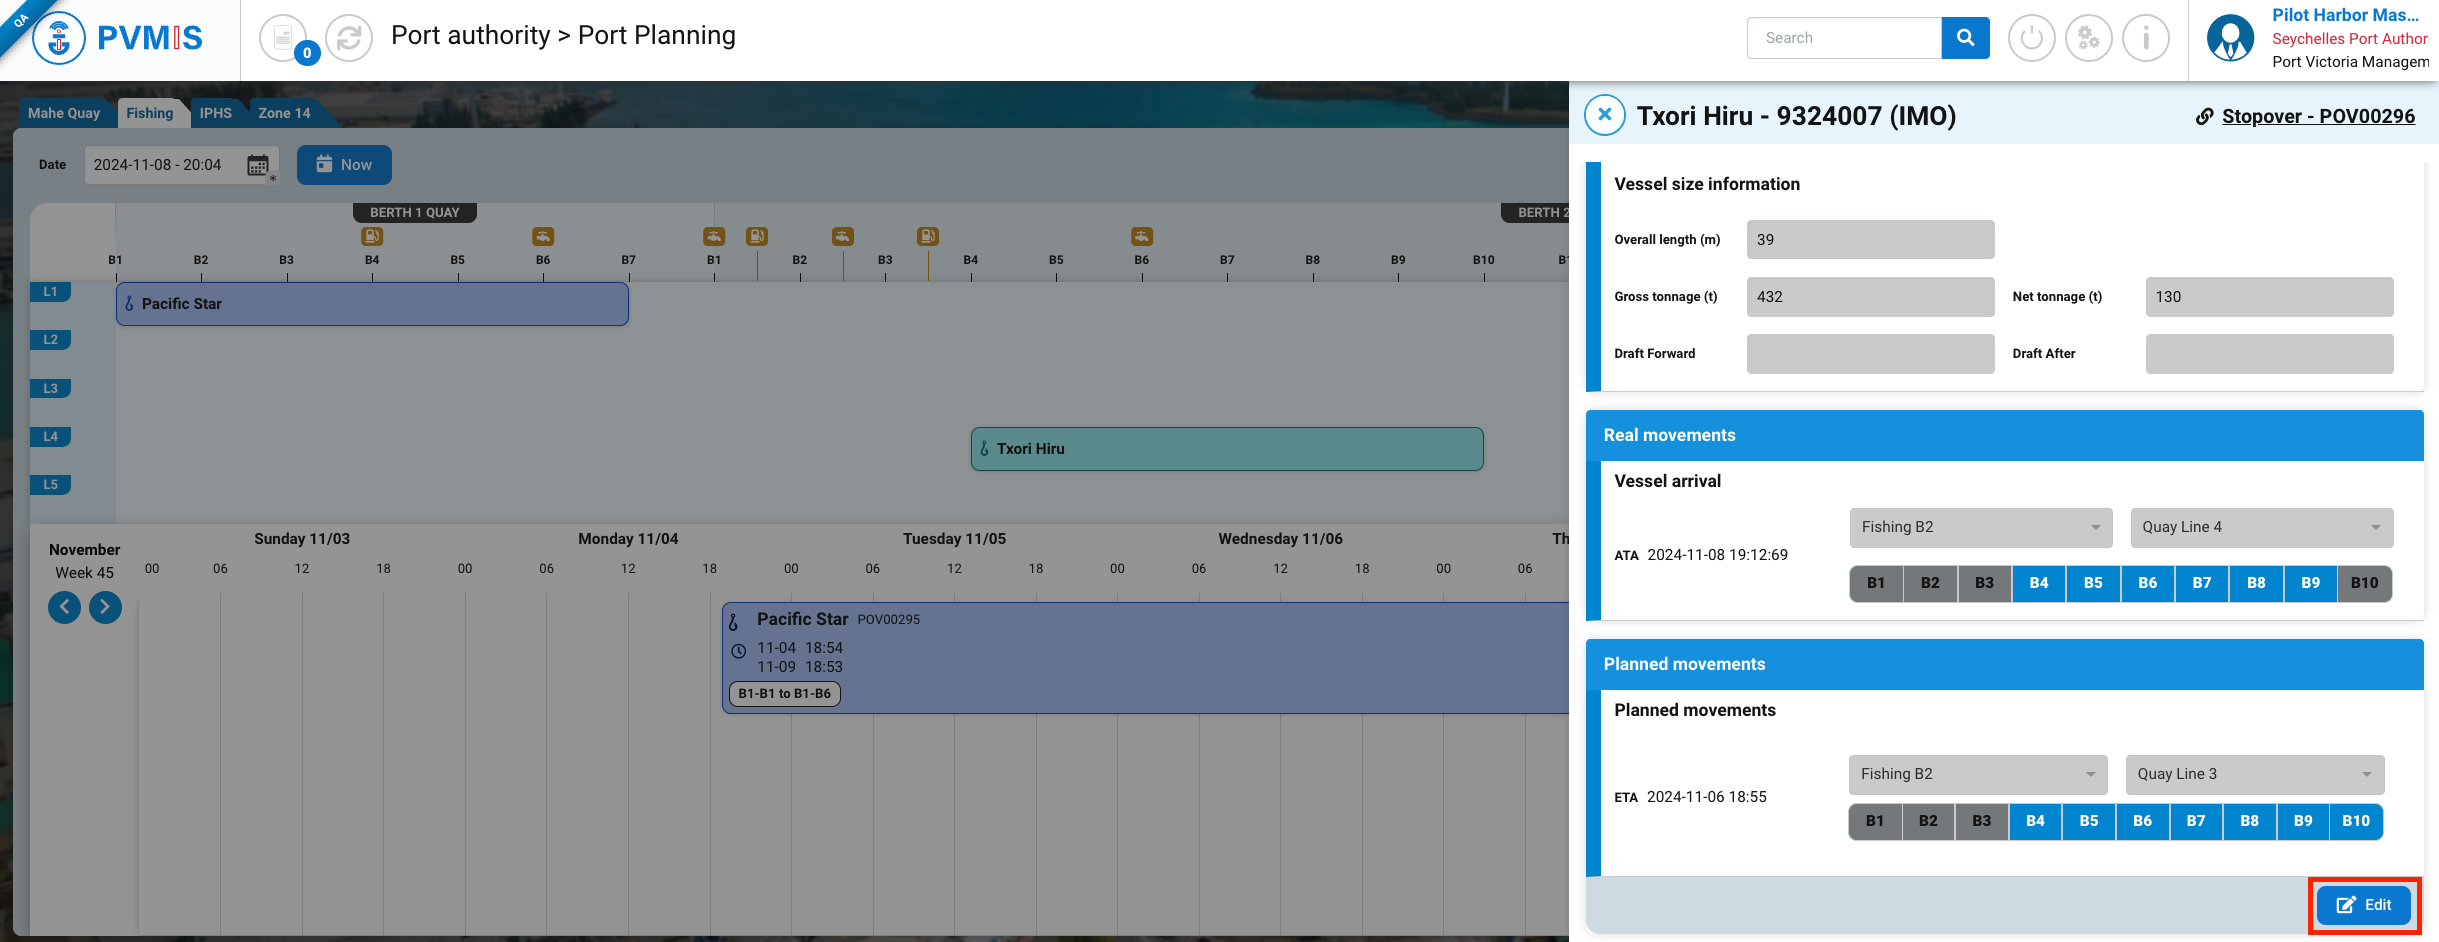
The stopover detail modal is displayed, allowing you to view the stopover information declared by the shipping agent and the vessel information as the Harbor Master, Pilot, Tower, Information, Financial Services, Customs, Environment, Health, and Shipping Agent roles, but only if you are assigned to the associated stopover.
Two other sections are also distinguished: "Real Movements" and "Planned Movements." The Real Movements section will be updated when the Pilot role declares the vessel's arrival.
To edit Estimated Time of Arrival (ETA) and indicate the position of the provisionnal stopover for it to be displayed in the Port Plan section of the planning, click the Edit button in the Planned Movements section.
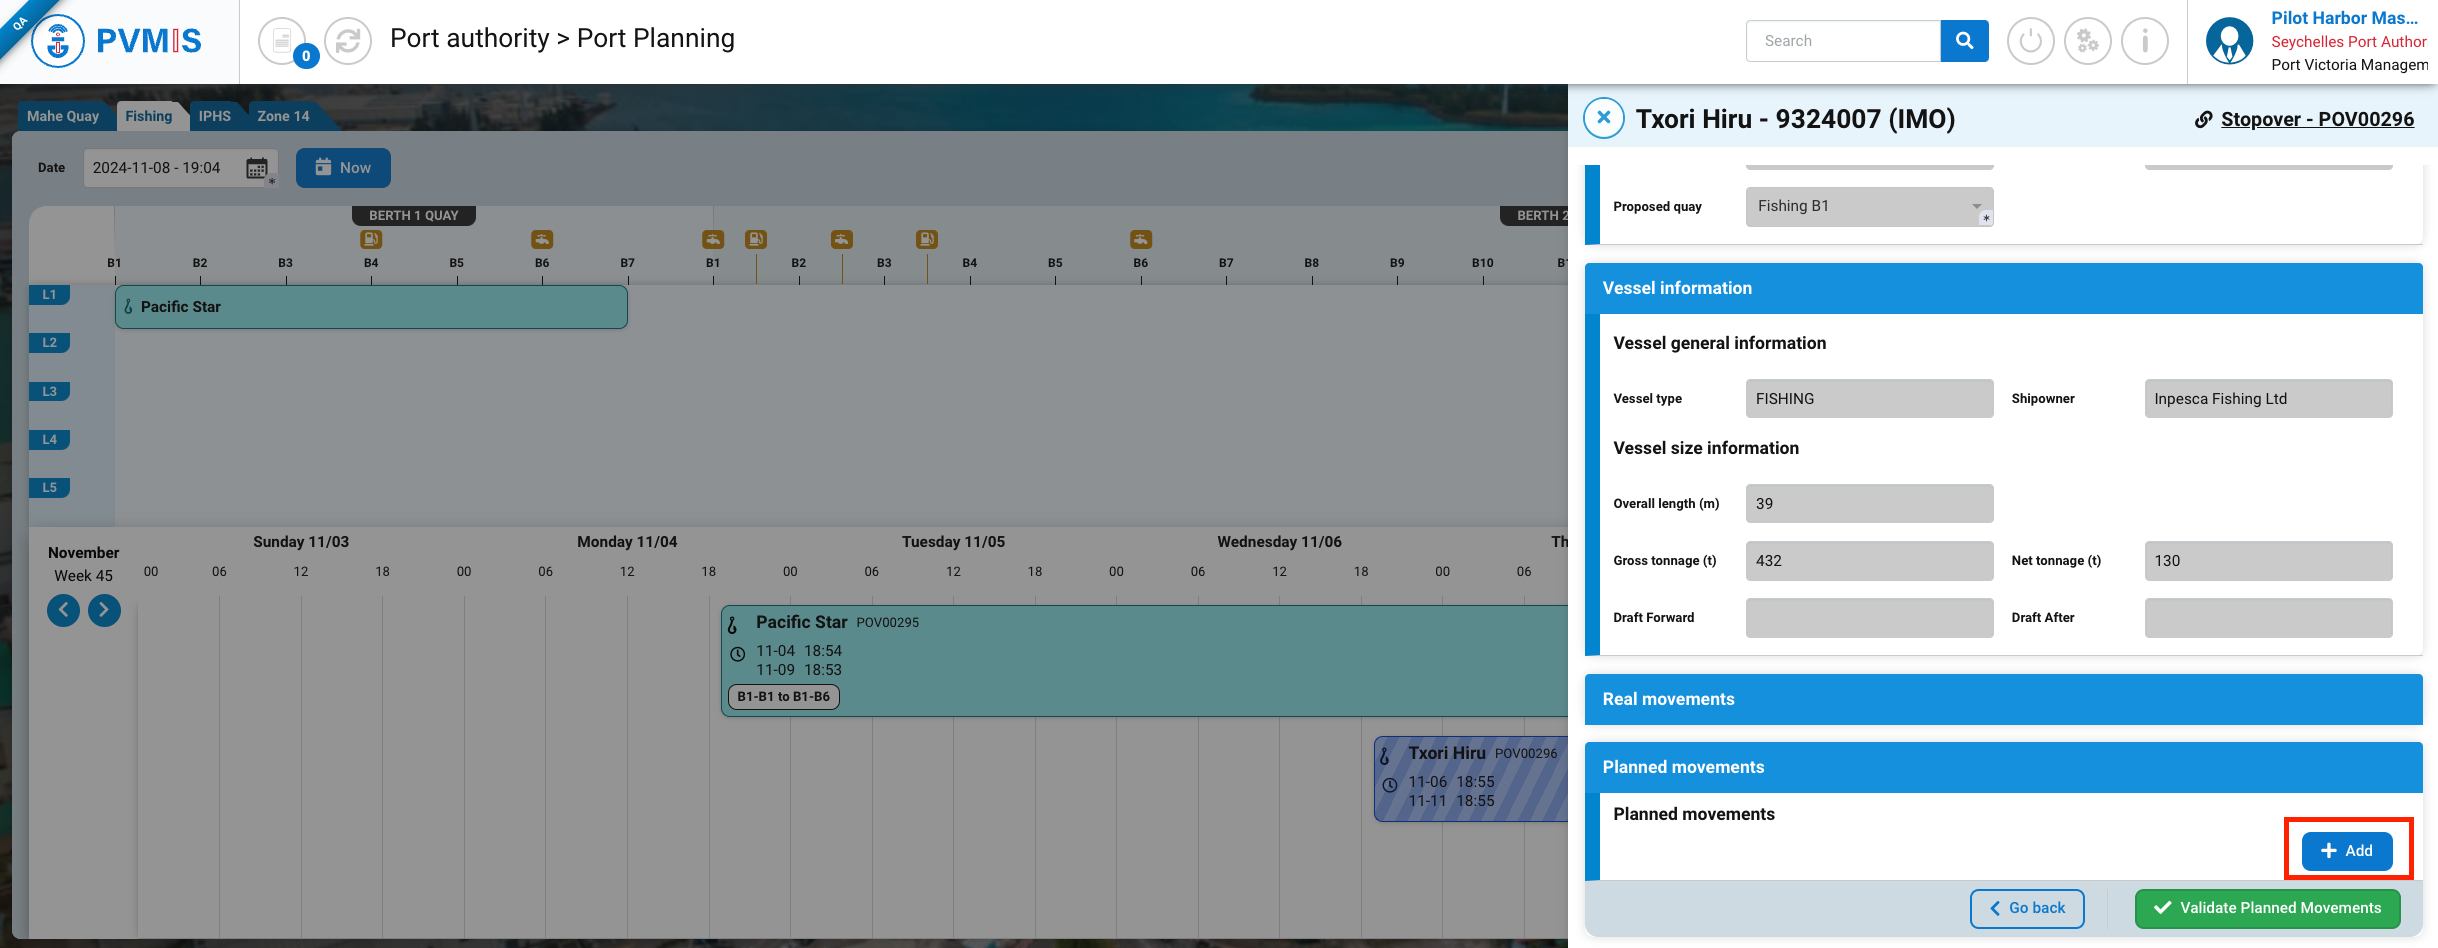
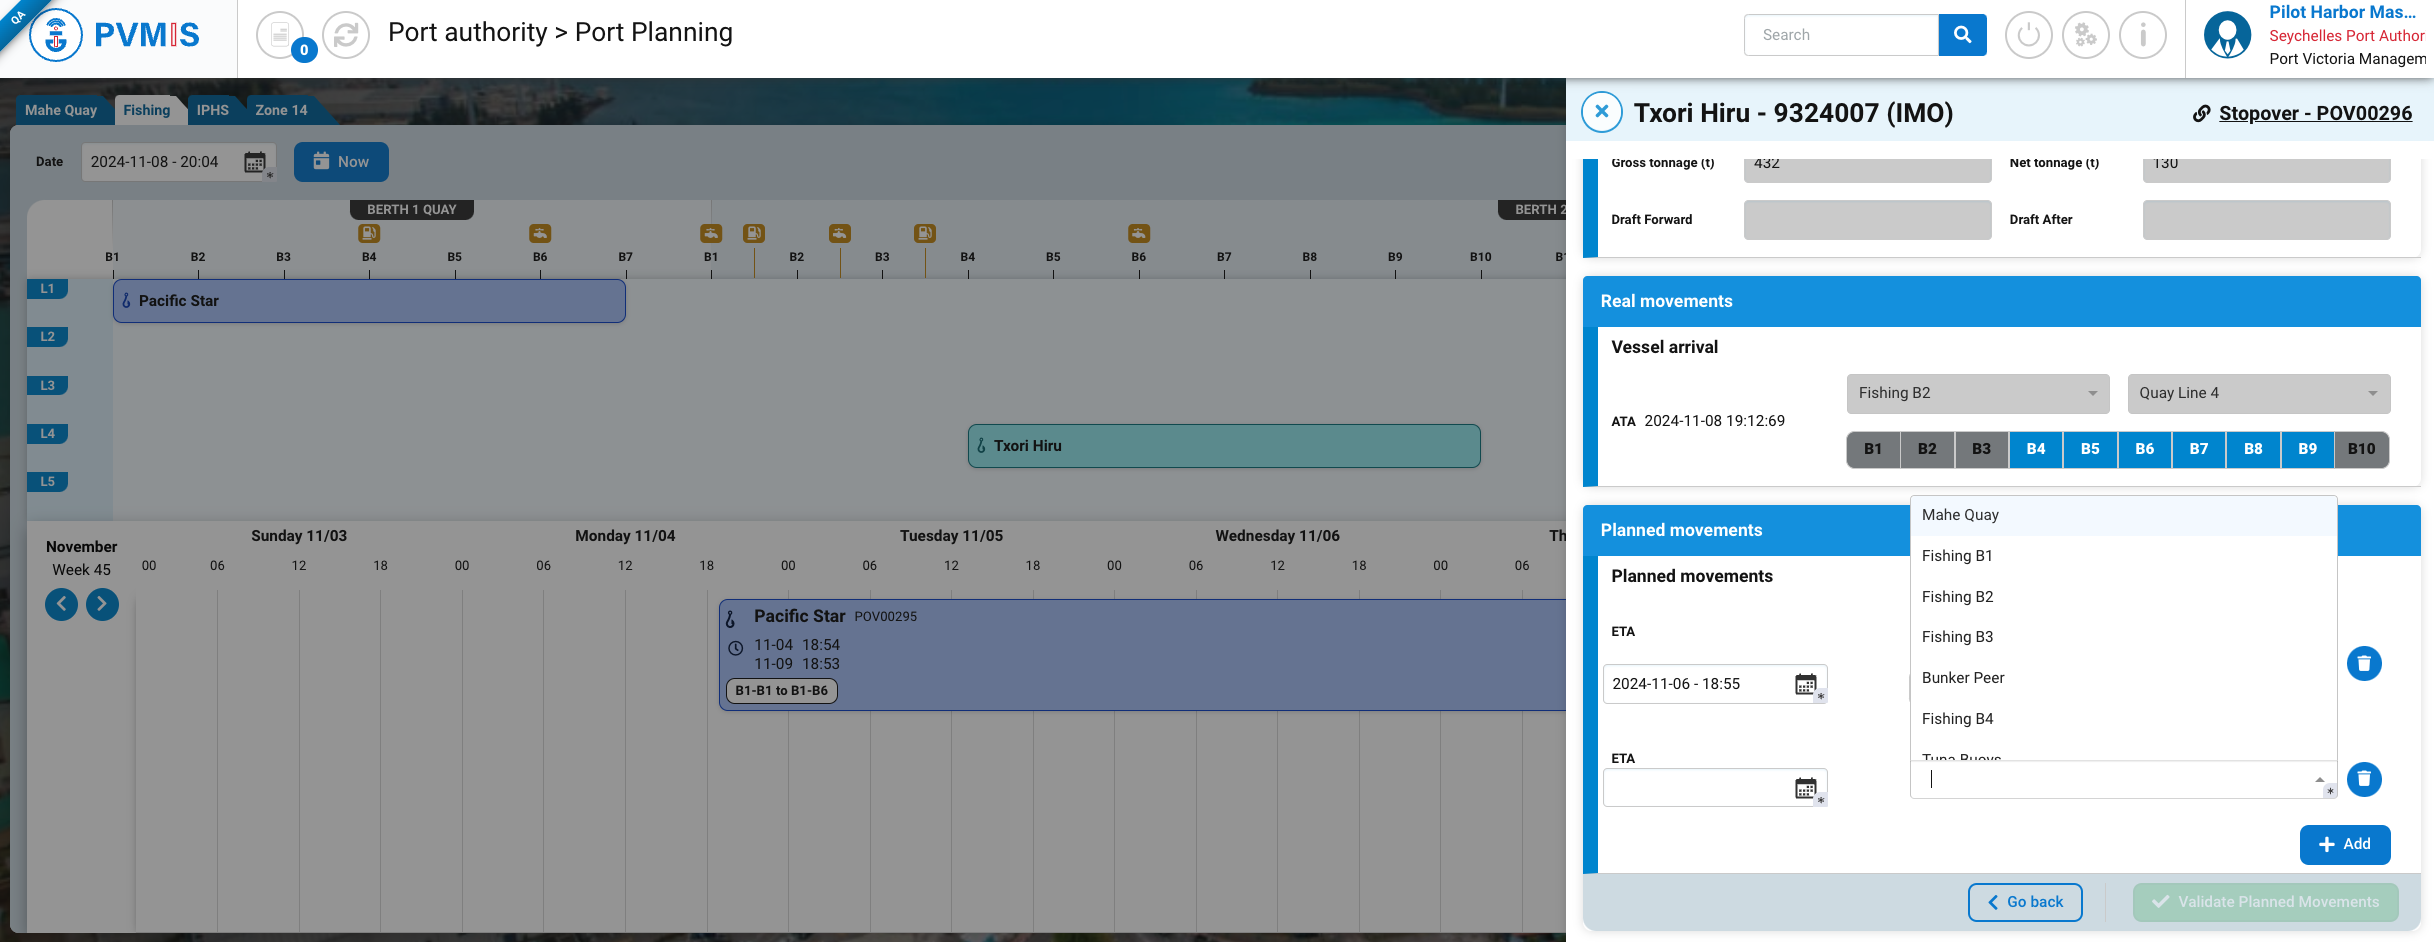
After clicking the Edit button, the editing form for the Planned Movements section appears, click on +Add button .
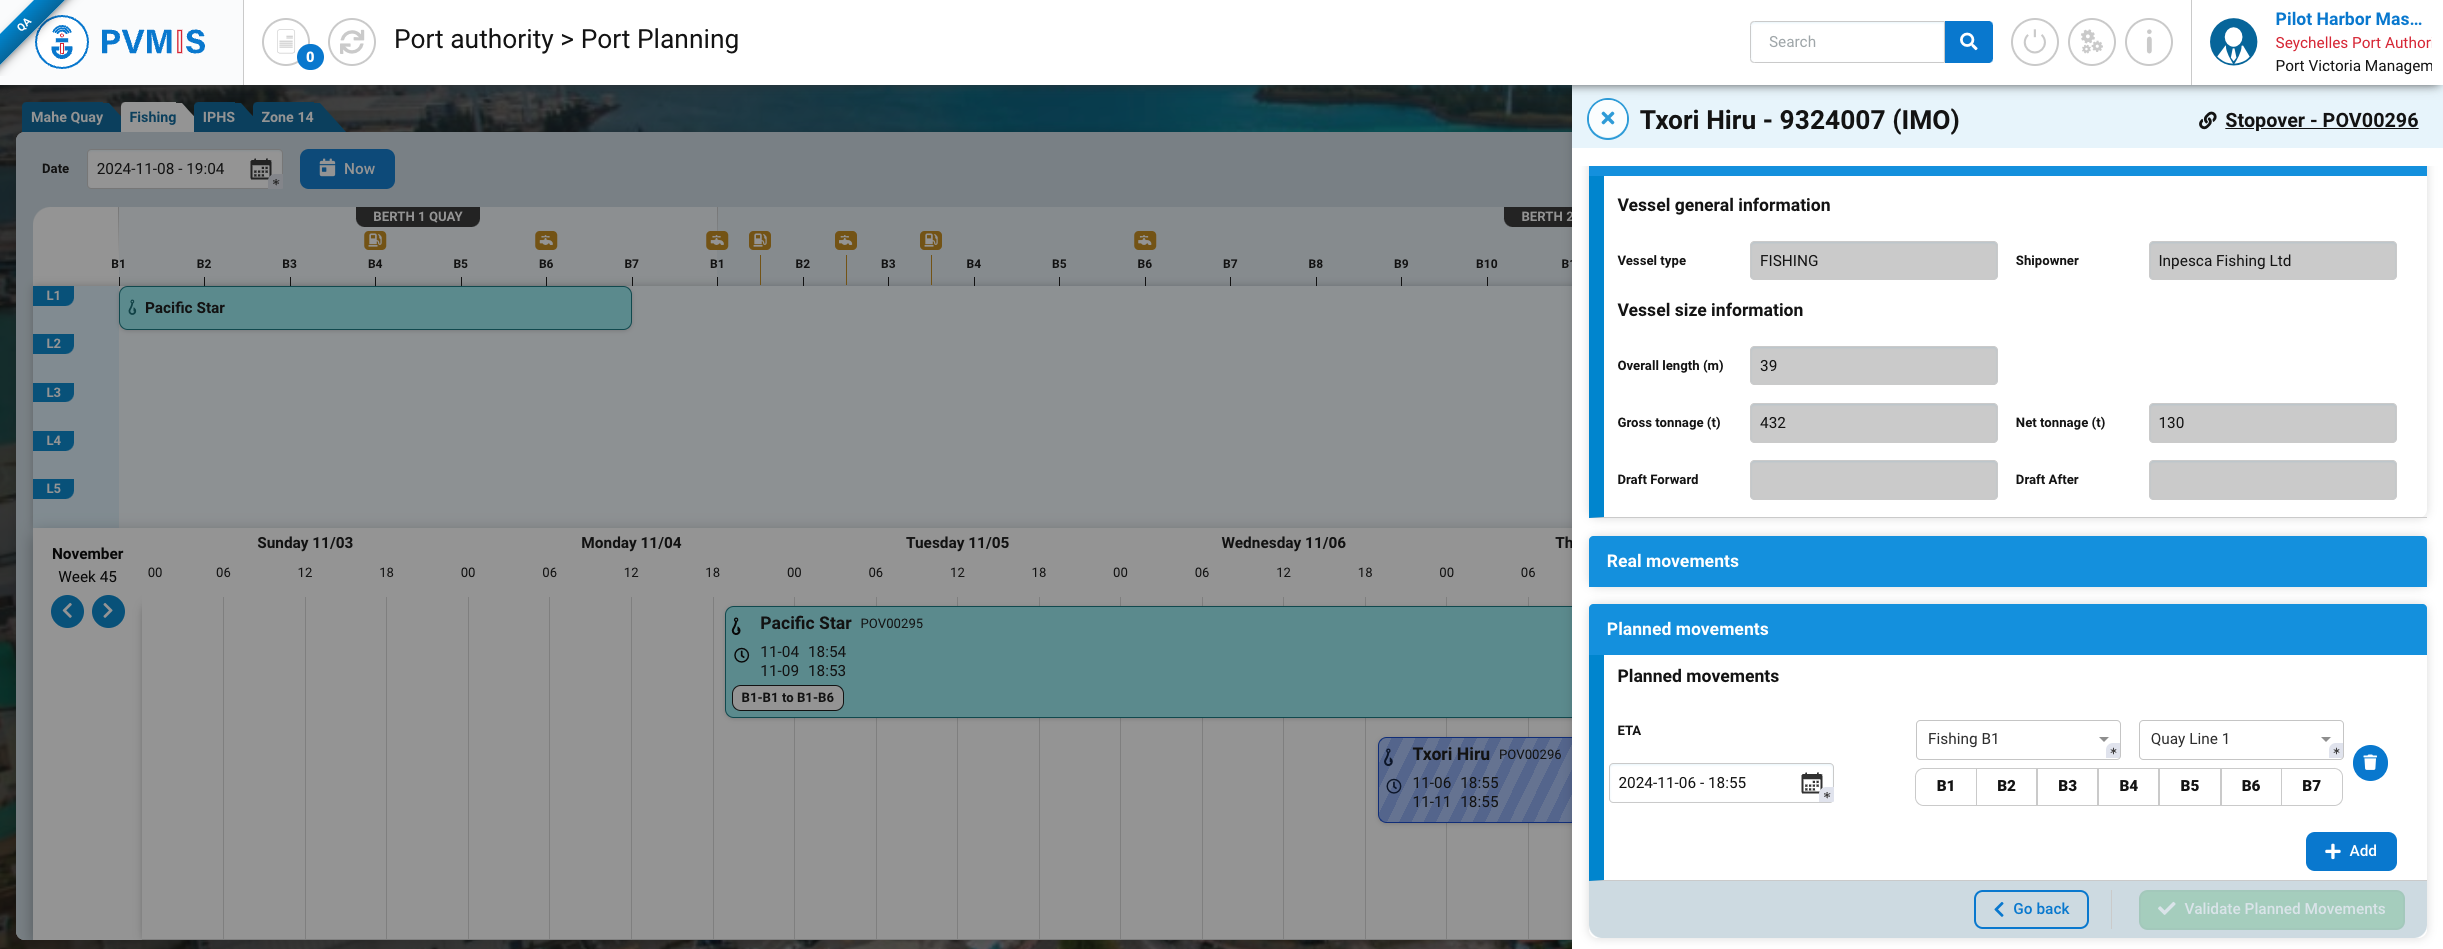
The ETA field is pre-filled with the information entered by the shipping agent during the stopover declaration, you can edit the date and for the position you can change the quay, select the desired berth line and bollards by click on.
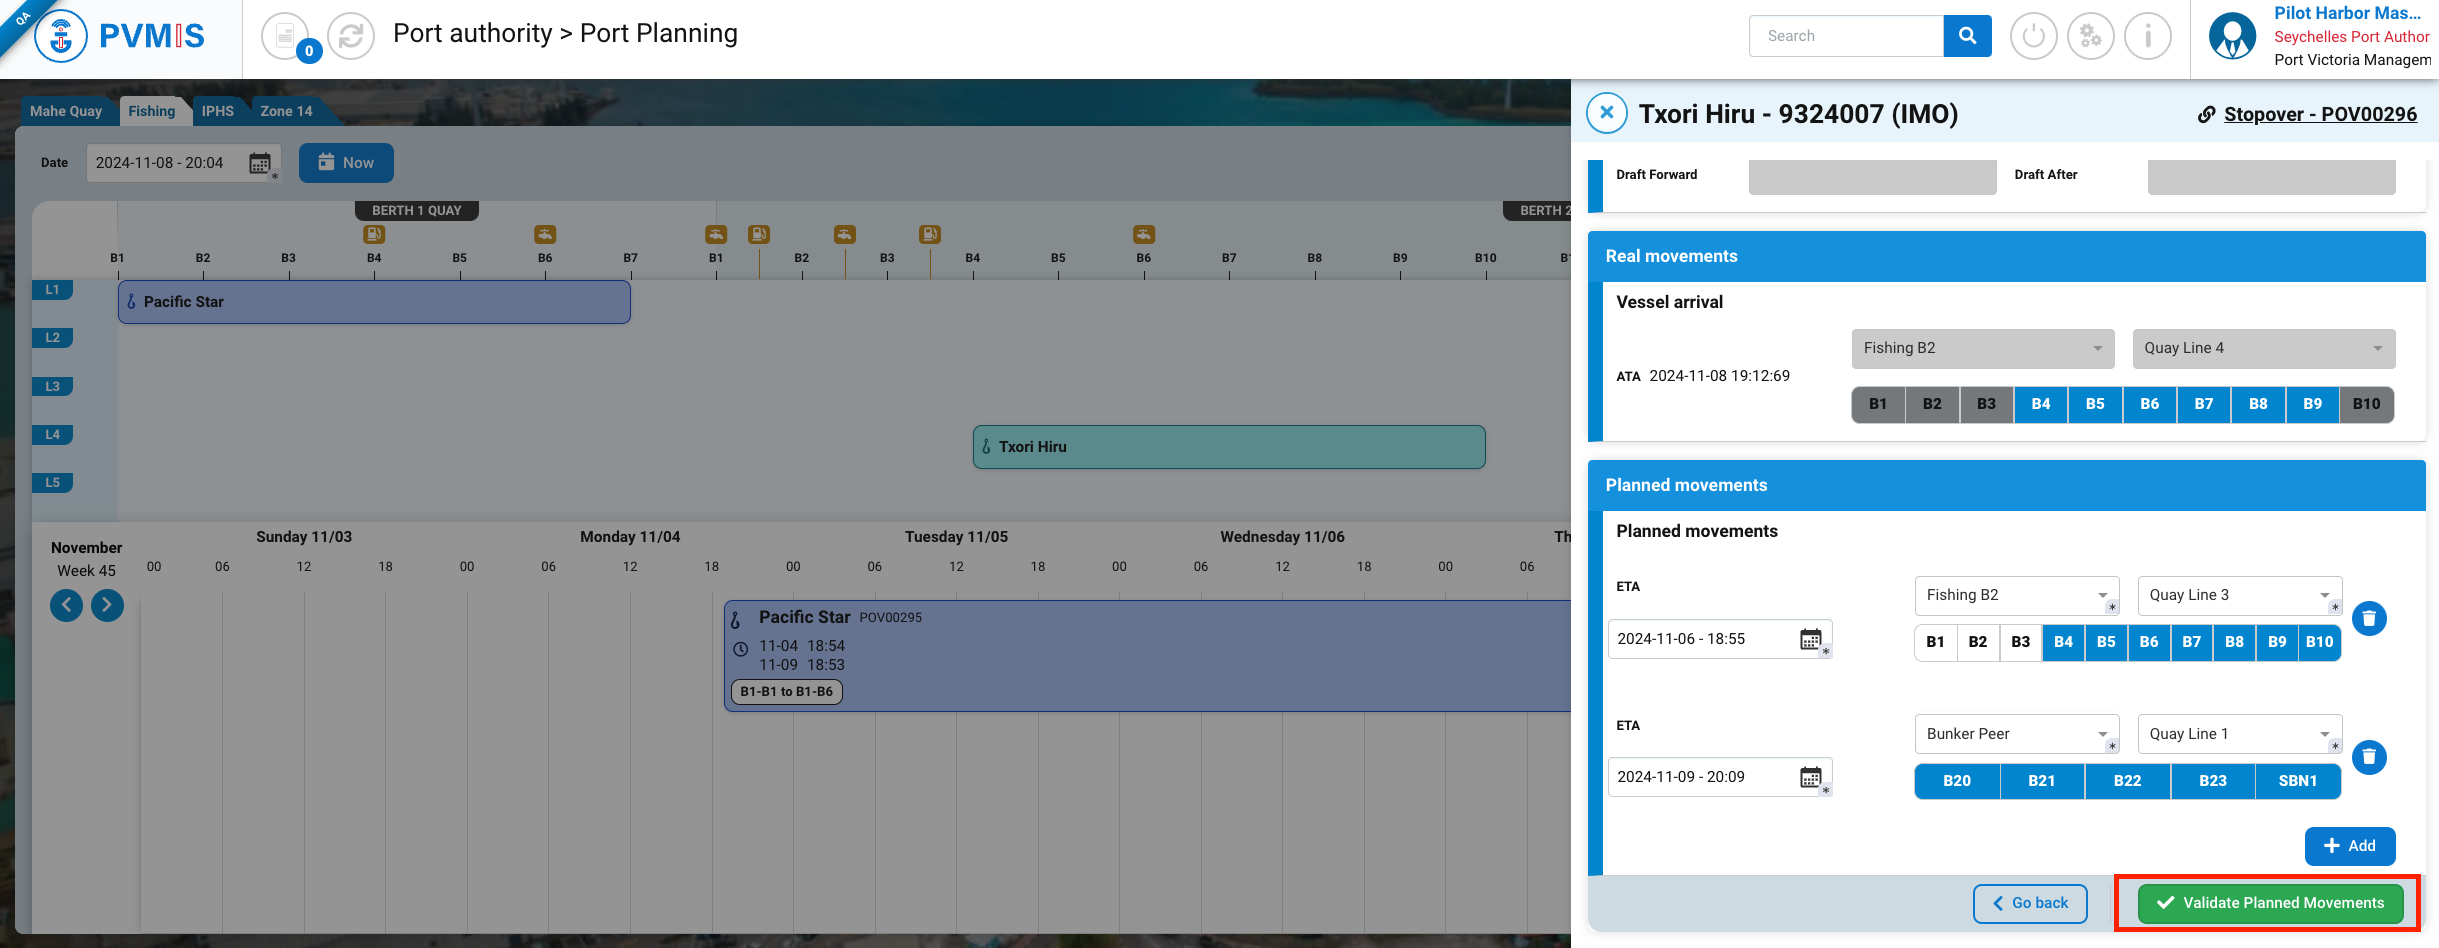
Once you've selected the desired quay line and bollards, click on the Validate Planned Movements button.
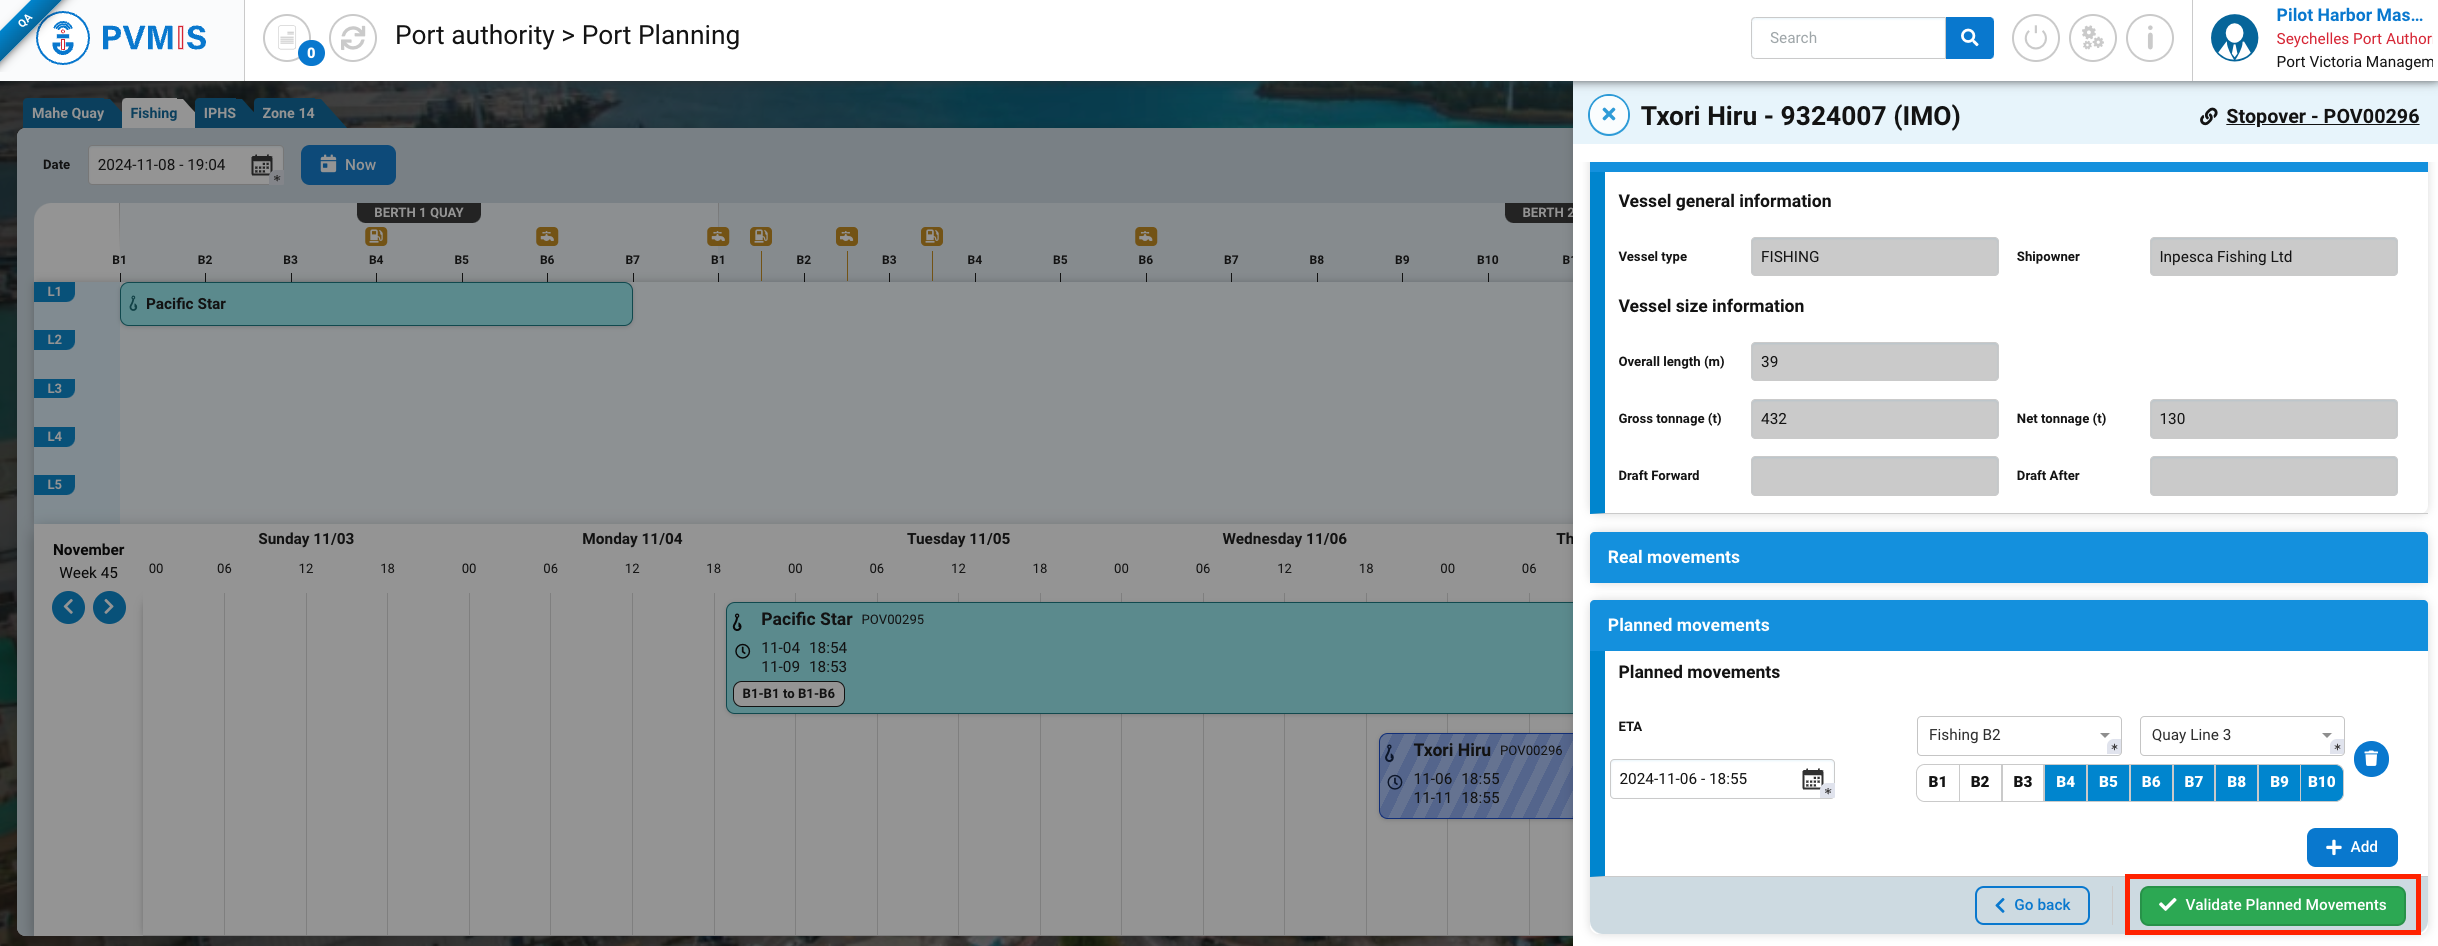
After validation of the form, the stopover details popup closes, and the user can see the stopover's position displayed in the port plan section (top) that was specified in the scheduled ETA movement.
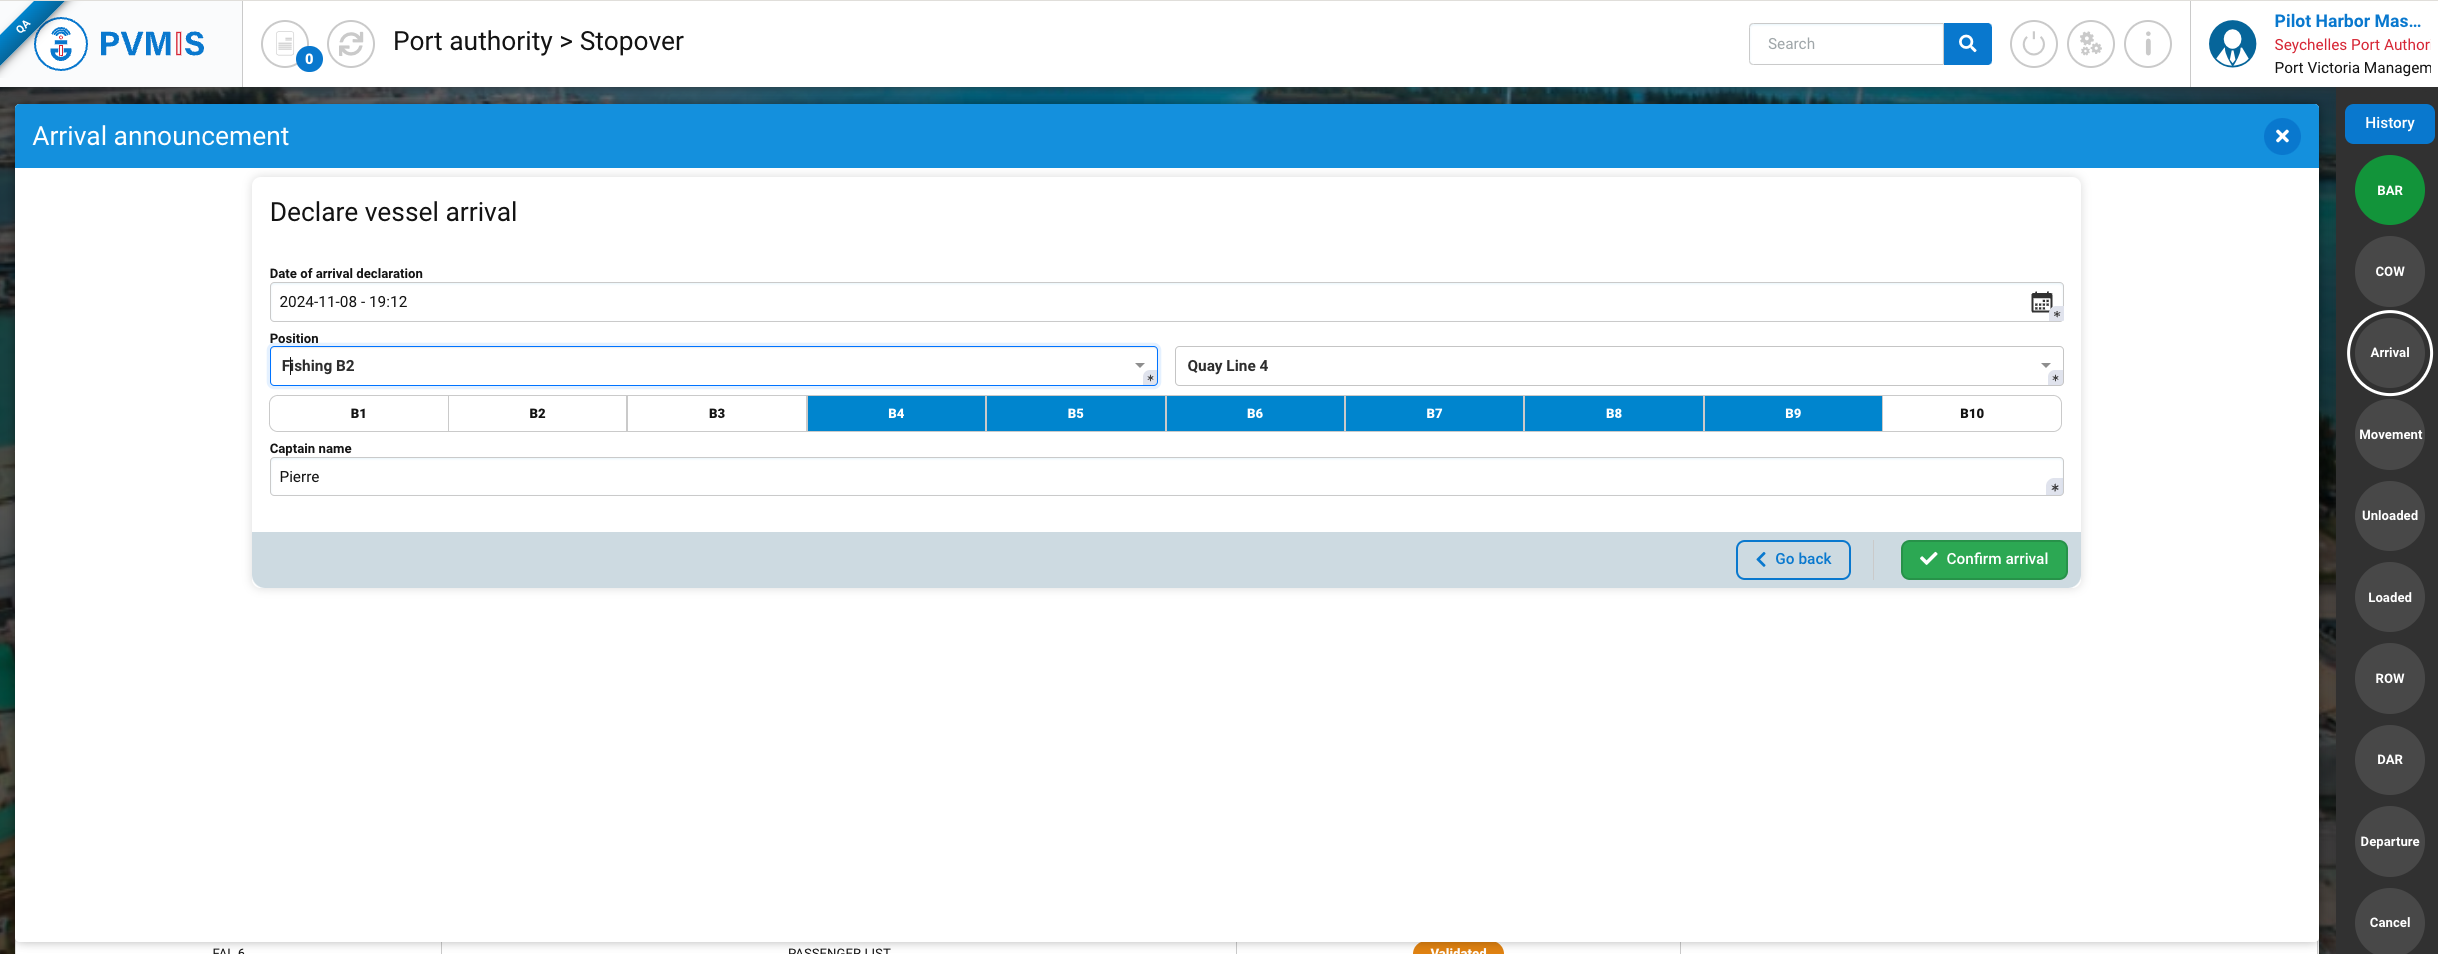
When declaring the arrival of the stopover from the Arrival status in the stopover details screen, the pilot must enter the exact actual position of the stopover within the associated port.
The pilot may enters a position different from the planned position entered in the previous step, that is, during the creation of the planned ETA movement from the stopover popup on the port planning.
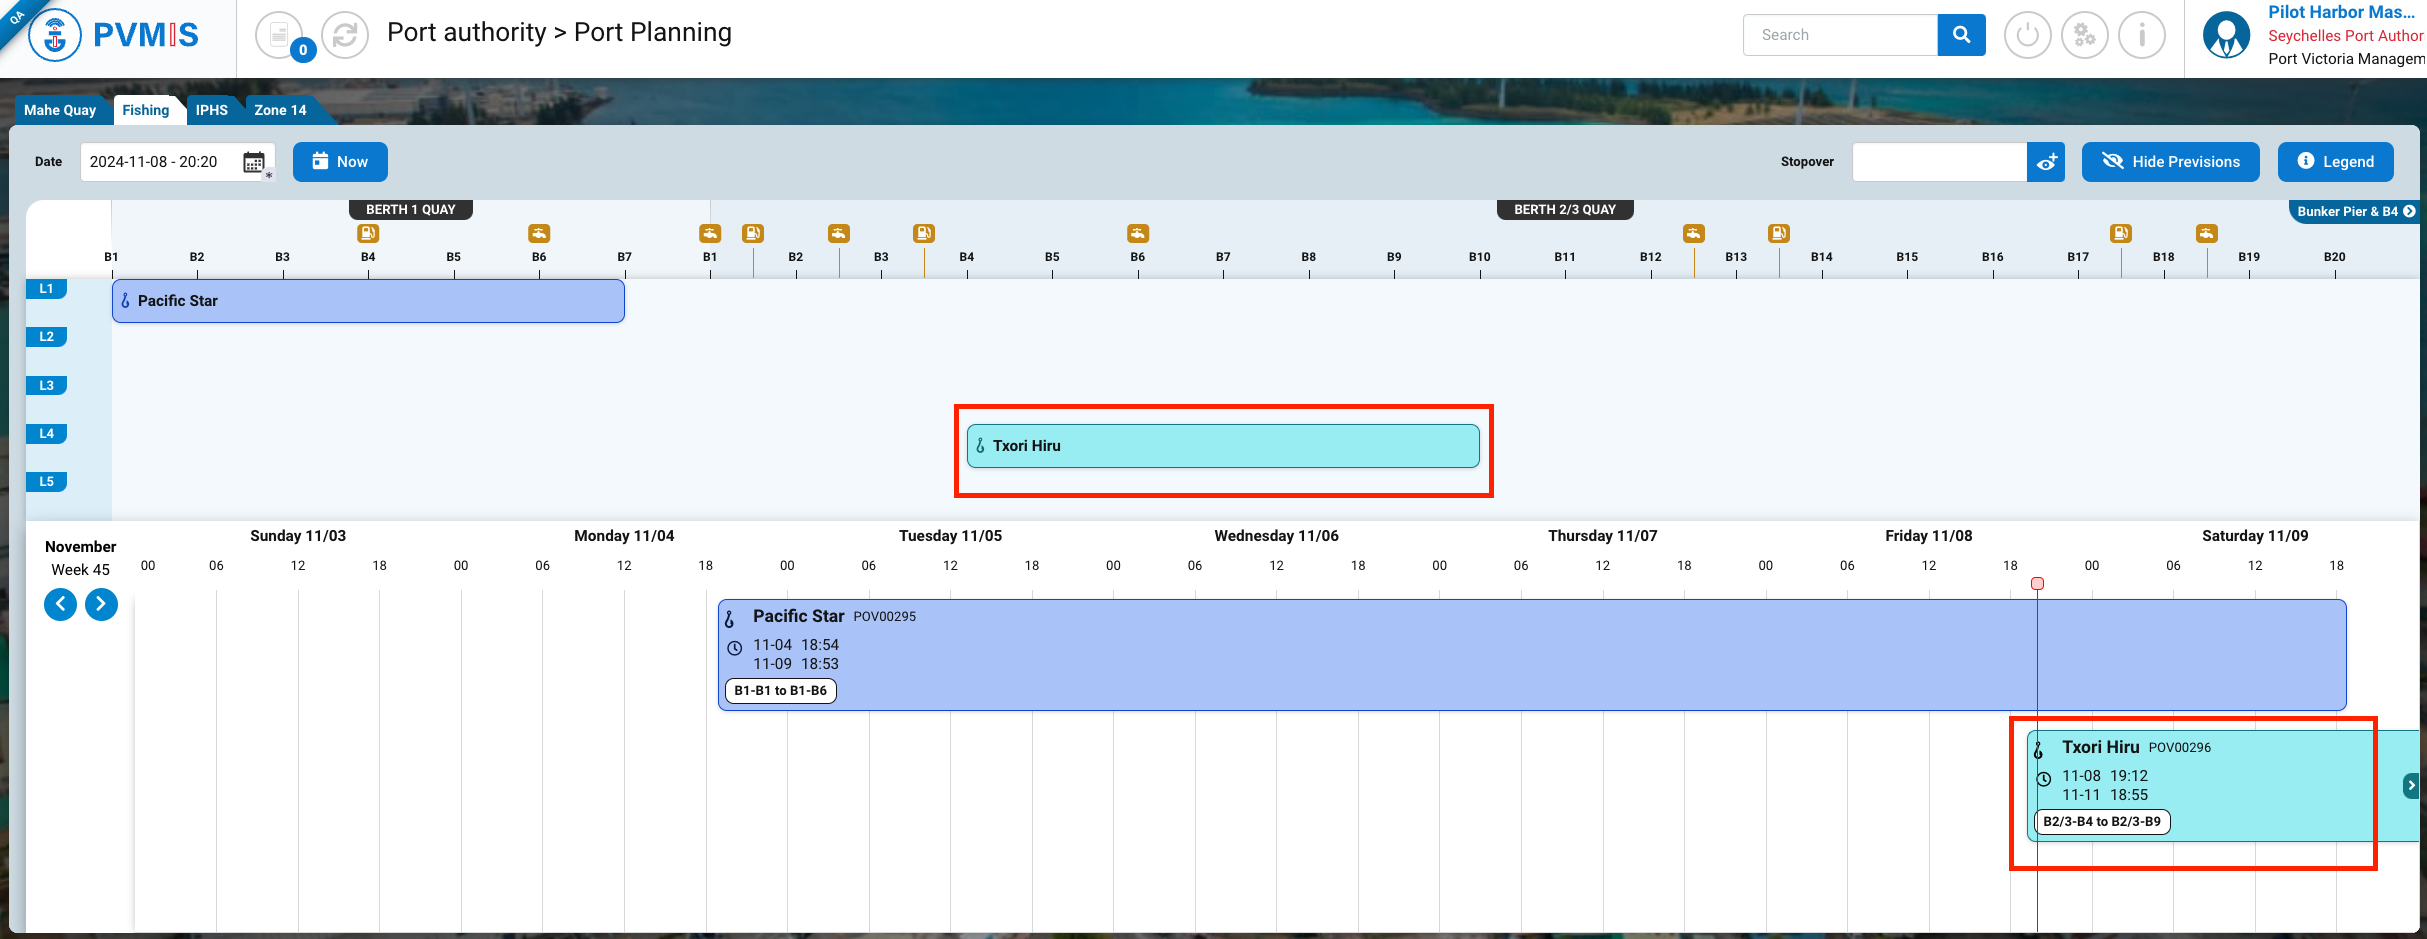
After the confirmation of the arrival, on the port planning, by entering the date and time of the vessel's arrival in the Date search field, the hatching on the corresponding stopover block in the port plan and agenda sections is no longer displayed, indicating that the stopover is stationed at this position and has arrived.
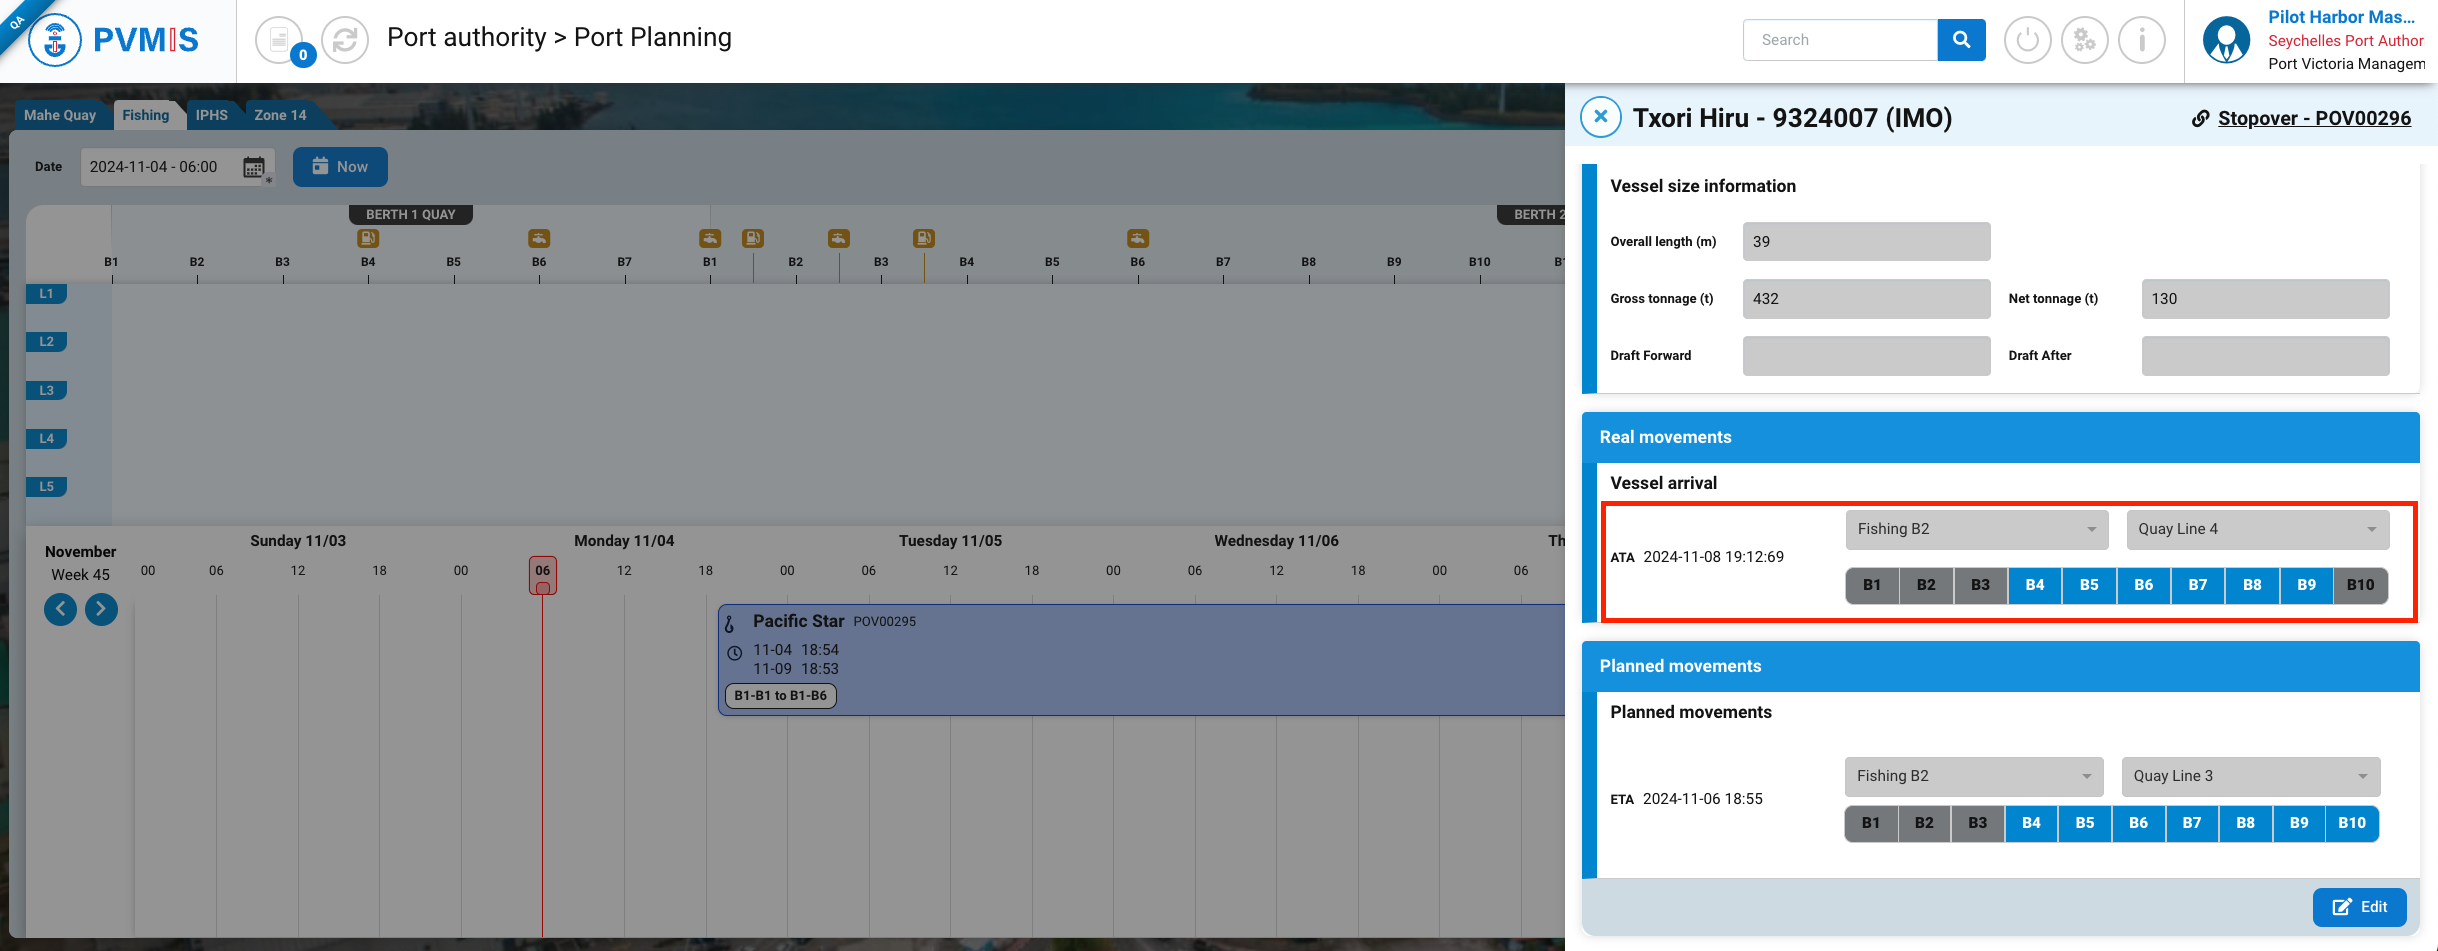
If you view the stopover information by clicking on the associated block, you will see in the popup that the Real Movement section has been updated with an actual movement for the Actual Time of Arrival (ATA) and the position specified during the arrival declaration.
⚠️ Note that it is important to check and select the date and time at which you wish to view port occupancy. You can do this either by entering it in the Date search field or by clicking on the times in the agenda section. Referring to the agenda, if your red timeline does not overlap any stopover blocks, it is normal not to see any stopovers in the port plan section, as this means there is no occupancy during this time slot.
Plan vessel movements
Once your stopover has arrived, you also have the option to plan ship movements before its departure, for example, if the vessel needs to move to another location to make room for another vessel or to refuel.
Simply click on the stopover block in question to display its details popup, and in the Planned Movements section, click the Edit button.
Click on +Add button:

A new planned movement line appears; enter an ETA for the scheduled vessel movement and select a quay.
You can specify a quay or port different from the current position (Mahe quay, Fishing port - Bunker Pier..) , click on the bollards to which you wish to attach your vessel, and then click on Validate Planned Movements button.
When viewing the port planning on the ETA date specified in the planned movement, the user will be able to see that the stopover is scheduled at this location (in the port plan section) on that date (in the agenda section).
To carry out the actual movement, the pilot must go to the stopover details screen in the the Movements status modal. Refert to : Stopover Movements