|
Actors |
Gate Operator |
|---|---|
|
Description |
As a gate operator, you are responsible for declaring the handled goods/units entering and exiting the terminal. When a transport exits the terminal, the gate operator is responsible for indicating the departure of the carrier for a Empty release order (EXPORT) transport order type and for recording the number of equipment that have left the terminal. |
Declare the departure of a carrier
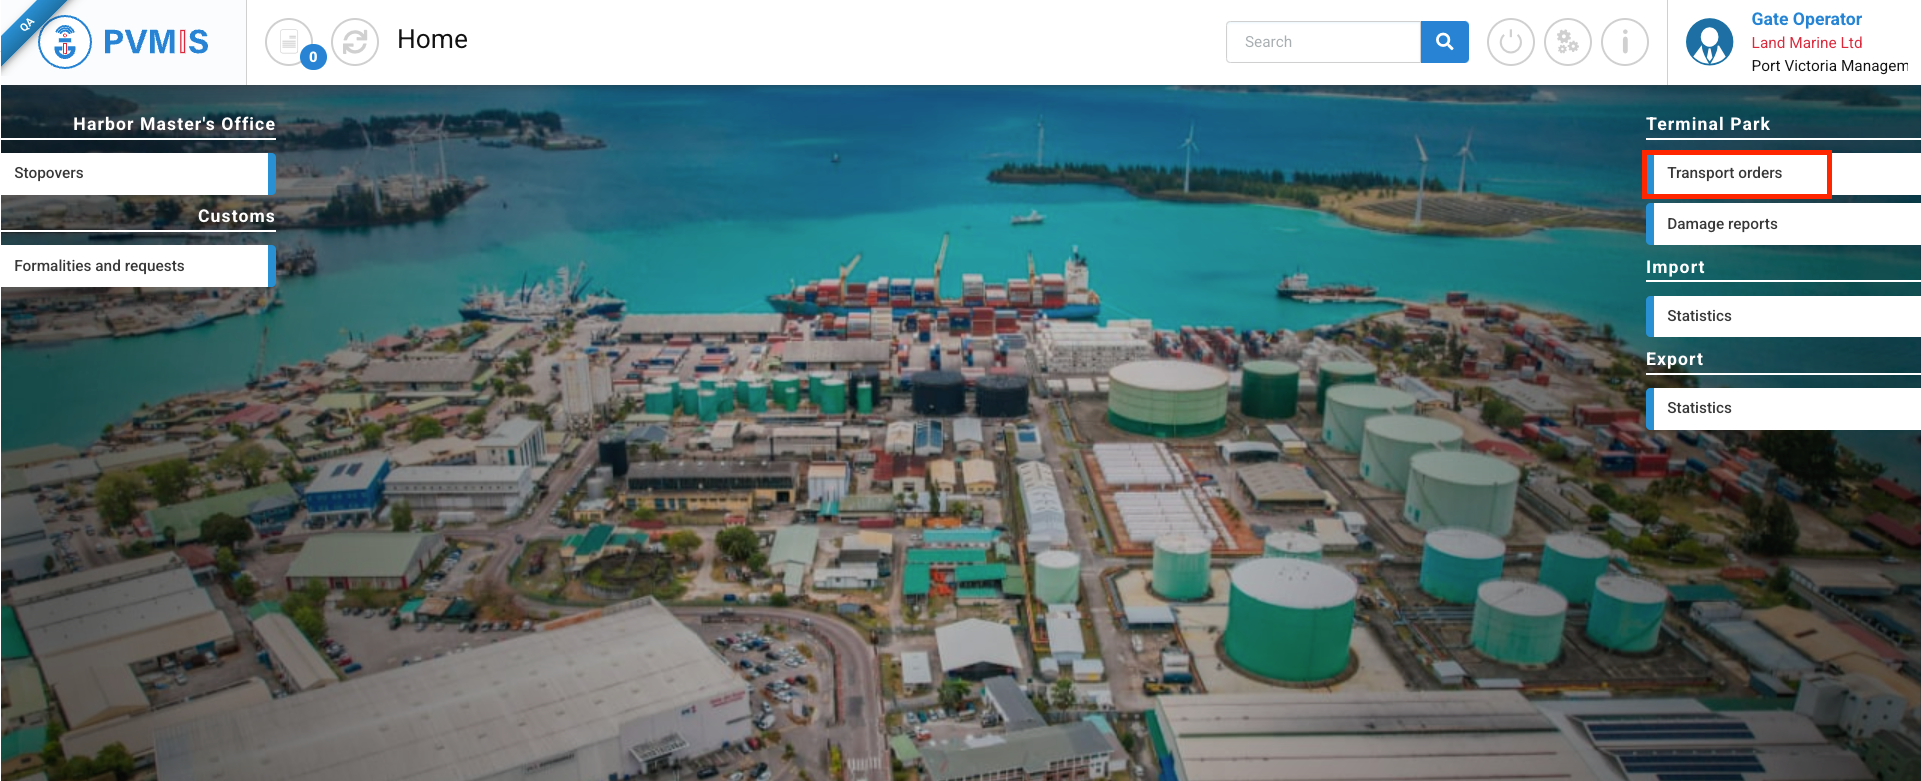
Connected as a Gate operator, click on Transport orders menu in Terminal Park section.
The user is redirected to the transport order list screen. The screen displays only the list of all transport orders.
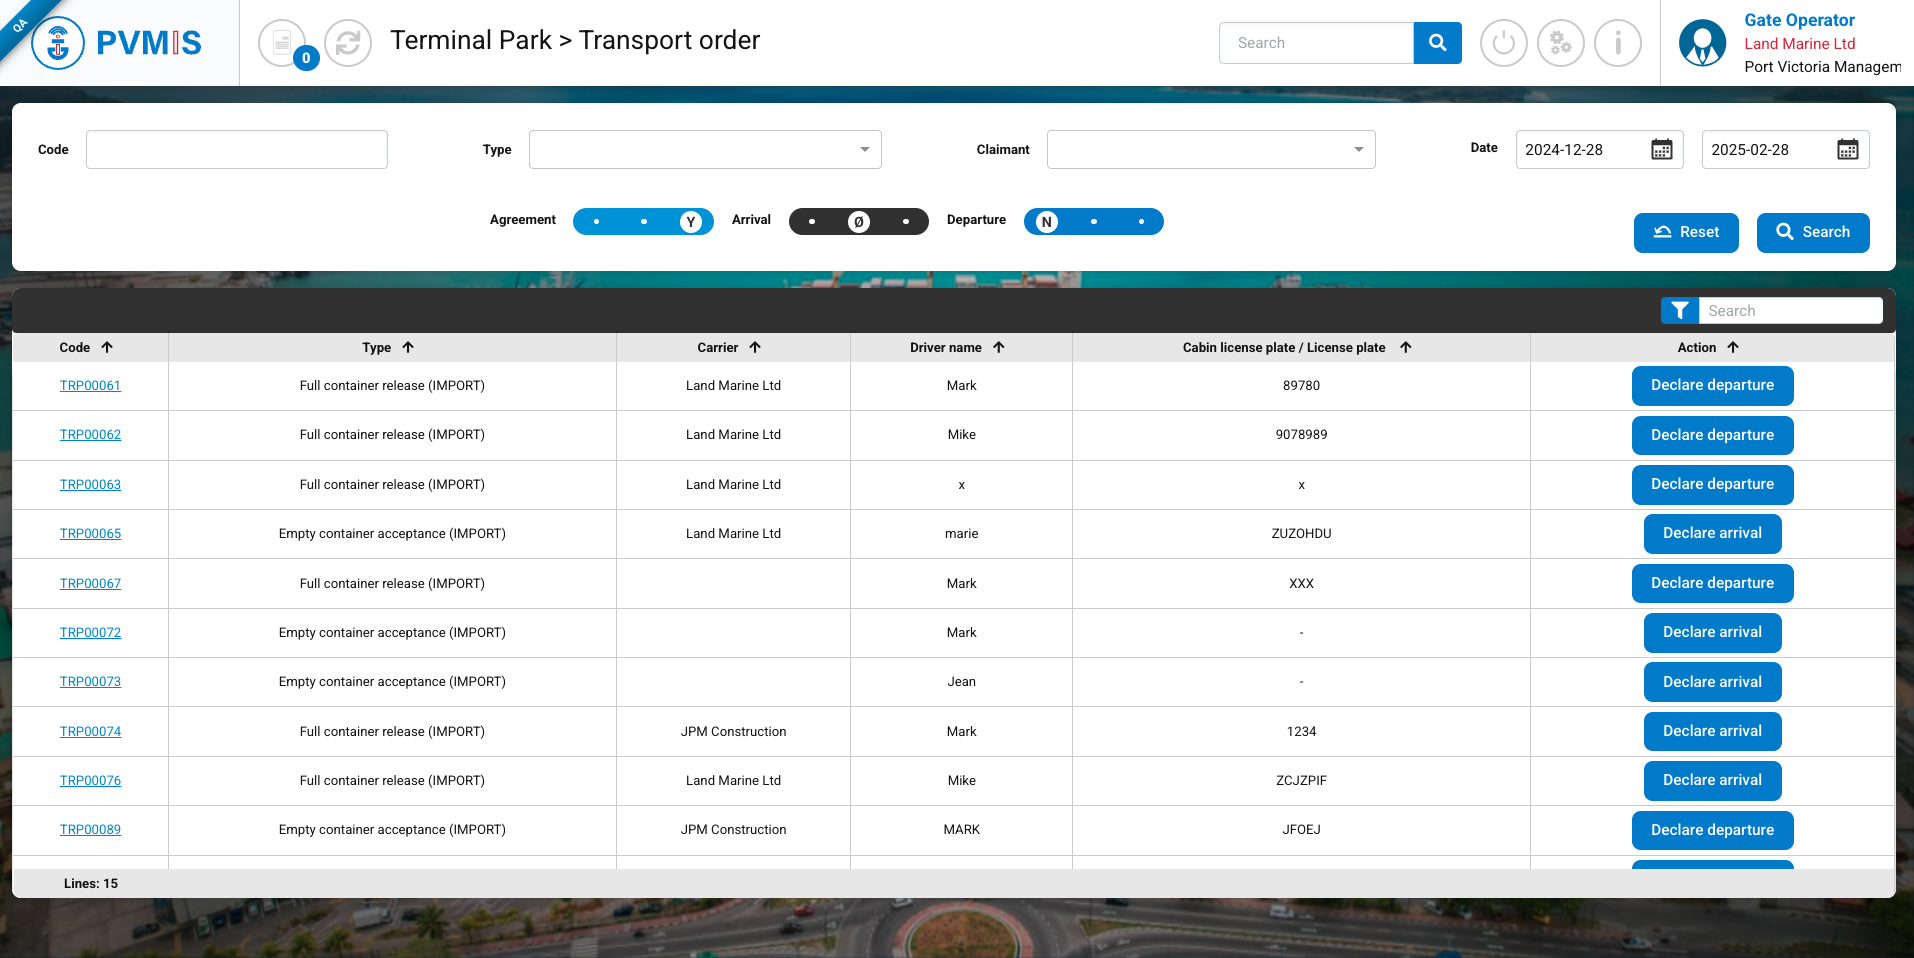
In the header, it’s possible to do a quick search by :
-
Code of transport order
-
Type of transport order (Empty container release (EXPORT), Full container acceptance (EXPORT), Full container release (IMPORT), Empty container acceptance (IMPORT)).
-
Date of the creation of the transport order
-
Freight forwarding company that created the transport order - Claimant : Allows filtering the list by freight forwarding company.
-
Status of the transport (Agreement ; Arrival ; Departure) and for each status select the state (No, No activated, Yes). By default, the status filters are configured to display the list of transport orders that are validated (Agreement status in YES). In order to prioritize the transport orders for which they need to declare the arrival or departure, the system should display these orders prominently at the forefront.
In the results table, the following columns are displayed:
-
Code, which corresponds to the transport order number generated by the system upon creation (when clicking the link, the user will be redirected to the transport order details screen).
-
Type of transport order
-
Carrier, which corresponds to the name of your transport company.
-
Driver name
-
Cabin license plate / License plate of the driver
-
Action : In this column, action buttons can be displayed. When logged in as a Gate opérateur :
-
If the arrival declaration has not been made for a transport order, or if the Arrival status is PARTIAL because there has already been a partial quantity of exits, the Declare Arrival button will be displayed. When this button is clicked, the user will be taken directly to the arrival declaration form.
-
Similarly, if the departure declaration has not been made for a transport order, or if the Departure status is PARTIAL because there has already been a partial quantity of exits, and a transporter has already re-entered the terminal to retrieve the remaining quantity, the Declare Departure button will be displayed. When this button is clicked, the user will be taken directly to the departure declaration form.
-
You can also access these forms from the transport order details screen. From the transport order list screen, simply click on the link of a transport order in the "Code" column.
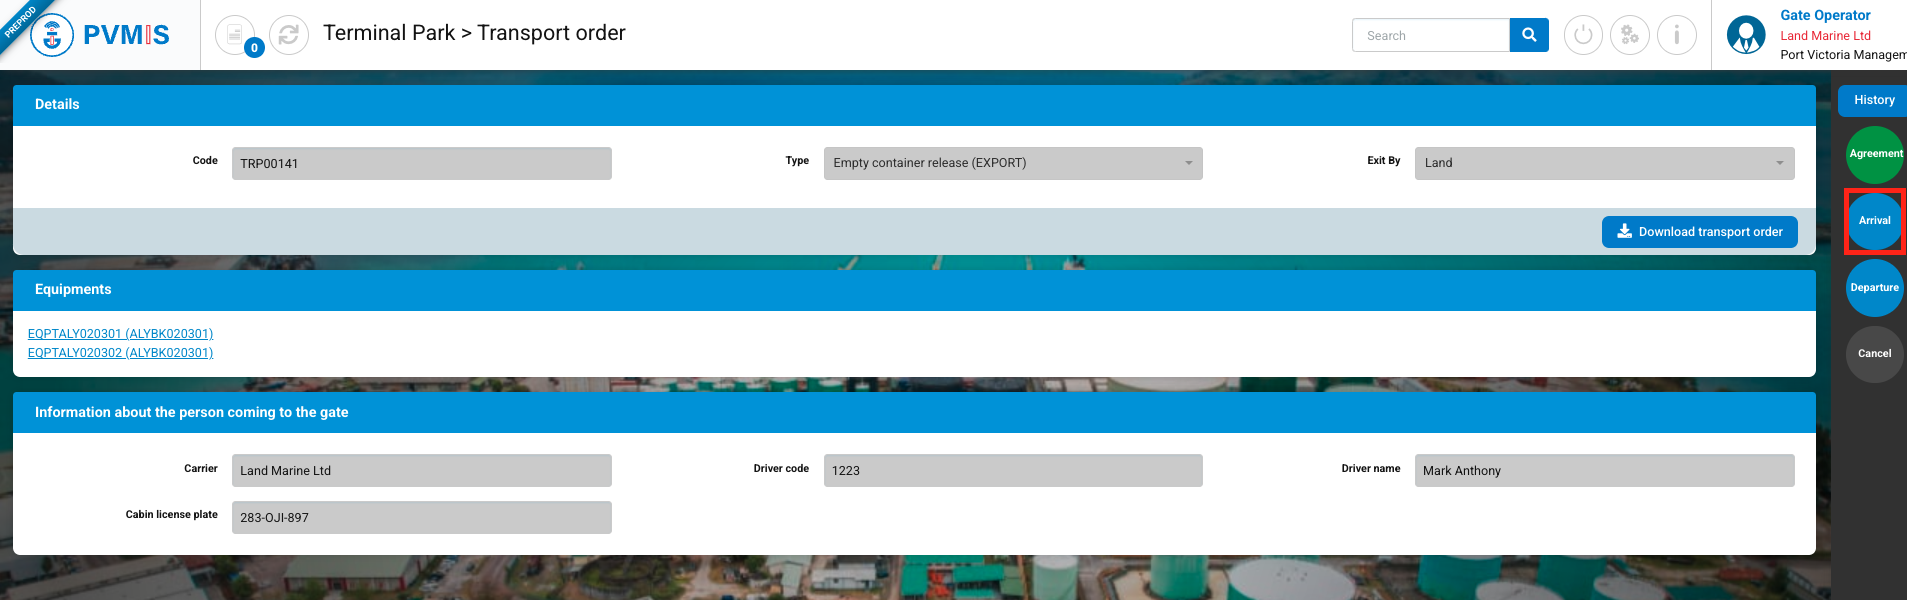
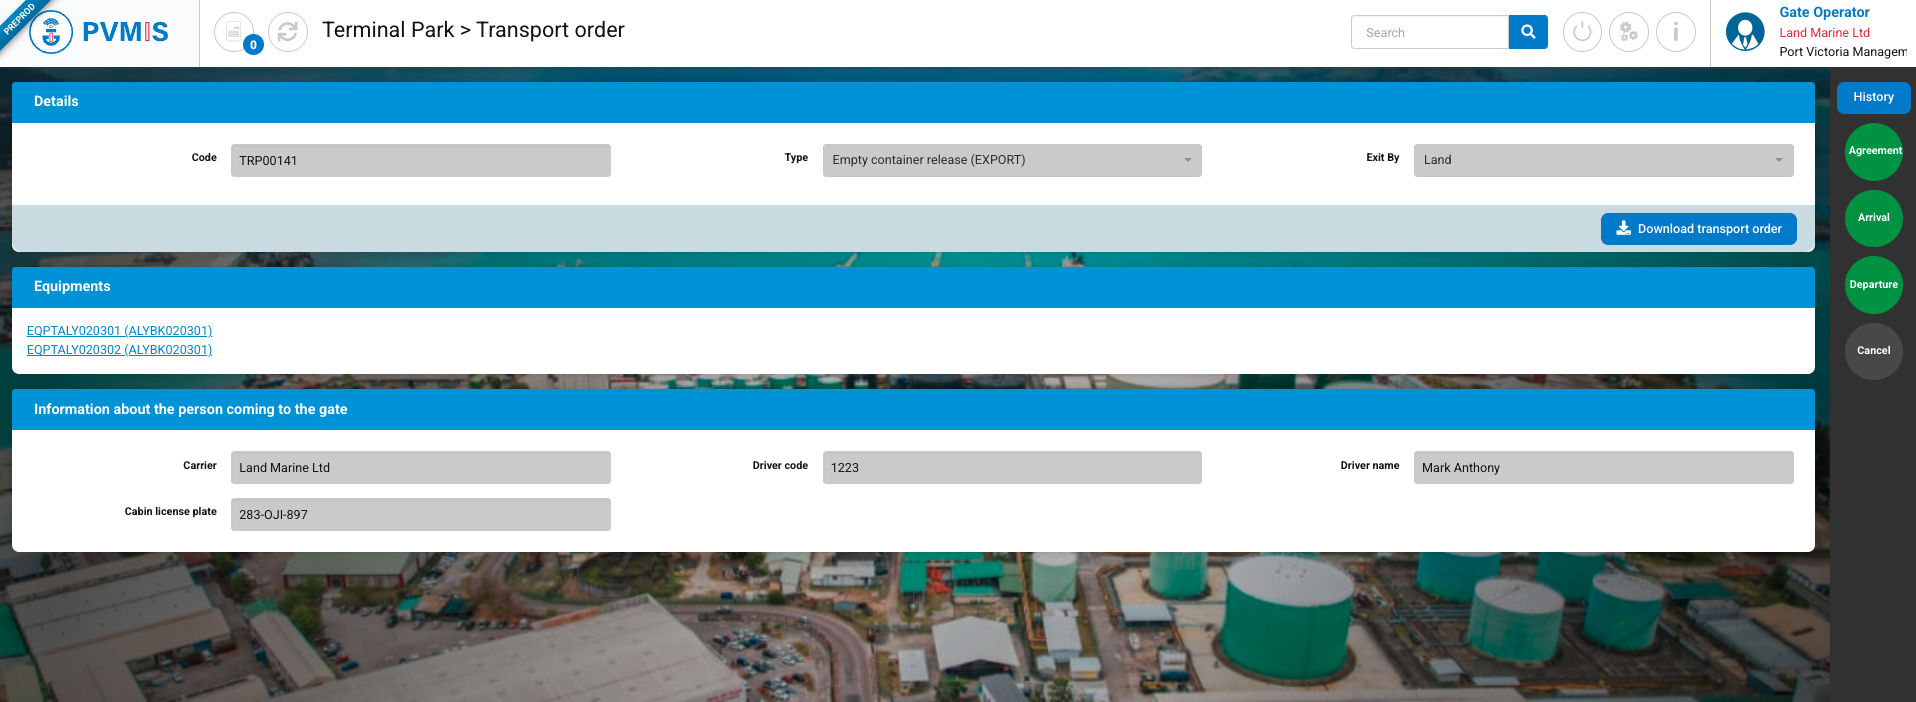
On the transport order details screen, you can view the information and download the mission order by clicking the Download transport order button.
To declare the departure of the carrier, click on the Departure status.
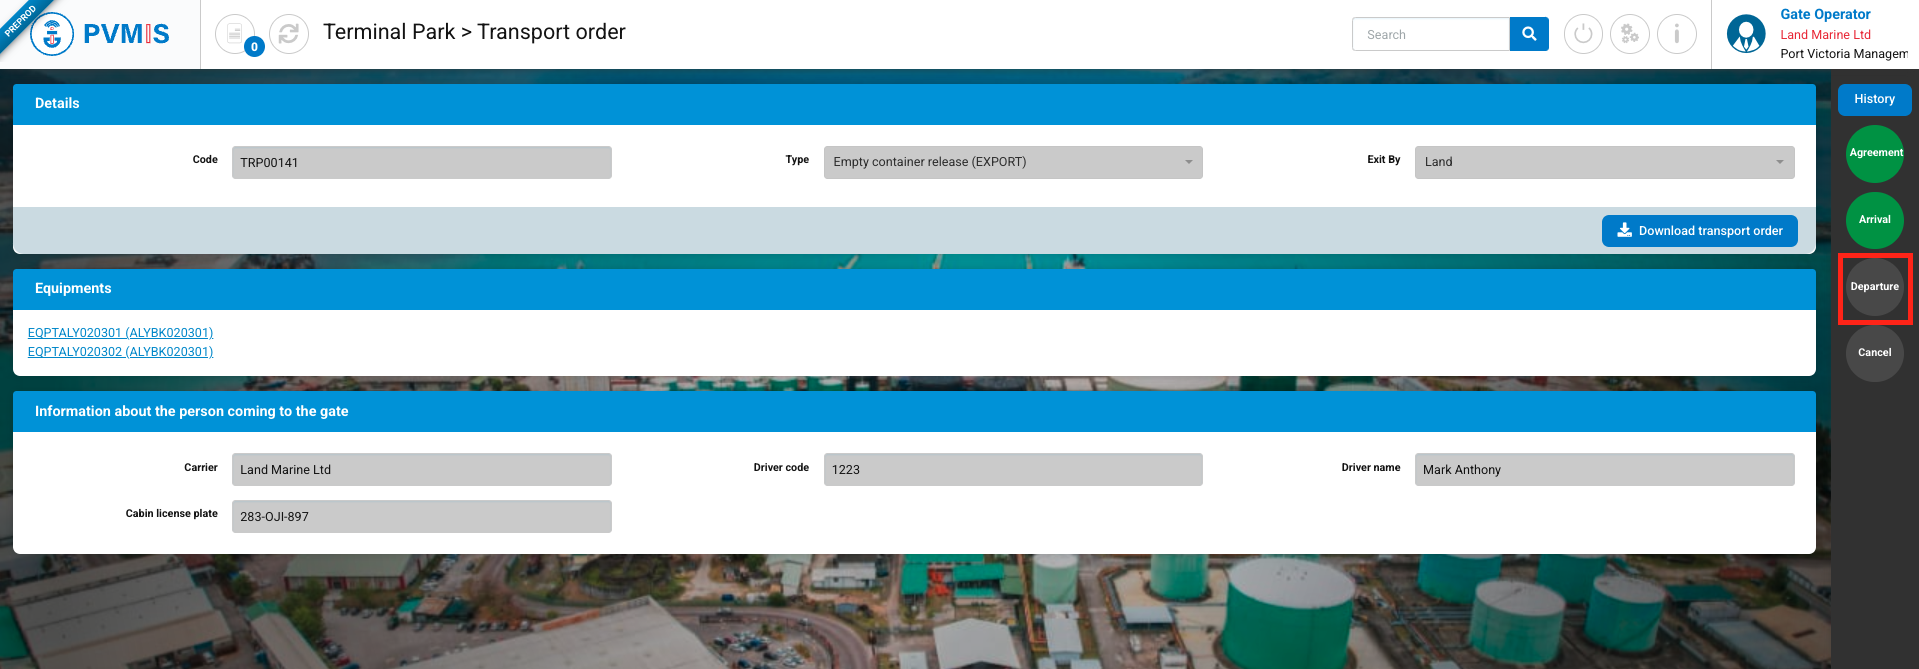
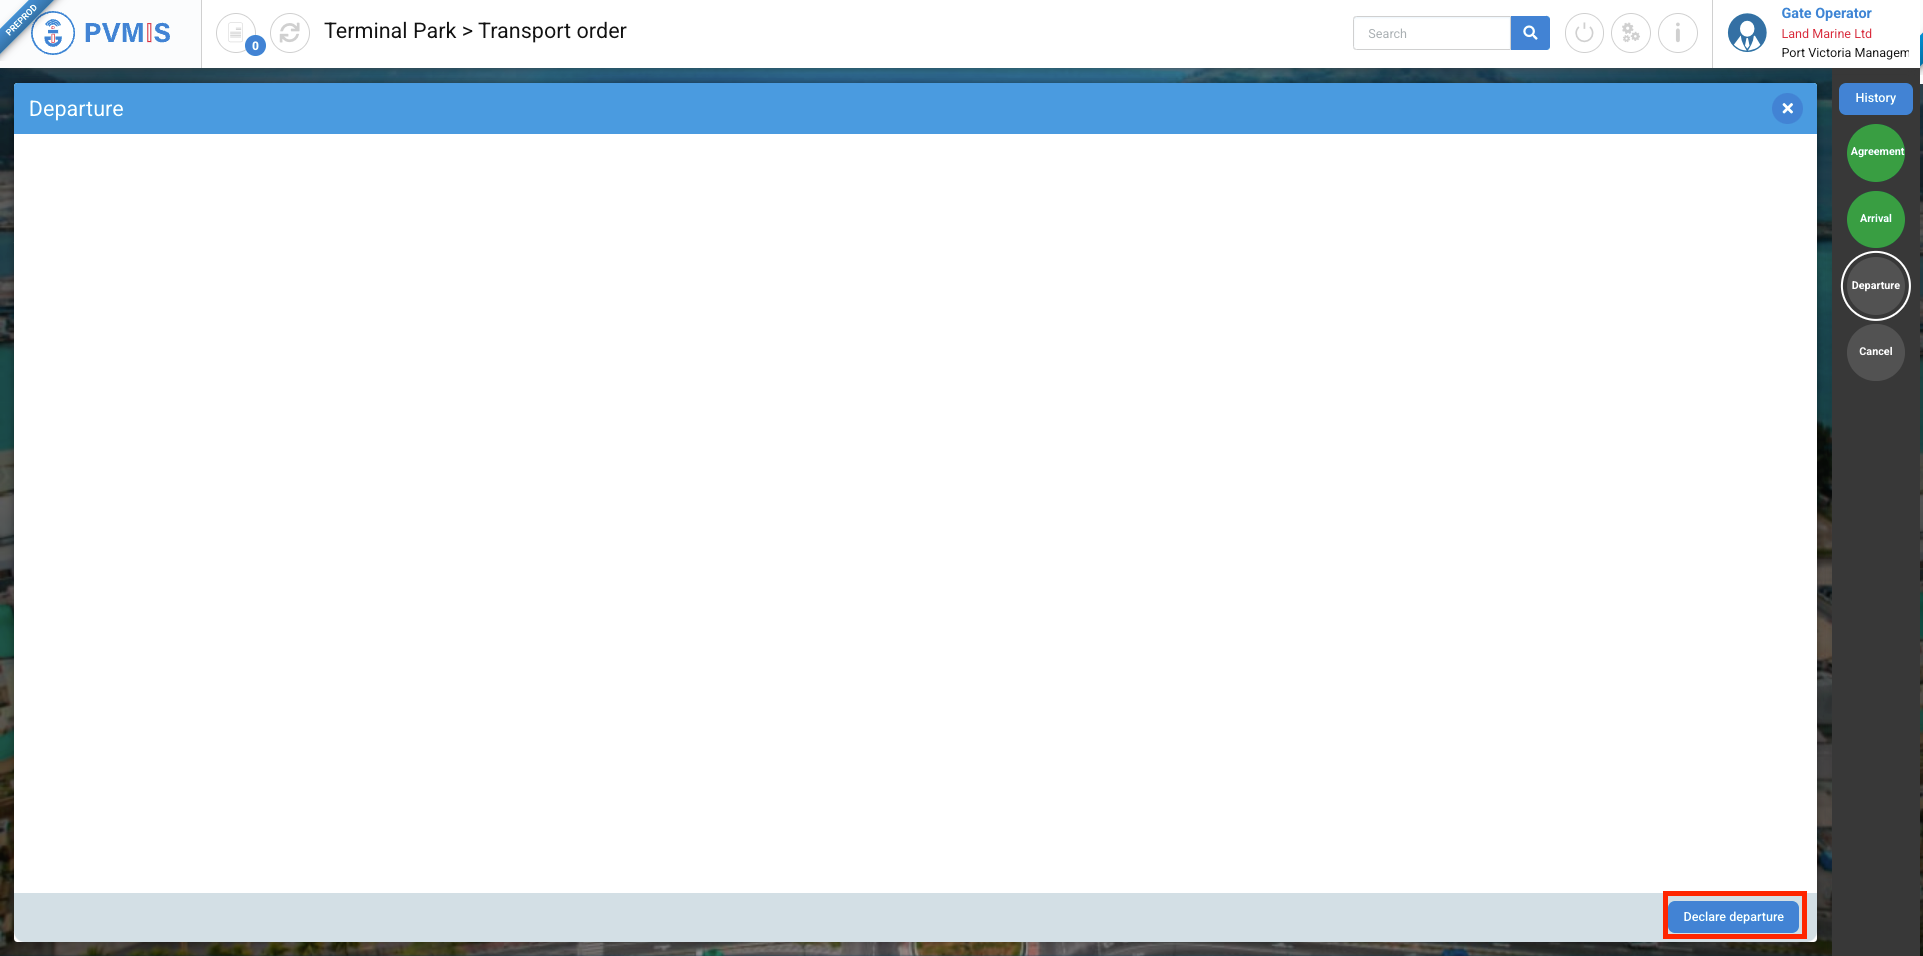
Click on Declare departure button:
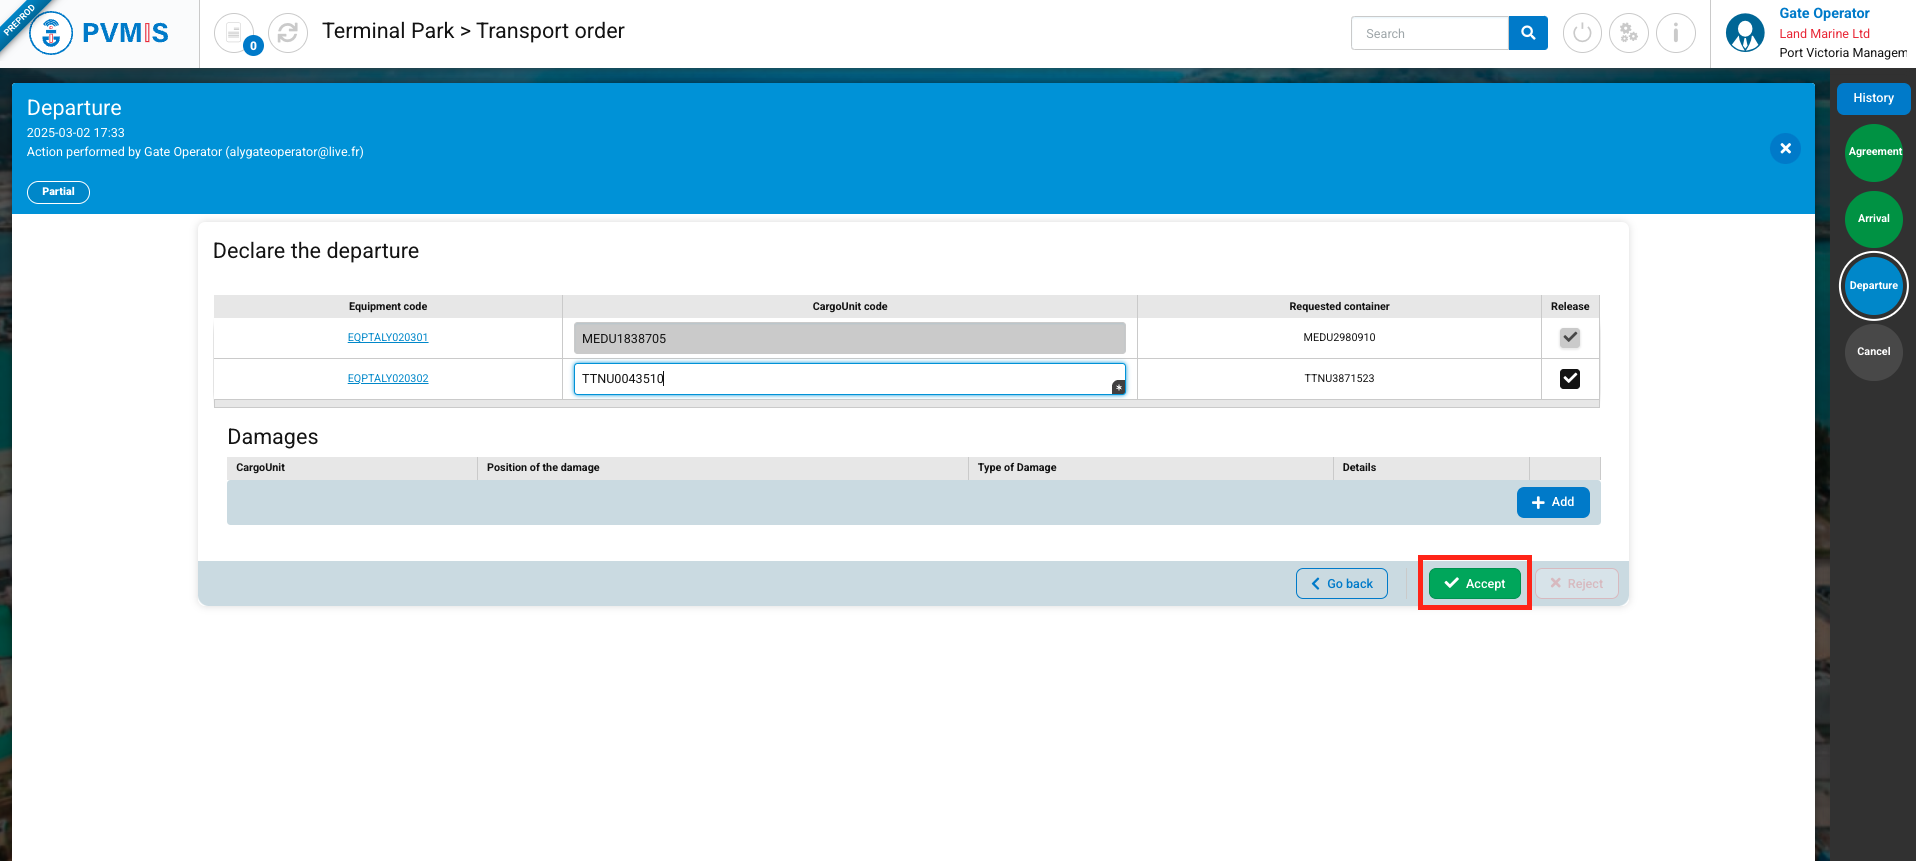
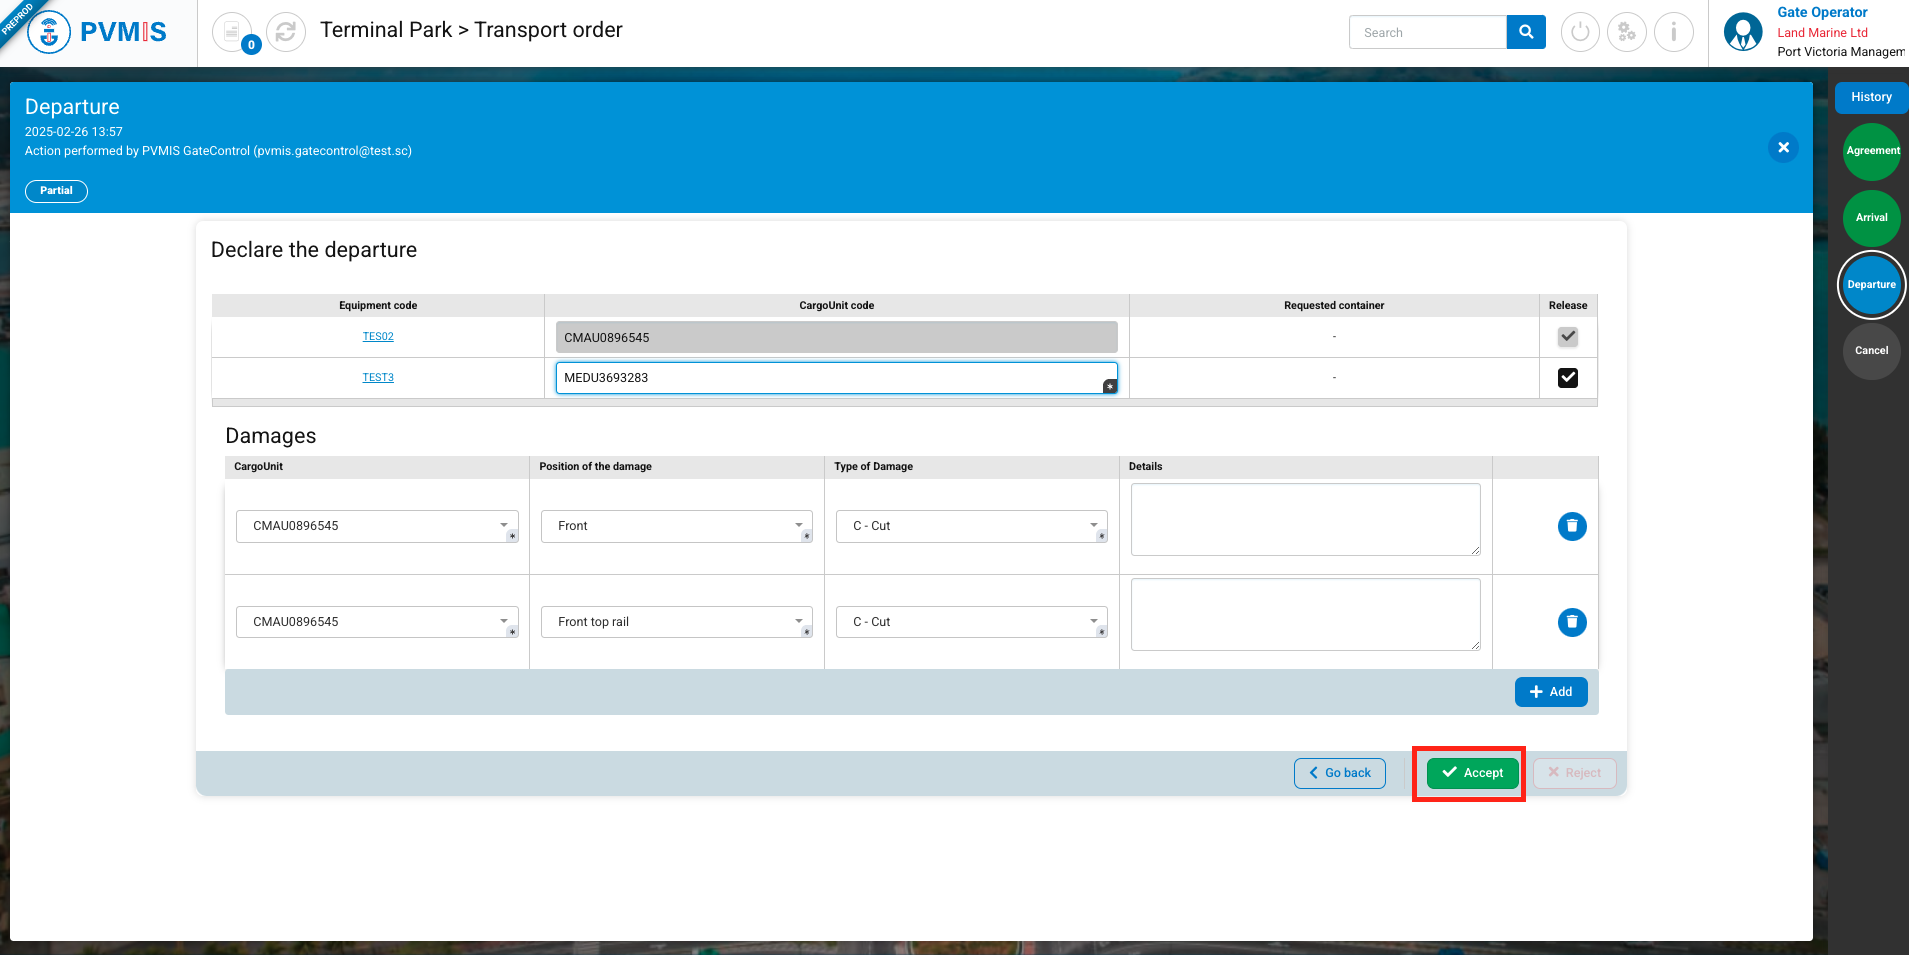
On the Departure Declaration form, the list of all Cargo Units included in the transport order is displayed. For each equipment, the following details are provided:
-
Equipment code
-
Cargo Unit code - To enter the Cargo Unit code, the user must first check the empty equipment that is about to be released.
-
Requested container - This information was provided by the shipping agent when creating the booking, and it is possible that it may not be filled in. This information aims to facilitate communication between the Gate Operator and the handler.
-
Release Selection of the empty equipment ready to be released.
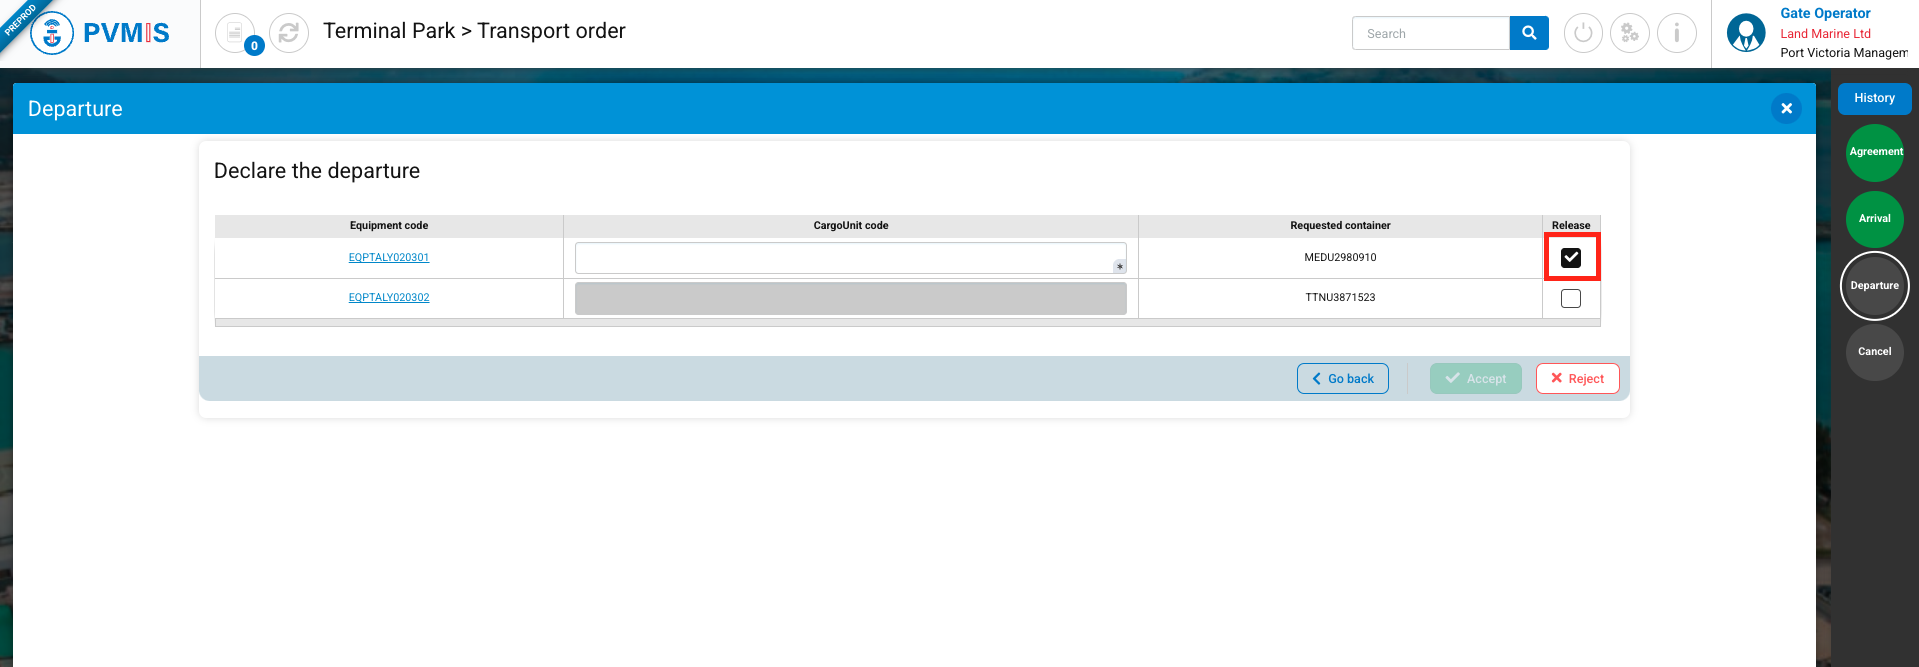
Enter the Cargo Unit code(s) of the container type for the selected equipment to be released, then click on the Accept button:
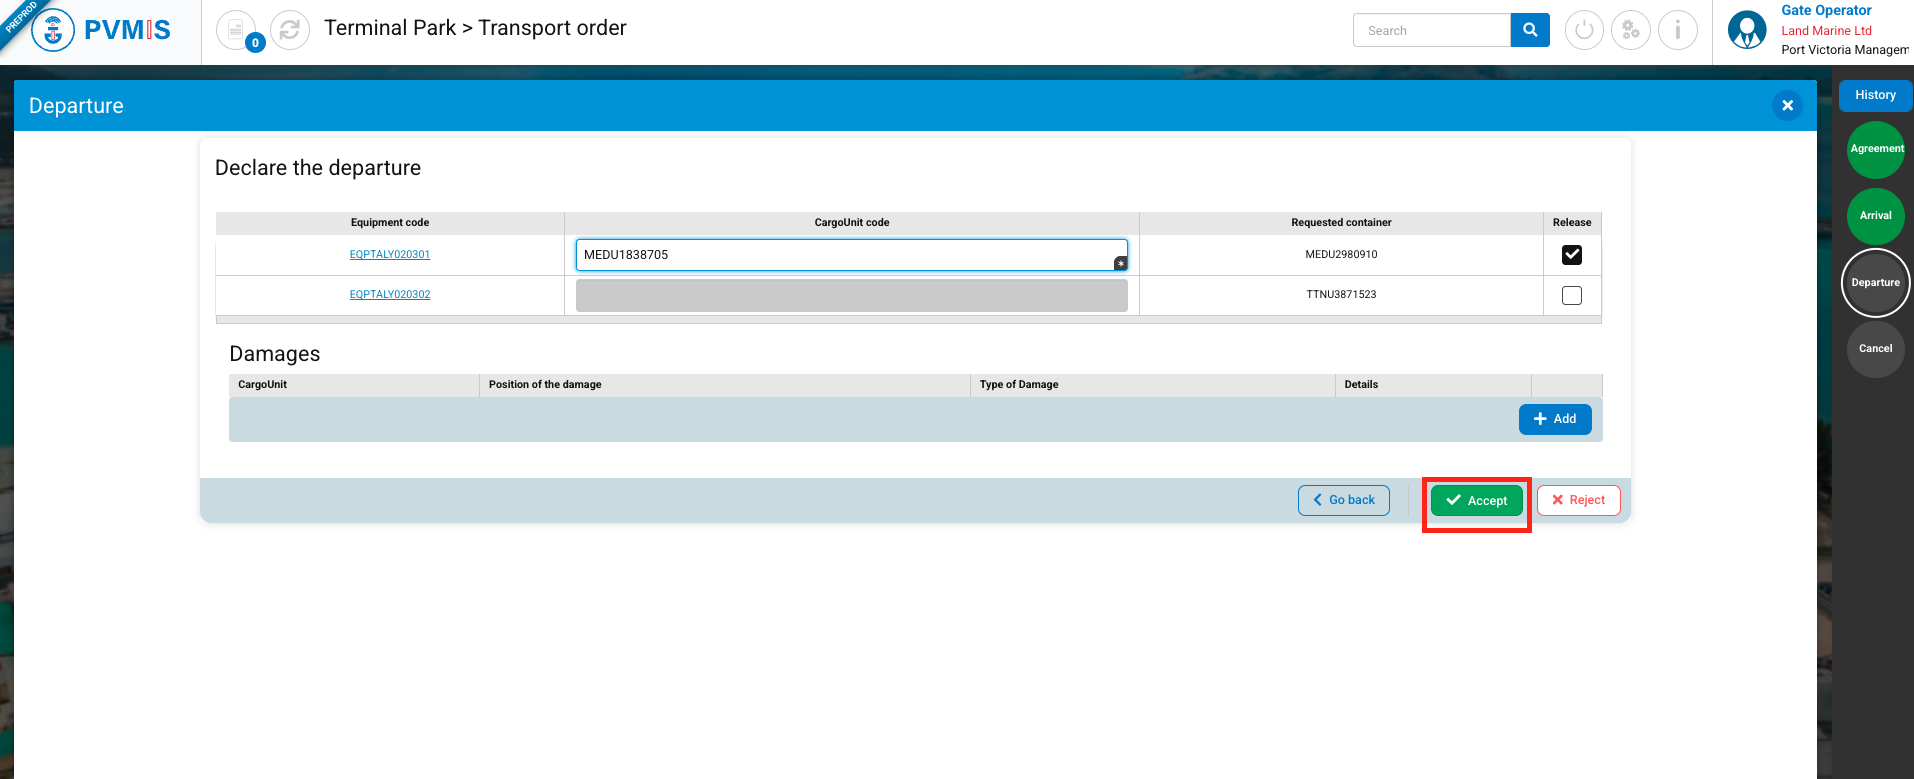
You can select the equipment to be released, and after declaring the departure, you will need to wait for the transporter's next trip to collect the remaining equipment and declare its arrival. Alternatively, you can release all the equipment by selecting all items.
For this documentation, we will illustrate the case of a partial release
The user is redirected to the transport order detail screen. The Arrival and Departure status are in the "PARTIAL" state, which means that the total equipments for the transport order has not left the terminal, and the carrier will return to collect the remaining items.
Therefore, as a Gate Operator, when the carrier must present themselves at the gate with the same transport order, you will need to declare the arrival.
Click on the Arrival status to declare the arrival of the carrier returning to the terminal, you will need to register the arrival in the system, ensuring that the transport order is updated to reflect the return of the remaining goods.
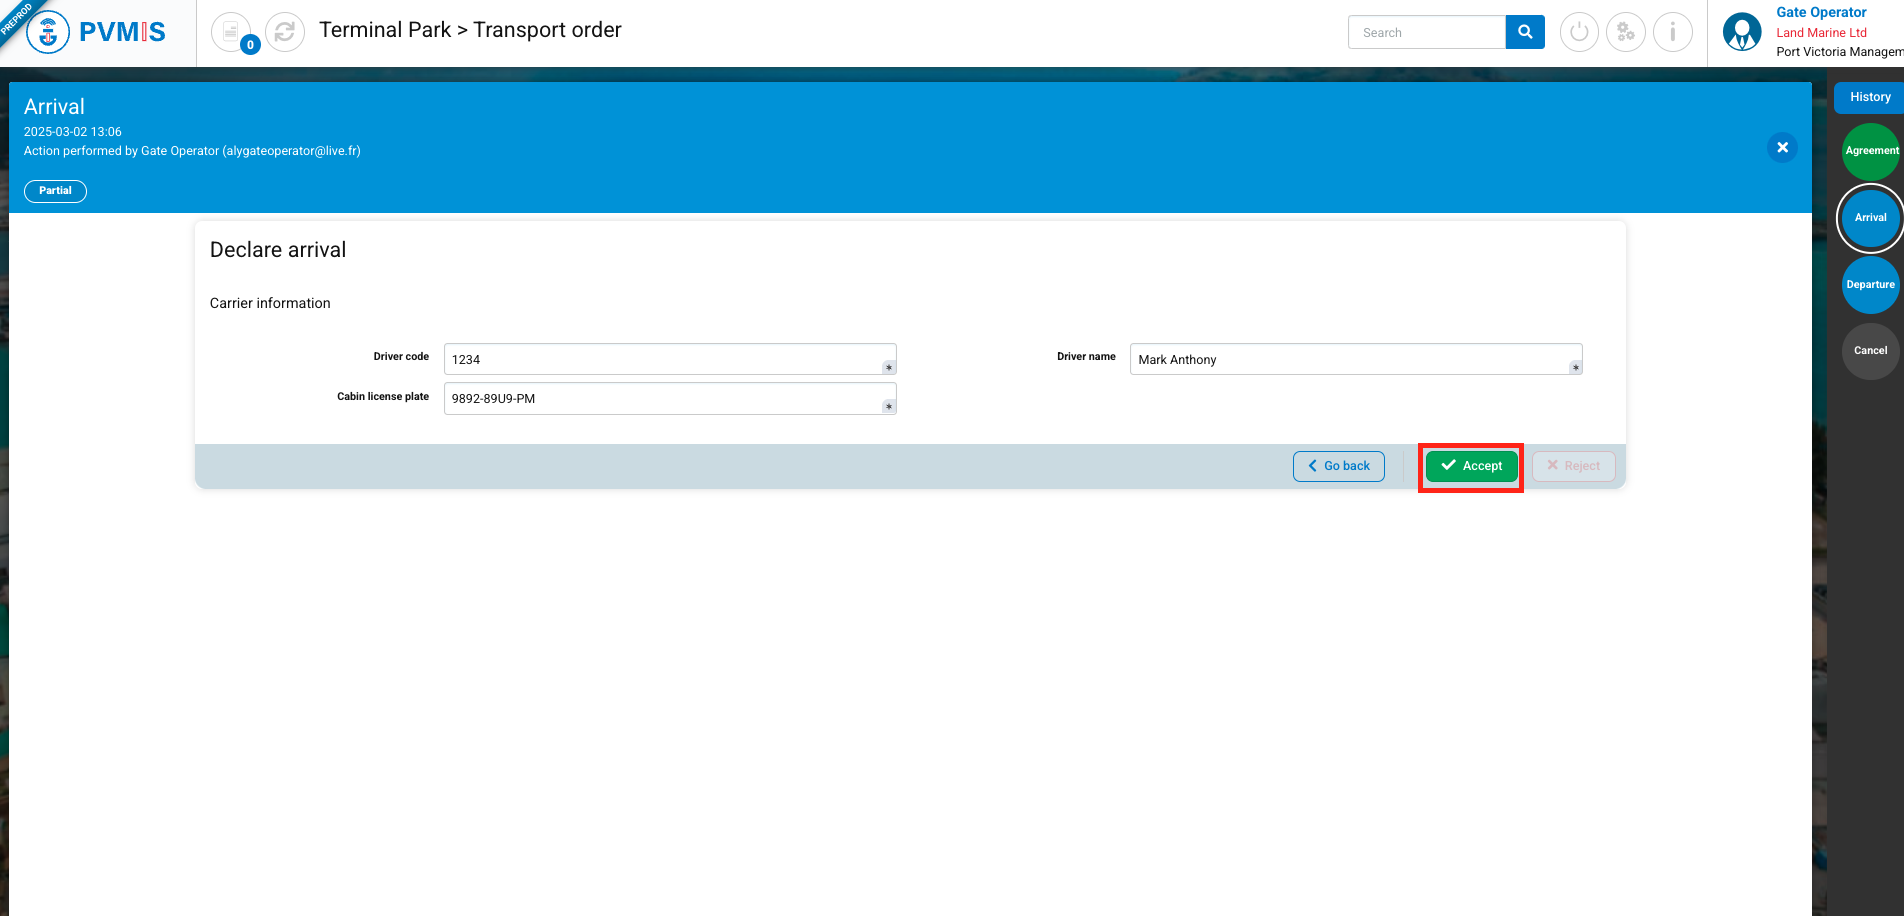
On the Arrival status detail screen, you can view the carrier's information that was recorded during their first pass. Click on Declare arrival button:
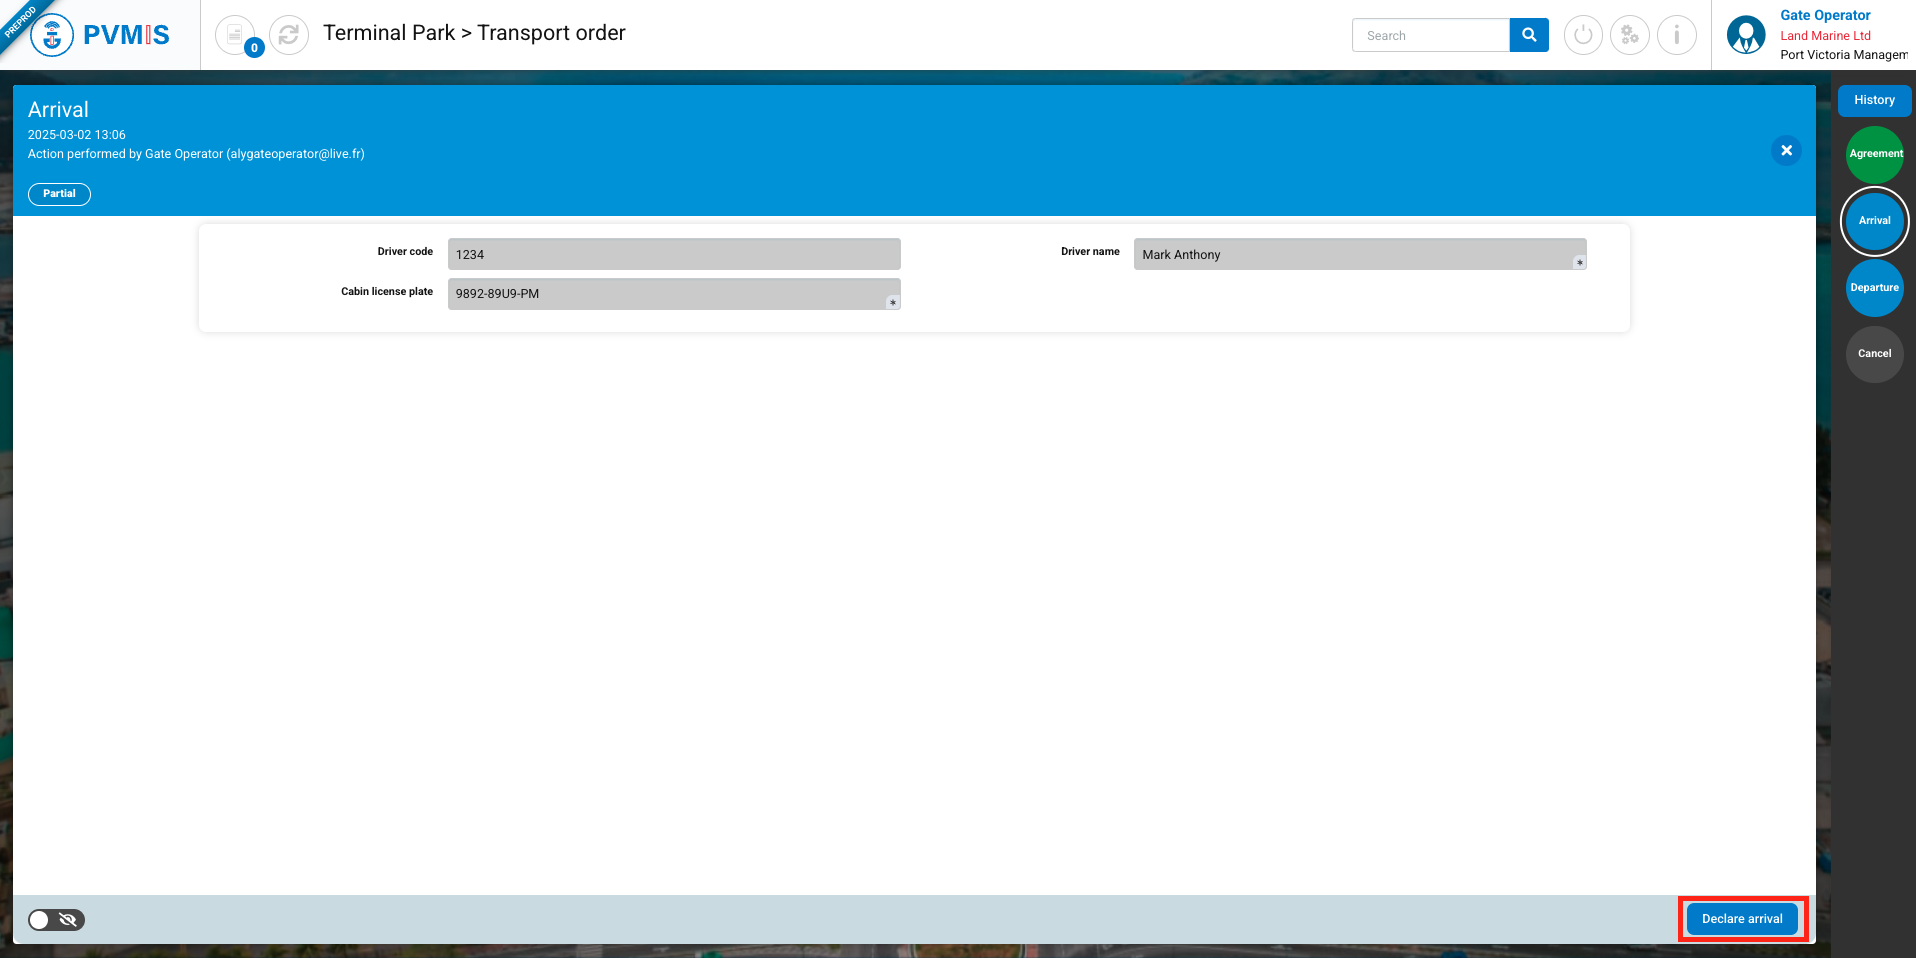
Click on Accept button:
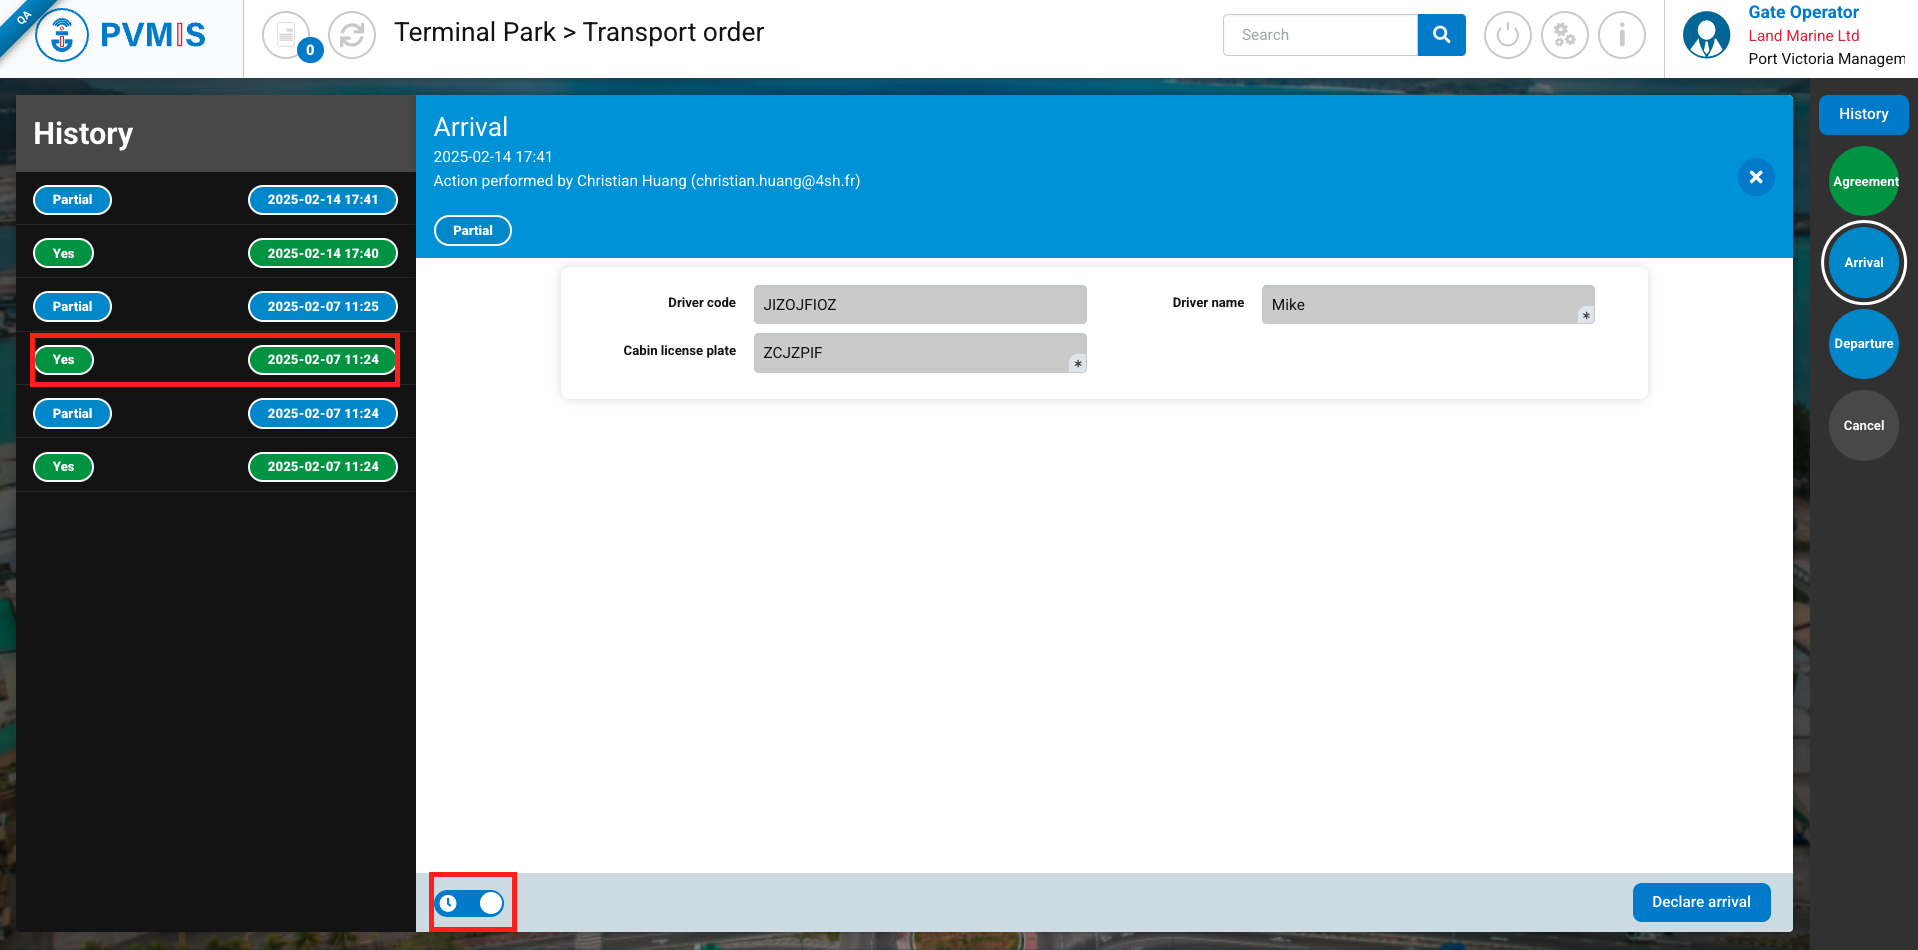
In the case where the carrier has changed and is not the same person as during the first pass, as a Gate Operator, you can modify this information (Driver code, Driver name, Cabin license plate), and it is your responsibility to validate this change. You can view the carrier history for each visit to the terminal by clicking on the toggle on the left.
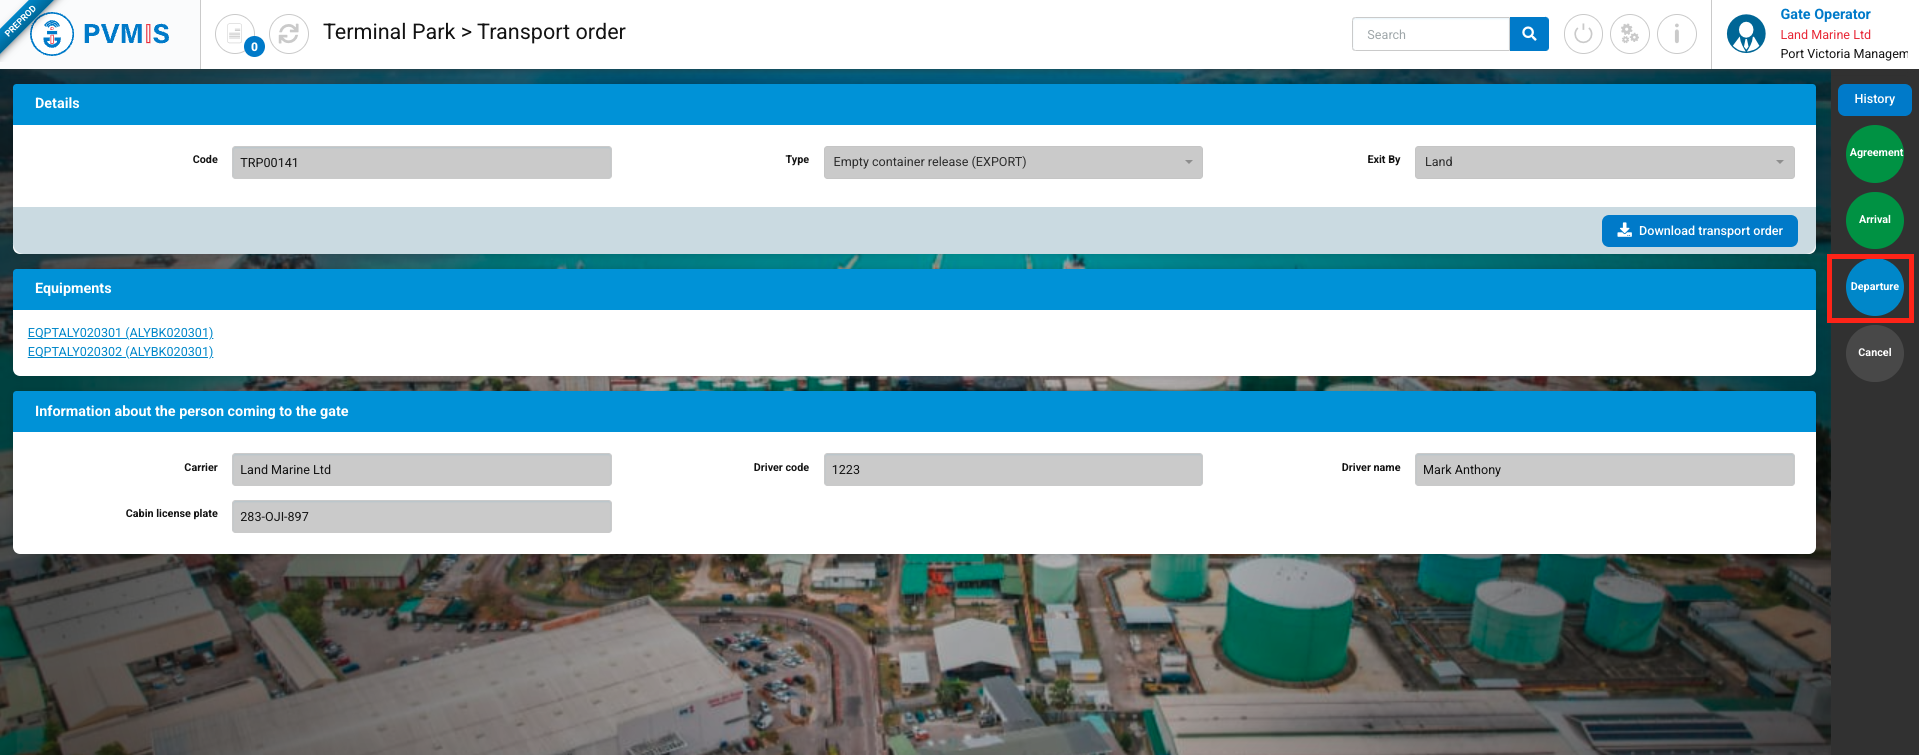
The user is redirected to the transport order detail screen, and the Arrival status is set to "YES."
Click on the Departure status:
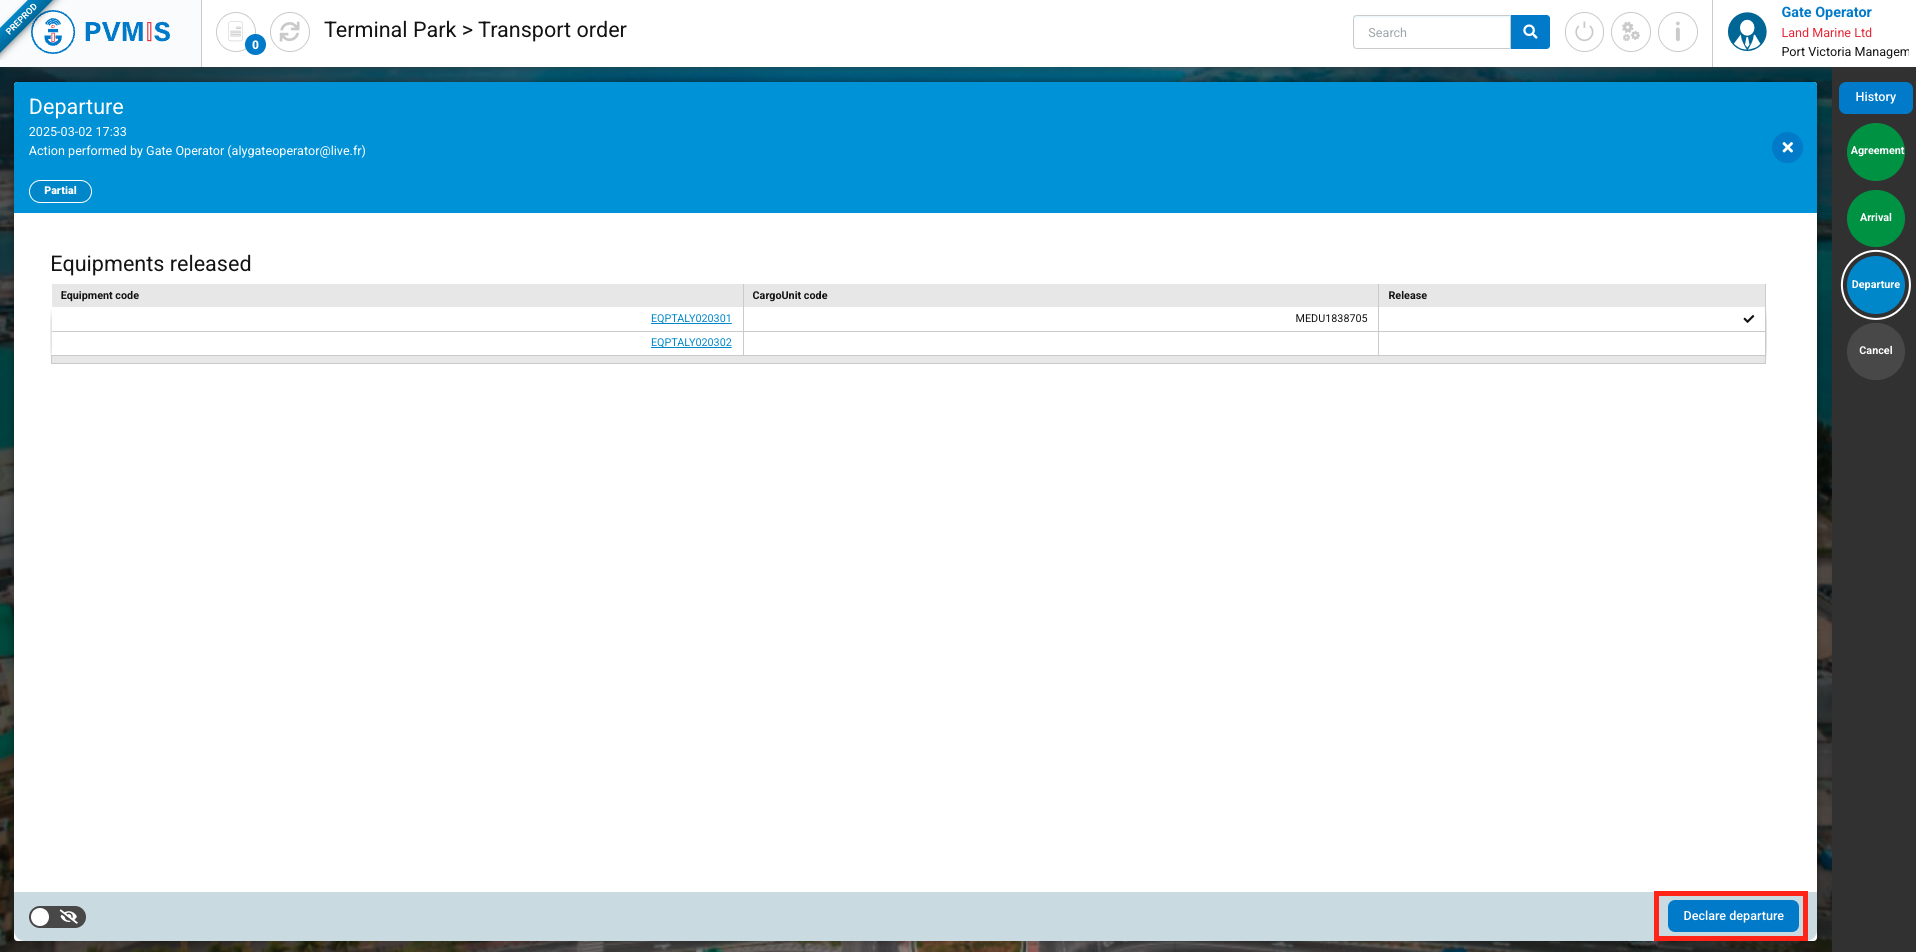
In the Departure status detail, you can see that there are still 1 equipment remaining on the terminal and an other has already delivered.
Click on the Declare departure button:
Check the equipment that is about to be released:
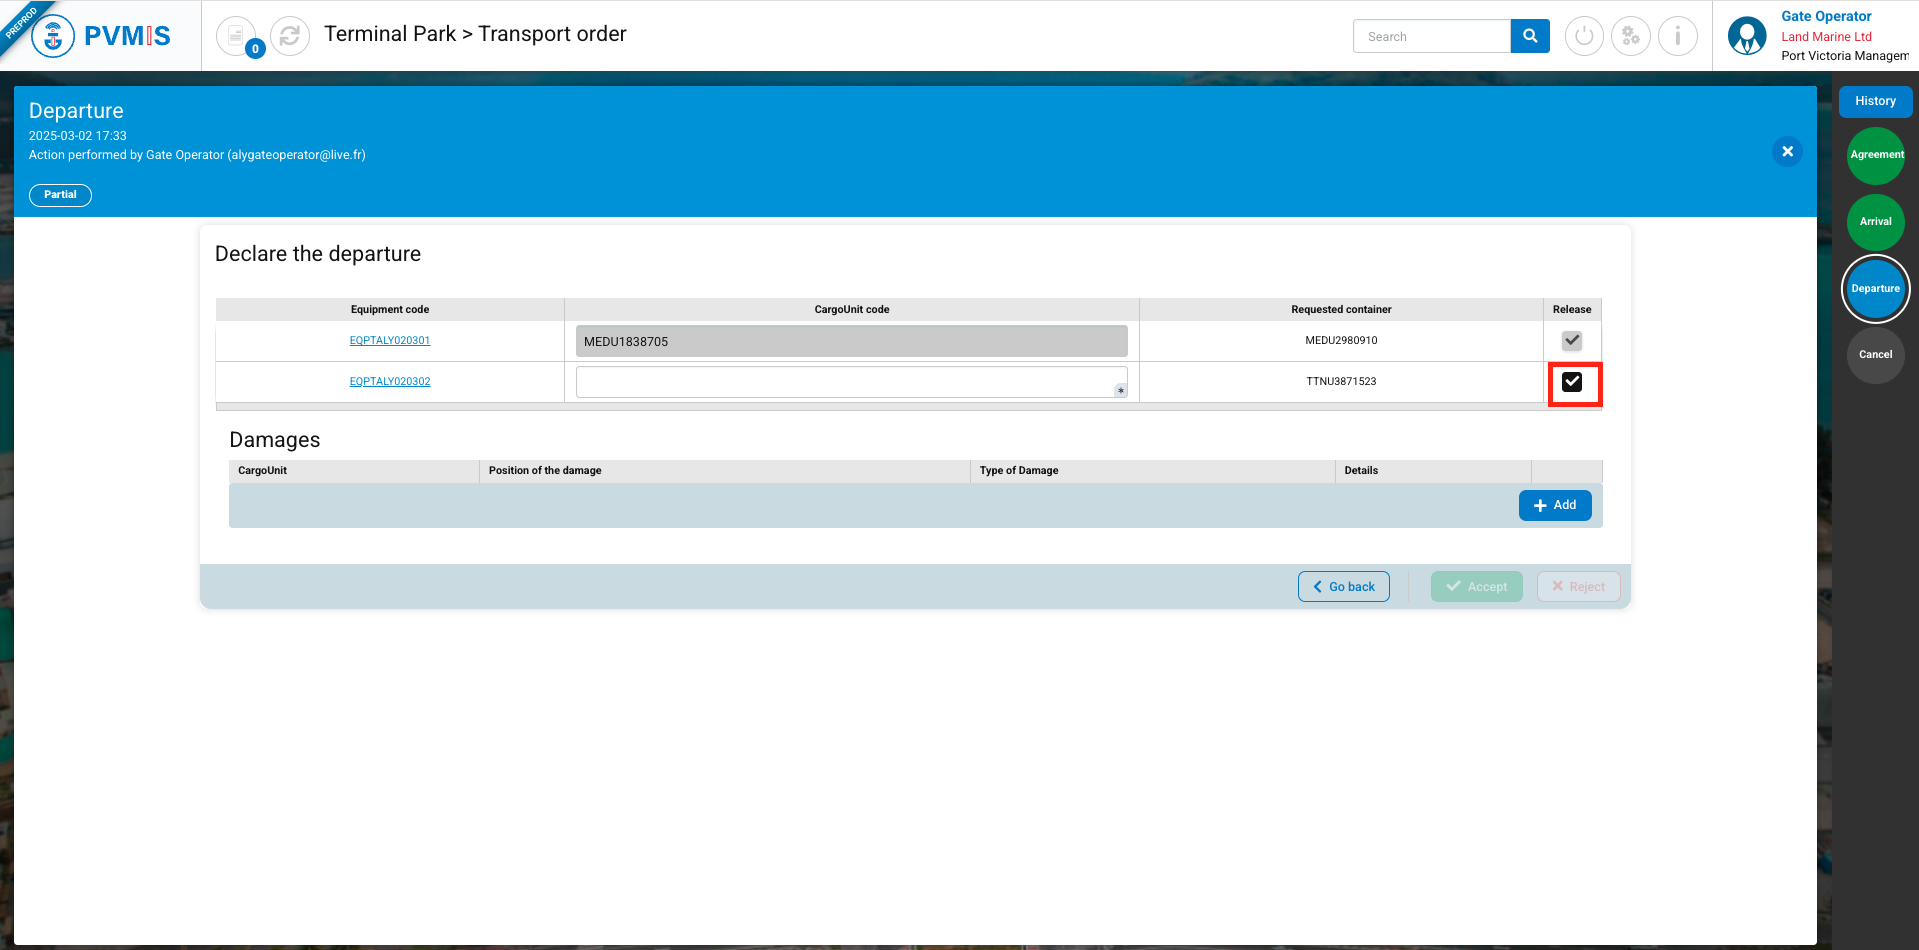
Complete the Cargo Unit code and click on the Accept button:
The Arrival and Departure status are in the "YES" state, which means that the total quantity of the transport order has exited the terminal.
Damages report
As a Gate Operator, for each departure declaration, you have the option to provide an anomaly report for a specific Cargo Unit.
On the departure form click on +Add button:
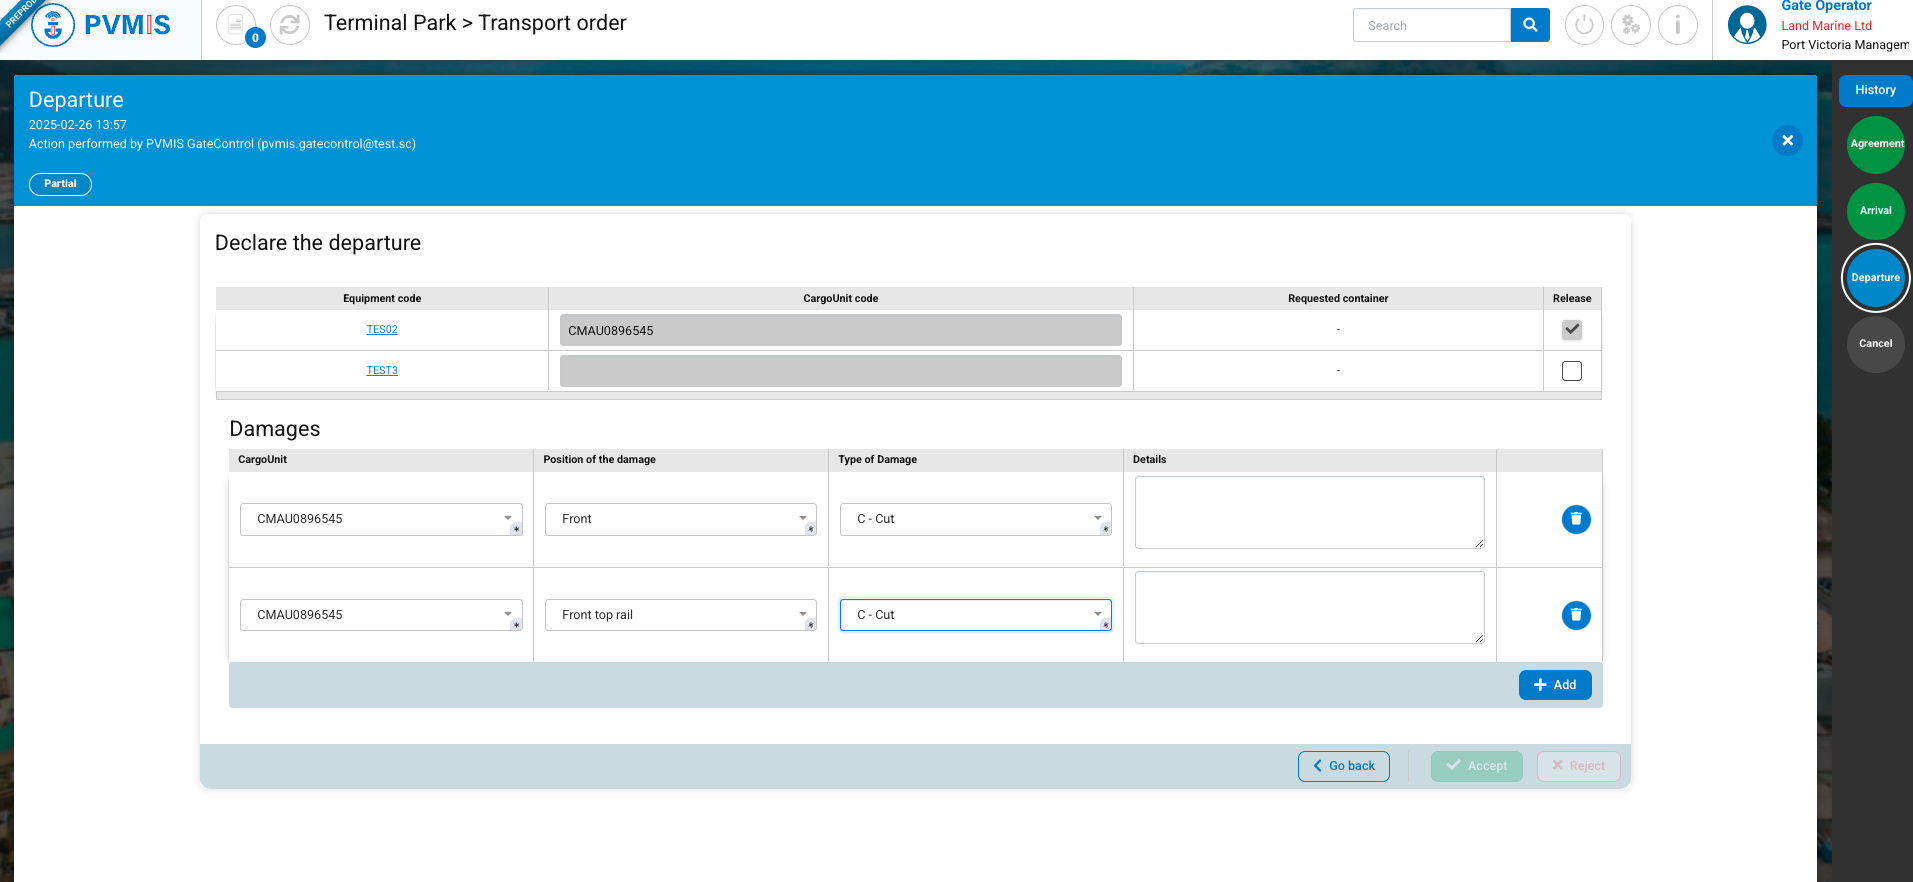
A line is generated for each anomaly, and each added line corresponds to a specific type of anomaly in a targeted location on a Cargo Unit. If you detect multiple anomalies on a Cargo Unit, you should add a line for each type. If you detect the same anomaly but at different locations on a Cargo Unit, you should add a line for each position.
-
To save an anomaly report, it is mandatory to select a Cargo Unit (Cargo Unit column), the position of the anomaly, and the type of anomaly.
-
You can also optionally add additional information in the "Details" column.
-
To delete an anomaly report, click on the trash bin icon.
After indicating the quantity to be released from the terminal and completing the mandatory information to save your damage reports, click on the Accept button:
After validating the departure form, you can find all your damage reports in the "Damage Report" menu under the "Terminal Park" section.

In this list, click on the link of a damage report in the "Code" column to access on the detail.
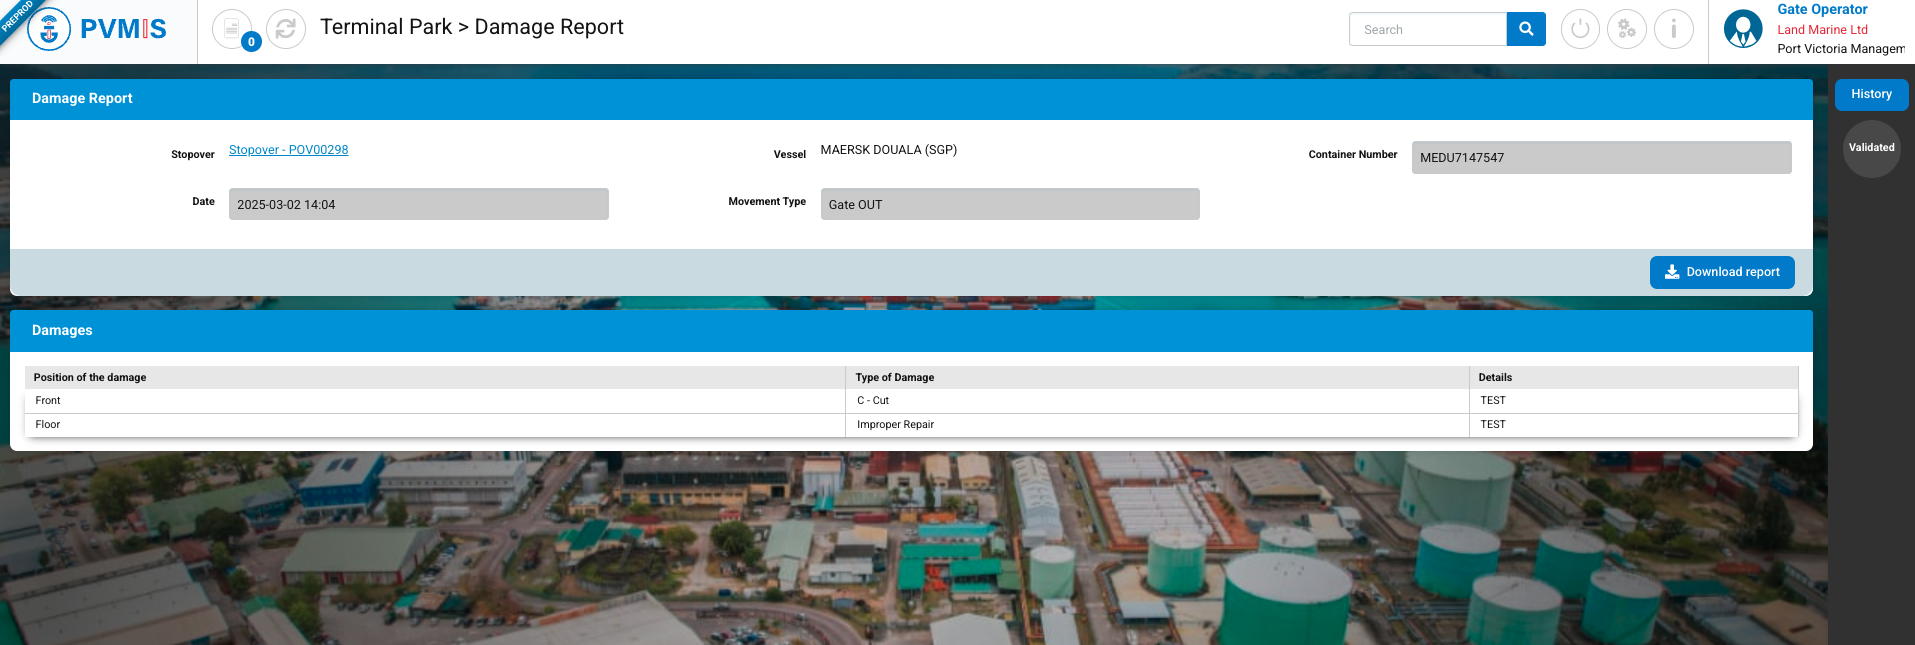
On the damage report detail screen, you will find all the entered information.